Tag: healthy recipes

  • A New View of Healthy Eating: Daily Healthy Recipes by Melanie Albert: Quick Farm-to-Table Veggie Saute

    A New View of Healthy Eating: Daily Healthy Recipes by Melanie Albert: Quick Farm-to-Table Veggie Saute

    by Melanie A. Albert, intuitive cooking expert, author, speaker, Founder & CEO Experience Nutrition Group, LLC

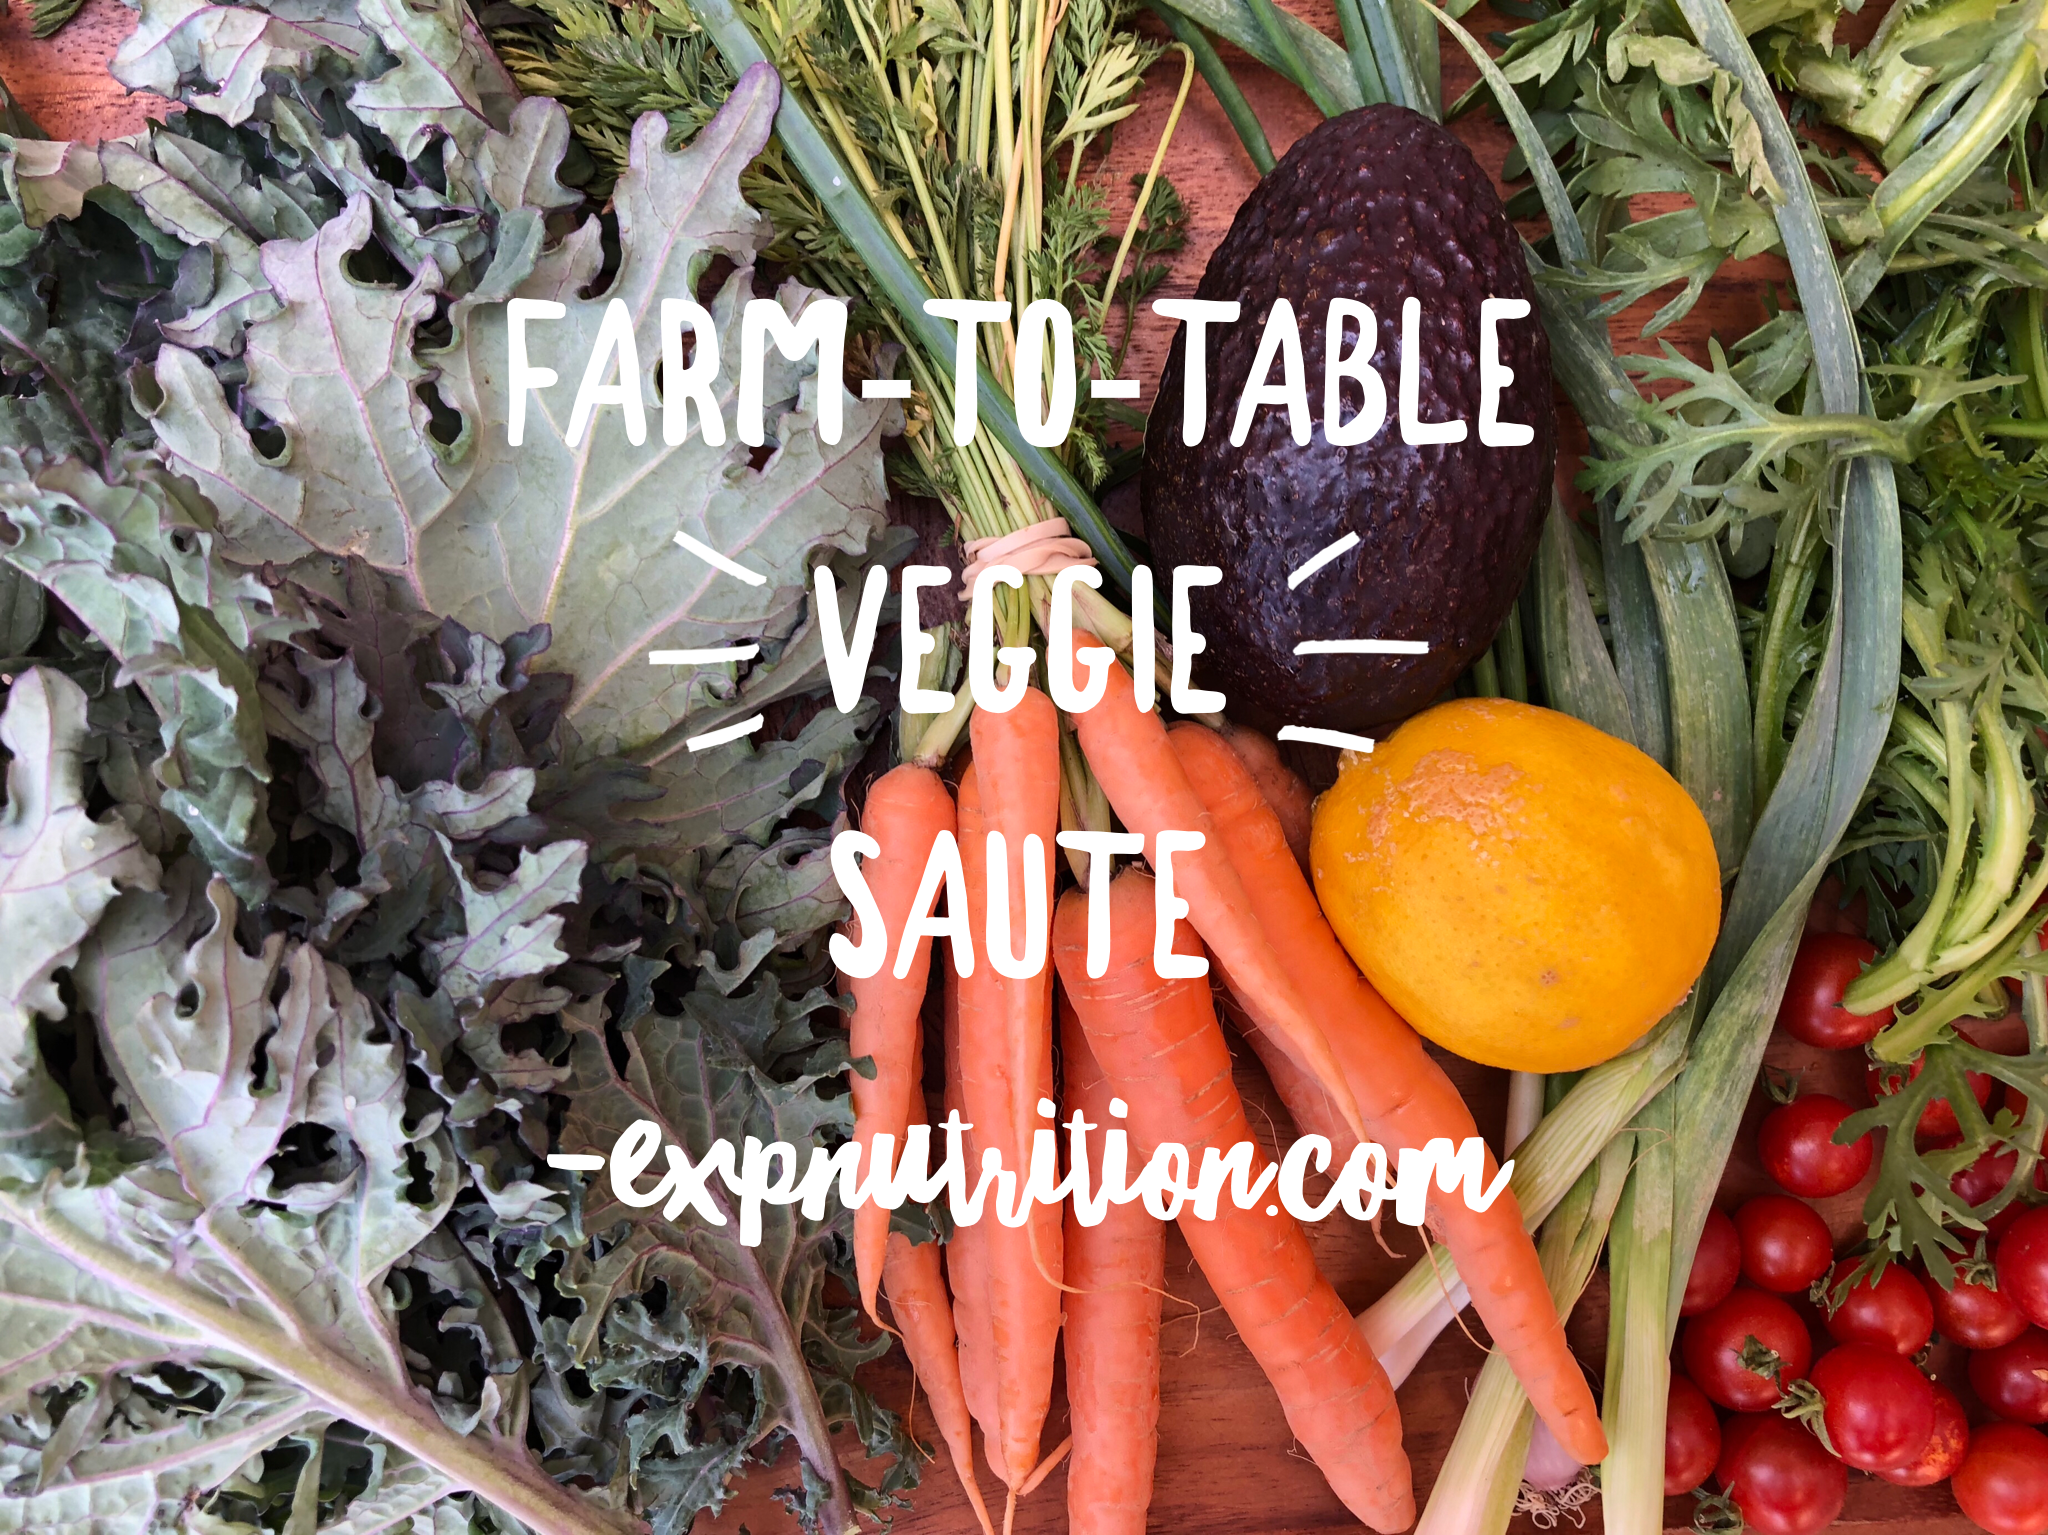
    Today I very intuitively created a very simple farm-to-table veggie saute with beautiful veggies in my refrigerator from local Phoenix farmers and gardeners. When I first pulled out the veggies from my refrigerator my intention was to create a cold avocado tartar with the tomatoes and carrots.  While chopping the veggies I was imagining the beautiful aromatic veggie saute from last night’s  “Living an Edible Landscape Life” and decided to prepare a saute.

    D-03-vegsaute-plate-IMG_3705

    When cooking a quick stove-top saute, first gather your veggies. Today’s veggies are from many of our local Arizona farmers.

    • Green onions
    • Green Spring garlic, McClendon Select
    • Mini red tomatoes, Phoenix Community Exchange
    • Orange carrots, Steadfast Farms
    • Arizona lemon, Phoenix Community Exchange
    • Kale, The Farm at South Mountain, Seed & Soil Garden
    • Chrysanthemum greens, The Farm at South Mountain, Soil & Seed Garden
    • Fresh dill, Joan Baron Food in the Alley, Scottsdale
    • Avocado
    • Sea salt
    • Extra virgin olive oil

    A-01-VegSaute-IMG_3620

    As always, mindfully pre-chop your veggies and get your mise en place set for cooking.

    A-02-VegSaute-IMG_3629

    Once our mise en place is set, we mindfully cook the veggies, one-by-one. With this process, we can really taste the flavor layers. Start with a little olive oil, sweat the onions, add the garlic. Then add the veggies one-by-one. Intuitively, I usually add a little sea salt right after the tomatoes go into the pan, to bring out their sweetness. And, this time of year in Arizona, I love to squeeze in a little citrus to add a bright taste to the saute.


    This slideshow requires JavaScript.

    While this dish was cooking, the natural aromatherapy of the lemons and fresh dill really made the dish a more beautiful mindful experience.

    c-01-vegsaute-img_3657-e1517607613329.jpg

    Once you’ve sauteed the veggies, mindfully plate and enjoy your farm-to-table veggies. You’ll see that I added a few dehydrated tomatoes for extra beauty and flavor.

    D-01-vegsaute-IMG_3715

    ACTION: Have fun shopping at your local farmers’ market this weekend, and please share your veggie sautes with us on Facebook: www.facebook.com/NewViewHealthyEating

    For some additional veggie saute ideas, a spread from Melanie’s book, “A New View of Healthy Eating.”

    80-81_sir-fry-photos

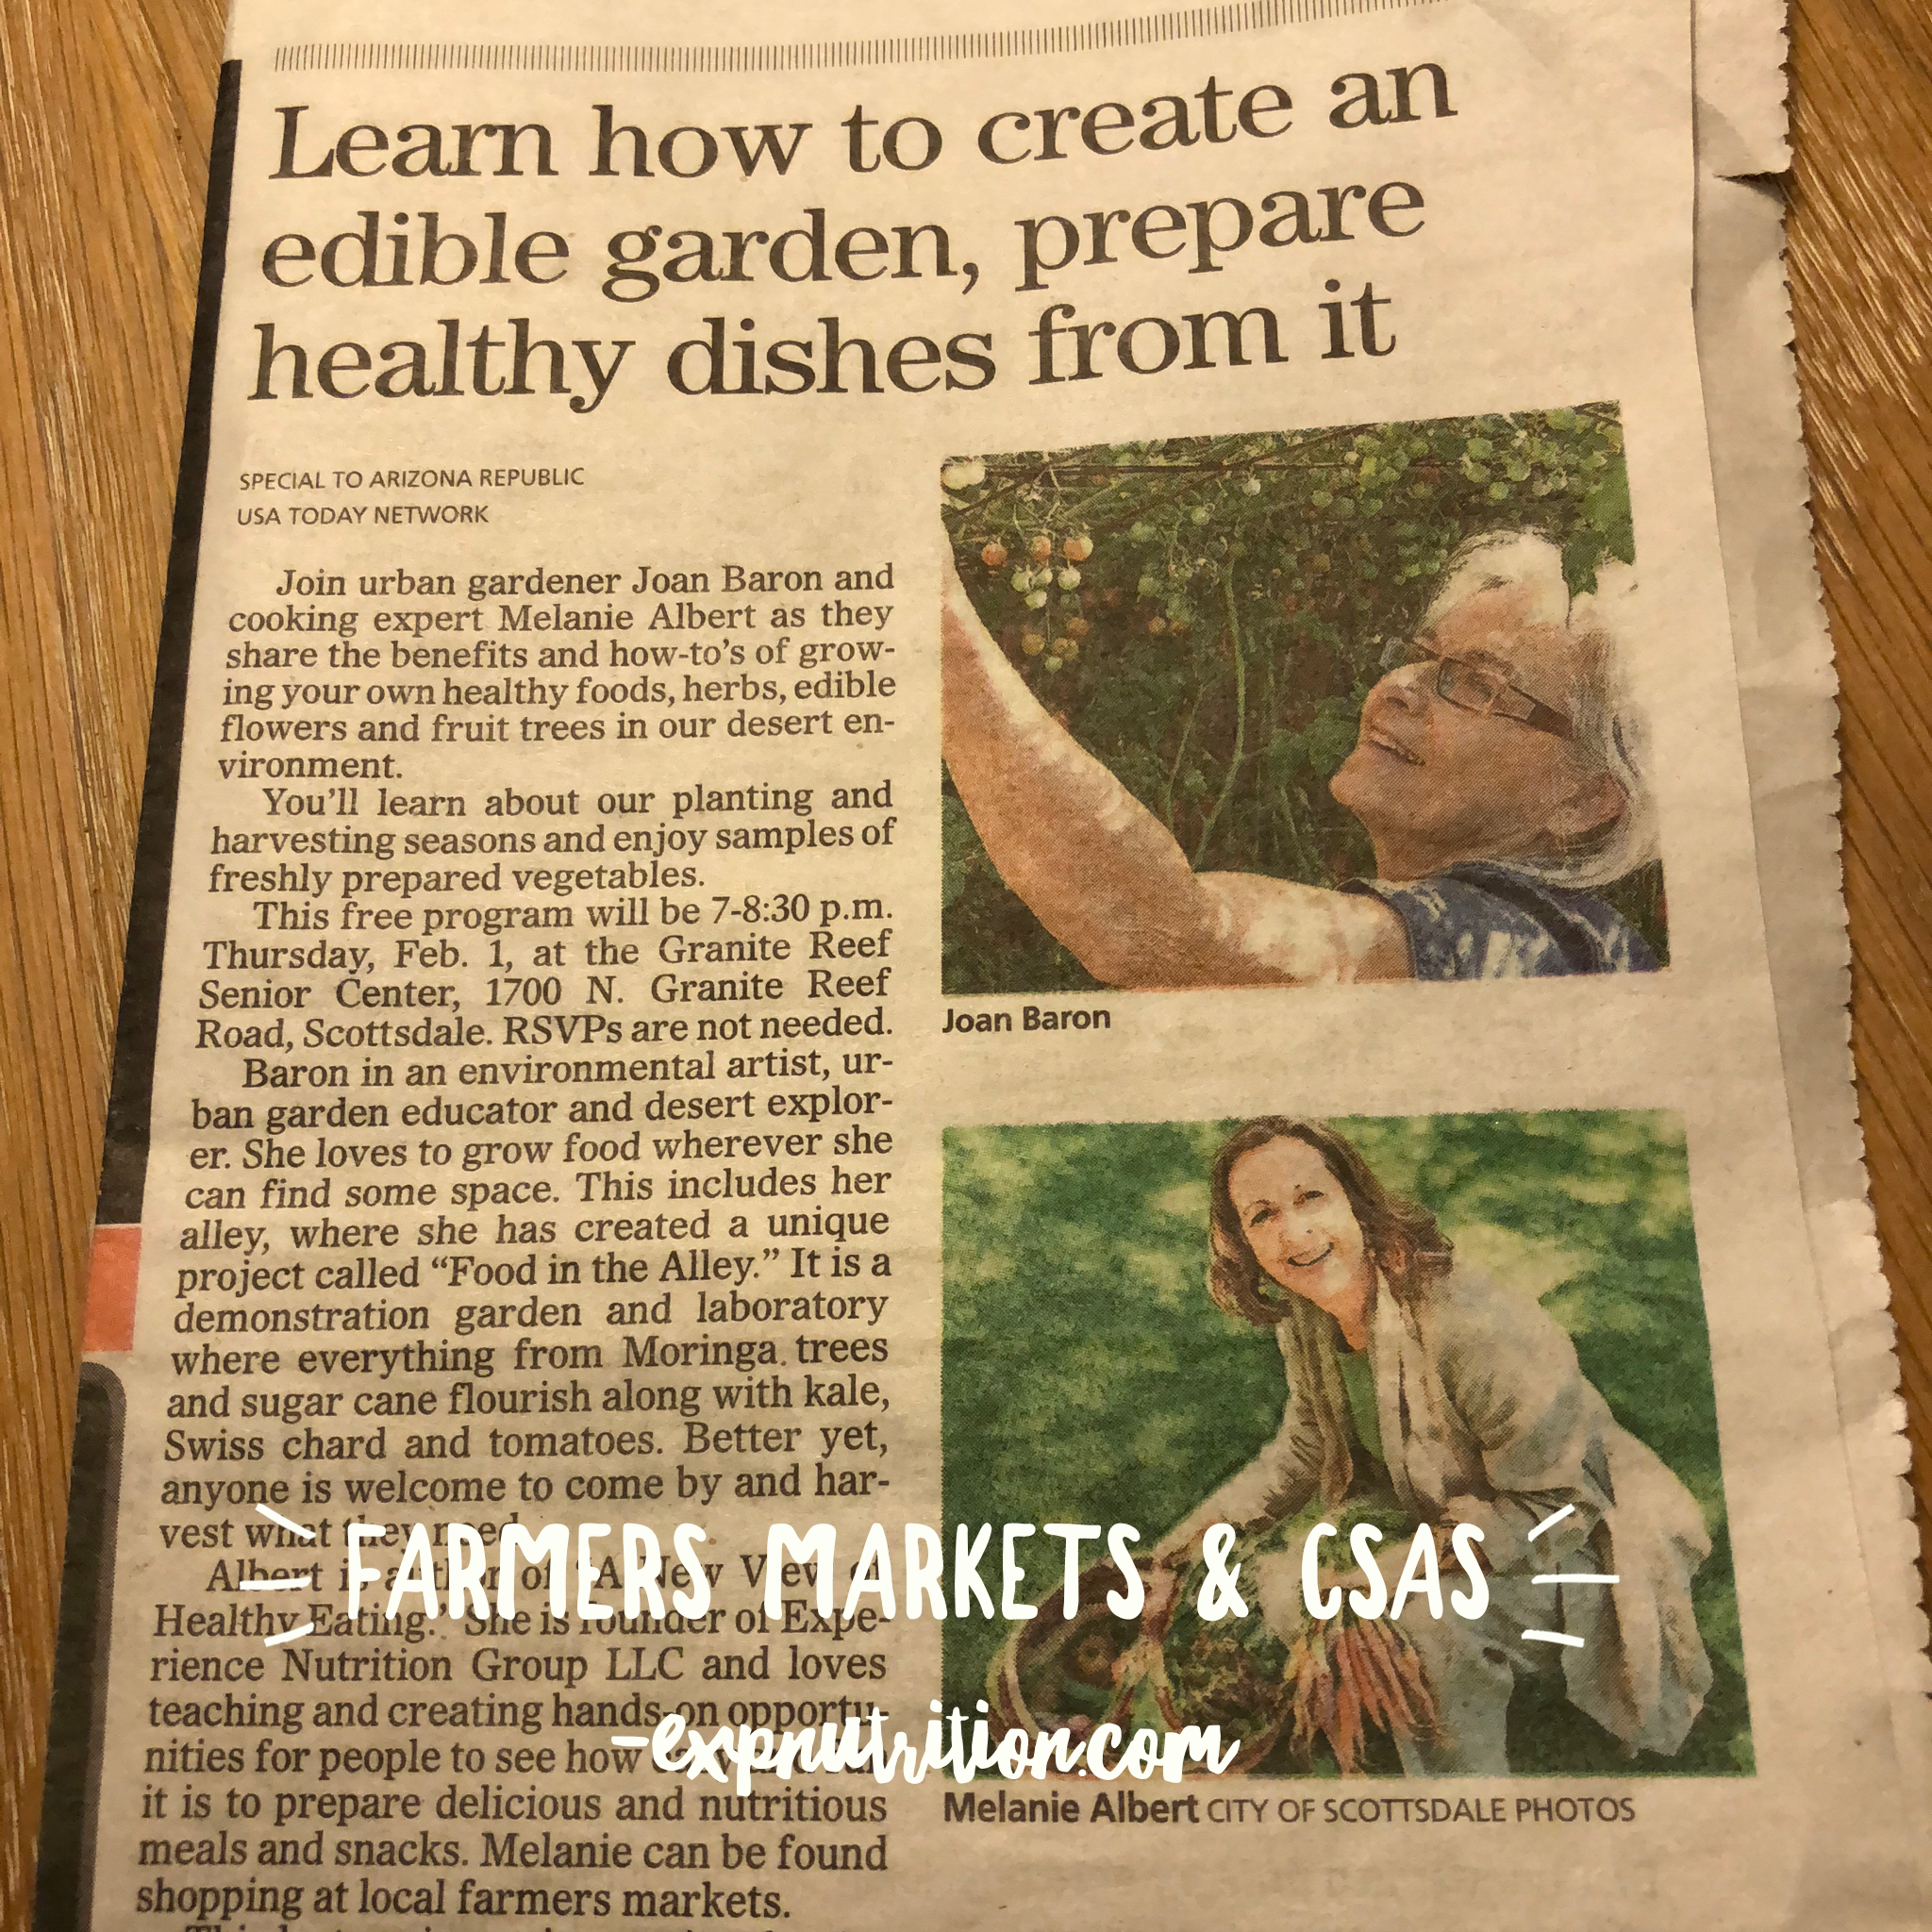
    If you’re in the Phoenix area, my next hands-on intuitive cooking class, Winter Farm-to-Table Harvest is at The Farm at South Mountain, Sunday, February 18, 2018, 11am-1pm.  Learn more and register here.

    You can order “A New View of Healthy Eating” book and I’m happy to gift wrap for you.


  • A New View of Healthy Eating: Daily Healthy Recipes by Melanie Albert: Get to Know Farmers’ Markets and CSAs (Community Supported Agriculture)

    A New View of Healthy Eating: Daily Healthy Recipes by Melanie Albert: Get to Know Farmers’ Markets and CSAs (Community Supported Agriculture)

    by Melanie A. Albert, intuitive cooking expert, author, speaker, Founder & CEO Experience Nutrition Group, LLC

    This evening I had the wonderful opportunity to participate in the Living an Edible Landscape Life with urban gardener Joan Baron, sponsored by the Scottsdale Green Building Program.

    aa-Edible-paper-IMG_3616

    Today, Joan Baron shared key tips to start a home garden in Arizona (which I’ll share in another blog). We also cooked a simple salad with Joan’s just-harvested greens, 3-ingredient salad dressing (Meyer lemon, extra virgin olive oil, sea salt, plus fresh mint), and a beautiful veggie saute with green onions, spring garlic, tomatoes, golden and striped beets, carrots, and watermelon radish.


    During the evening we discussed the value of shopping for local, in-season food at farmers’ markets and CSA’s (Community Supported Agriculture). I promised a few of the attendees at the workshop that I’d blog about farmers’ markets and CSA’s…

    A-edible-carrots-IMG_3586

    Excerpt from “A New View of Healthy Eating”

    Shop at Farmers’ Markets in Your Area

    As demand for locally grown fruit and vegetables has increased, farmers’ markets have steadily grown in number throughout the last few decades. According to the USDA Farmers Market Directory, in June 2017 there were 8,687 registered farmers’ markets as compared to 1,744 in 1994—an increase of more than 7,000 in 23 years. In addition to the USDA Farmers Market Database, another source to find farmers’ markets in your area is www.localharvest.org.


    Favorite Phoenix Farmers’ Markets

    We are so fortunate in the Phoenix area, as we have farmers’ market across the Valley of the Sun every Saturday, and even have a few mid-week markets. I recommend shopping at a farmers’ market that’s convenient and to getting to know your local farmers.

    I live in the South Phoenix area and my favorite markets are:

    • Downtown Phoenix Openair Market, Central and McKinley, Phoenix, Saturday, 8am-1pm
    • Scottsdale Old Town Farmers’ Market, 1st Street and N. Brown, Saturday, 8am-1pm
    • Uptown Farmers’ Market, Central and Bethany Home, Phoenix, Saturday and Wednesday 9am-1pm, Wednesday, 9am-1pm
    • Ahwatukee Market, 48th Street and Warner, Tempe, Sunday, 9am-1pm

    In addition to farmers’ market it’s great to buy a CSA (Community Supported Agriculture). 

    Excerpt from “A New View of Healthy Eating

    Commit to a CSA (Community Supported Agriculture) Share

    Developed in the 1960’s in Japan, CSA programs are designed to build a relationship between the farmer and the community. At the beginning of each season, farmers sell CSA memberships to consumers. Each week, customers receive a sampling of produce that is available from one farmer or a group of local farmers. CSAs cost $25 to $35 per week for six to eight weeks and are perfect for those of us who wish to experiment with unique, interesting, locally grown food. Farmers distribute CSA’s at farms, farmers’ markets, and convenient pick-up locations, such as yoga studios. Some farms even deliver CSA’s right to your home.

    Great CSA’s in Phoenix

    Since I primarily shop with our local Phoenix farmers for both my personal cooking and cooking classes, I’m very familiar with our local organic small farmers. A few of my farmer friends offer CSA’s. If you’re in the Phoenix area, check out the CSA’s from these farmers and know that you do not need to live near their farms, as they have various pick-up locations around the Valley.

    • Maya’s Farm, South Phoenix. My favorites: Fresh herbs, flowers, edible flowers. www.mayasfarm.com
    • Steadfast Farm, Queen Creek. My favorites: Yellow and orange carrots, Romanesco. www.stead-fast-farm.com
    • Blue Sky Organic Farms, Litchfield. My favorites: Dinosaur kale, dandelion greens. blueskyorganicfarms.com

    ACTION: I invite you to shop at your local farmers’ markets and/or support your local farmers’ by participating in a CSA (Community Supported Agriculture.)

  • A New View of Healthy Eating: Daily Healthy Recipes by Melanie Albert: Chocolate Avocado Pudding. Arizona Navel Orange.

    by Melanie A. Albert, intuitive cooking expert, author, speaker, Founder & CEO Experience Nutrition Group, LLC

    I’m so honored to be presenting monthly cooking classes at the Humana Community Center in Mesa, Arizona. Today’s theme was superfoods. One of my very favorite superfoods is raw cacao, so we prepared the very simple Avocado Chocolate Pudding. We topped the pudding with hydrated goji berries, raw cacao nibs, and hemp seeds. Everyone in the class loved the simplicity of making the pudding, it’s smooth texture and how healthy it is.

    A few fun photos from today’s class:

    Today I was very fortunate to have a few left-over perfectly ripe avocados. When I returned home from the cooking class, I made a small batch of the Chocolate Avocado Pudding. I had fun mindfully plating it with some of my favorite superfoods and a sweet Arizona navel orange. After the recipe from “A New View of Healthy Eating,” scroll down for today’s dessert creation.

    Simple Recipe from “A New View of Healthy Eating”

    Chocolate Avocado Pudding

    Incredible, rich, and creamy vegan chocolate pudding will delight everyone. Make it for dessert or an after-work or after-school snack. Once you’ve made this avocado pudding, experiment by adding some extras, such as bananas, raspberries, blueberries, strawberries, homemade nut milk, and freshly ground spices, like cinnamon and nutmeg.

    SIMPLE INGREDIENTS

    • 4 ripe avocados
    • 8 Medjool dates, pitted and sliced
    • 2 tsp vanilla extract or 2 vanilla beans, scraped
    • ½ cup raw cacao powder
    • 2 cups water

    SIMPLE STEPS

    1. Place all ingredients in high-speed blender.
    2. Blend on high for about 2 minutes.
    3. Stop and scrape down sides of blender, if needed.
    4. Blend for another 2 minutes or until completely pureed and smooth.
    5. Refrigerate for 1-2 hours.
    6. Enjoy topped with fresh fruit, nuts, and seeds.

    Avocado Pudding Mise en Place

    Blend All Ingredients in Food Processor

    Prepare your Plating Mise en Place

    B-05-avocadopudding-IMG_3399

    Fun Chocolate Pudding Plating

    Another look at the final Chocolate Pudding Plate…

    D-avocadopudding-plate-IMG_E3442

    C-07-Avocadopudding-plate-IMG_3417

    Having fun with the raw cacao…maybe a little too much…but tasty!

    c-08-avocadopudding-plate-img_3443.jpg

    D-avocado-plate-cacao-IMG_E3457

    If you’re interested in learning more simple culinary skills and healthy recipes, Melanie’s book, “A New View of Healthy Eating” is available.

    If you’re interested in a Workshop, Cooking Class, Team Building Event, or Retreat, contact Melanie: Mel@MelanieAlbert.com


  • A New View of Healthy Eating: Daily Healthy Recipes by Melanie Albert: Smoothie Mise en Place

    by Melanie A. Albert, intuitive cooking expert, author, speaker, Founder & CEO Experience Nutrition Group, LLC

    As I sit here late tonight with the beautiful full moon above my home in Phoenix, with a beautiful cloud ring around it, I really want to be outside looking forward to the Super Blue Blood Moon. Thus, tonight’s blog will be very short.

    This morning while making my Superfood Smoothie, I realized that I actually almost always set up my “mise en place” when I cook, prepare, and plate food. Even with today’s smoothie, I mindfully put my ingredients into place before “plating” (if you want to call it plating) my smoothie.

    My Smoothie Mise en Place

    A-00-IMG_3282

    Today’s Superfood Smoothie

    Excerpt from “A New View of Healthy Eating”

    Mise en Place: Be Organized When You Cook

    Mise en Place (French pronunciation: [mi zɑ̃ ˈplas]) is a French phrase that means “putting in place,” as in “setting up.”

    Mise en Place is used in the kitchen to “set up” all the ingredients needed to prepare a dish before we start cooking. The purpose is to be organized when we cook, with everything ready so that it’s easier to cook. Mise en Place is a useful cooking technique to incorporate when you are cooking in your kitchen for both complex and simple recipes.

    With the Mise en Place concept, before we start cooking we get all the ingredients ready, sliced, diced, measured, and organized. To be super organized, we can even set up our ingredients in order of use in the cooking process, which is especially beneficial when cooking a fast-paced meal like a stir-fry or a recipe with a lot of ingredients.

    4 Reasons to Love Mise en Place 

    1. Be prepared and calm. You will not be scrambling around your kitchen during the middle of the cooking process, looking for that one ingredient you really need. Also, you will be so organized that you won’t need to rush out to purchase a missing ingredient.
    2. Cook when cooking. You will not need to quickly chop food you might have forgotten about right in the middle of the cooking process. You will mindfully enjoy cooking your meal.
    3. Save time. As an example, if you are mincing onions or garlic for several dishes, you can mince them at the same time while setting up your Mise en Place.
    4. Cook mindfully and clutter-free. Cooking is much more enjoyable in a neat, clutter-free environment. Your cooking process will be mindful and beautiful when you cook in an organized fashion.

    ACTION: I invite you to use the Mise en Place process when you cook to bring more mindfulness, organization, and calm to your cooking. Would love to see your Mise en Place photos on our Facebook page: www.facebook.com/NewViewHealthyEating

    A-06-IMG_3290

    A-07-IMG_3294

  • A New View of Healthy Eating: Daily Healthy Recipes by Melanie Albert: 4 Great Ways to Cook 20 Pounds of Organic Tomatoes: Part 2: Slow Roast Tomatoes

    by Melanie A. Albert, intuitive cooking expert, author, speaker, Founder & CEO Experience Nutrition Group, LLC

    Continuing the recipe blog with this week’s 20 pounds of organic tomatoes, today’s recipe guide to roast tomatoes is a simple way to very easily cook tomatoes. Chop a few veggies and roast for in the oven with tomatoes for about 1 ½ -2 hours.

    This batch of tomatoes was cooked intuitively with a few ingredients from this week’s farmers’ market. And, while the tomatoes were cooking, I really enjoyed the natural sweet aromatherapy of the sauce that reminded me of an authentic Italian restaurant.

    Simple Ingredients

    • Tomatoes
    • Red peppers
    • Orange carrots
    • Green onions
    • Parsley
    • Extra virgin olive oil
    • Sea salt

    a-01-tomatoes-roast-img_2894.jpg

    Simple Steps

    • Pre-heat oven to 350 degrees Fahrenheit.
    • Slice peppers, carrots, and green onions.

    a-04-tomatoes-roast-img_2905.jpg

    • Place all veggies in a large baking pan.
    • Drizzle with olive oil.
    • Add a few pinches of sea salt.
    • Lightly toss the veggies.

    A-05-tomatoes-roast-IMG_2912

    • Roast for about 1 ½ – 2 hours, stirring and breaking down tomatoes occasionally.

    A-07-tomatoes-roast-IMG_3002

    This tomato sauce was so rich I enjoyed it on flatbread, and topped it with arugula, dehydrated tomatoes, and goat cheese. Enjoy your tomato sauce with flatbread, quinoa, or spiralized veggies.

    A-flatbread-tomato-sauce-IMG_3188

    The next time you roast tomatoes, please share your creations with us on Facebook: www.facebook.com/NewViewHealthyEating

  • A New View of Healthy Eating: Daily Healthy Recipes by Melanie Albert: 4 Great Ways to Cook 20 Pounds of Organic Tomatoes: Part 1: Dehydrate Tomatoes

    by Melanie A. Albert, intuitive cooking expert, author, speaker, Founder & CEO Experience Nutrition Group, LLC

    Several times a year I have the great opportunity to purchase a flat – 20 pounds – of organic Campari tomatoes from McClendon Select Farms in Phoenix. This week I shared a few pounds of the tomatoes in a Wise Choices Meet-up with the Valley of the Sun United Way. After that I started creating a few different batches of tomatoes with the other beautiful produce from this week’s Uptown Farmers Market.

    A-tomatoes-box-IMG_2786

    4 Different Ways to Cook Tomatoes

    I invite you to use these 4 ways to cook the tomatoes as a guide to cook tomatoes from your local farmers’ markets. During the next few days I’ll be blogging the cooking process with photos and videos for all of these ways to cook tomatoes.

    • Roasted Tomatoes. Orange Carrots. Red Peppers. Green Onions.
    • Stove Top Tomato Sauté. Arizona Lemons.
    • Dehydrated Tomatoes.
    • Roasted Tomatoes. Leeks. Green Garlic.

    AA-tomates-4ways-JVRJ3960

    Dehydrated Tomatoes

    Dehydrating tomatoes is a really simple way to prepare tomatoes. When we dehydrate, the flavor of the tomatoes becomes very concentrated and sweet.

    Simple Steps

    • Slice tomatoes in rounds: half or in thirds.
    • Place on dehydrator screens, with skin side down.

    A-02-DehydrateTomatoe-IMG_2968

    • Dehydrate at 115 degrees for about 10-12 hours. Enjoy the tomato aromatherapy while dehydrating.

    A-04-TomatoesDehydrate-Ready-screen-IMG_3021

    • Store in air-tight glass jars.

    A-07-DehydratedTomatoes-jars-IMG_3133

    The dehydrated tomatoes were so delicious,  I  sliced a few more pounds, which are in the dehydrator right now.

    5 Great Ways to Enjoy Dehydrated Tomatoes

    1. Enjoy as a snack.
    2. Add to a veggie sauté.
    3. Use as a pizza or flatbread topping.
    4. Process in a raw marinara sauce for a deep flavor.
    5. Add to a nut pate for a fresh taste.

    Stay in touch, as I’ll be sharing the other four ways to cook 20 pound of tomatoes. If you dehydrate tomatoes, please share your experience with us on Facebook: www.facebook.com/NewViewHealthyEating

    For some additional ideas to cook tomatoes, Melanie’s book, “A New View of Healthy Eating” is available.

    56-57_Tomato-sauce-1

    A-IMG_5209


  • A New View of Healthy Eating: Daily Healthy Recipes by Melanie Albert: Superfood Sweet Potato Brownie

    by Melanie A. Albert, intuitive cooking expert, author, speaker, Founder & CEO Experience Nutrition Group, LLC

    This week I had the wonderful opportunity to lead an amazing Cooking Challenge Team Building with Visit Phoenix. For dessert, I decided to prepare the Sweet Potato Brownie and jazz it up with a raw cacao sauce and goji berries. This dessert is full of so many healthy ingredients, the sweet potatoes, raw cacao, and Arizona Medjool dates. It’s plant-based, gluten-free, and dairy-free. And, it tastes great. Not too sweet. Chocolatey. Just right.

    A-13-VisitPhoenix-ExperienceNutrition-TeamBuliding-MelanieDessert-IMG_2119
    PHOTO CREDIT: www.facebook.com/cassiescouture

    Excerpt from my book, “A New View of Healthy Eating”

    Chocolate Sweet Potato Brownie

    Delicious vegan, gluten-free chocolate dessert made with a sweet root veggie, the sweet potato. This brownie is always a favorite at kids’ and adults’ cooking classes. It’s one of those desserts we can even eat for breakfast!

    SIMPLE INGREDIENTS

    • 2 medium to large sweet potatoes
    • 12 Medjool dates, pitted
    • ⅔ cup raw almonds, ground
    • ½ cup brown rice flour
    • 4 tbsp raw cacao
    • 3 tbsp maple sugar
    • Pinch sea salt

    a-sweetpotatobrownie-img_2018.jpg

    SIMPLE STEPS   

    • Pre-heat oven to 350 F.
    • Peel sweet potatoes, cut into chunks, and steam in a bamboo steamer for about 20 minutes until they become really soft.


    • Once sweet potatoes are soft and beginning to fall apart, remove from steamer.

    A-SweetPotatoBrownie-IMG_2035

    • Mix sweet potatoes and pitted dates into food processor and blend.

    A-SweetPotatoBrownie-IMG_2044

    Put remaining ingredients into a large bowl and stir to combine.

    a-sweetpotatobrownie-img_2025.jpg

    • Add sweet potato/date mixture to other ingredients and stir well.

    A-SweetPotatoBrownie-IMG_2059

    • Place mixture into 8-inch by 8-inch parchment-paper-lined baking dish.

    A-SweetPotatoBrownie-IMG_2062

    • Cook for about 20 minutes.
    • Test doneness by pushing a toothpick into the brownie. The brownie is ready when a toothpick comes out dry.
    • Allow baking dish to cool for about 10 minutes.

    A-SweetPotatoBrownie-IMG_2066

    • Remove the brownies from baking dish.
    • Cool for a few minutes and cut into squares.
    • Enjoy!

    I had so much fun plating this Sweet Potato Brownie for our guests at the Visit Phoenix Team Building Cooking Challenge. Add a swipe of raw cacao agave sauce, goji berries, and a few walnuts.


    A-14-VisitPhoenix-ExperienceNutrition-TeamBuilding-Dessert-close-IMG_2121
    PHOTO CREDIT: www.facebook.com/cassiescouture

    ACTION: Make a healthy chocolate dessert and share your creation with us on Facebook, www.facebook.com/NewViewHealthyEating

    For more amazing simple healthy recipes, you can buy Melanie’s Book, “A New View of Healthy Eating: Simple Intuitive Cooking with Real Whole Foods”


    A-15-VisitPhoenix-ExperienceNutrition-TeamBuilding-Dessert-many-MG_2122

    PHOTO CREDIT: www.facebook.com/cassiescouture


  • A New View of Healthy Eating: Daily Healthy Recipes by Melanie Albert: Quick and Easy Tomato Gazpacho

    by Melanie A. Albert, intuitive cooking expert, author, speaker, Founder & CEO Experience Nutrition Group, LLC

    Today I had the opportunity to share how to make a really simple tomato gazpacho to a group with Gregory’s Fresh Market. Tomato gazpacho is one of the simple staples in my cooking classes, as it is so simple for everyone to make – from kids, to adults, to former NFL players and their families, to seniors.  This cold soup is also so refreshing and very versatile. Plus, it’s great for hydration.


    This soup is so quick to prepare. In fact, today, I chopped for 30 minutes and then prepared two big batches in 30 minutes for the 56 people attending the cooking class. During the classes, rather than blending the veggies, I actually massage the tomatoes to bring out the tomato juice and flavor. Today, we intuitively made one batch with lots of garlic and cilantro, and the other with a little more lemon and green onions.

    The recipe in my book, “A New View of Healthy Eating” can be used as a basic guide to prepare the soup, then you can experiment with different flavors. Such as lime, dill, lots of colorful heirloom tomatoes, various peppers.

    Excerpt from “A New View of Healthy Eating

    Summertime Tomato Gazpacho Cold Soup

    A fresh, cold tomato gazpacho is refreshing, especially on warm days. Make this quick cold tomato soup with red, orange, and yellow tomatoes and red, orange, yellow, and green bell peppers for a bright summer side dish. Be sure to try the beautiful (some may think ugly) heirloom tomatoes. If you are fortunate enough to purchase a whole flat of really ripe organic tomatoes, make a big batch of tomato gazpacho for a summertime picnic.

    P-078-Option-Content-02-T-TomatoesSoup-hand-DSCF9538

    Simple Ingredients: Soup

    • 10 medium tomatoes, cut into eighths
    • 4 red, orange, yellow, and/or green bell peppers, seeded and rough chopped
    • 3 cucumbers, rough chopped
    • 2 jalapeno or Anaheim peppers, seeded and rough chopped
    • ½ cup fresh cilantro, chopped
    • ½ cup fresh lime juice
    • 6-8 garlic cloves, minced
    • Up to 2 cups water, if needed
    • Sea salt and pepper, to taste

    Simple Ingredients: Topping

    • 4 tbsp cucumber, small diced
    • 4 tbsp tomato, small diced
    • 4 tsp cilantro leaves

    Simple Steps

    • Place all soup ingredients in a large bowl.
    • Mix well.
    • Puree half of the ingredients in a high-speed blender until smooth.
    • Combine pureed soup with chopped veggies.
    • Taste and season with sea salt and/or pepper.
    • Top with diced cucumbers, tomatoes, and cilantro.
    • Enjoy!
    • Refrigerate leftover gazpacho soup and enjoy the next day for an even more flavorful soup.

    P-080-tomatogazpacho-mandkind-B-IMG_4946

    P-081-A-gazpacho-IMG_0810

    ACTION: Make your own tomato gazpacho, experimenting with fresh herbs, peppers, and colorful tomatoes. Share your cold soup with us on Facebook.com/NewViewHealthyEating

    42-43_tomato-gazpacho_28June


  • A New View of Healthy Eating: Daily Healthy Recipes by Melanie Albert: Arizona Winter Harvest Flatbread

    by Melanie A. Albert, intuitive cooking expert, author, speaker, Founder & CEO Experience Nutrition Group, LLC

    It’s been a full few days, having fun preparing my Final Project – Arizona Winter Harvest Menu  –  the Plantlab Culinary Cooking Course.  Today I’ll share step-by-step photos of layering ingredients onto the final flatbread and some plating options. One plating presentation features many edible flowers from a local Arizona farm about half mile from my home. Hope this flatbread inspires you to make your own beautiful flatbread with your local farmers beautiful veggies.

    Prep the Pizza Stone

    Once the dough is prepared and rolled out for the flatbread, it’s time to put it into the oven. Click here for the Blog to prepare the Sprouted Spelt Flatbread Dough.

    • Place pizza stone in oven.
    • Pre-head oven to 375 degrees Fahrenheit.
    • Warm pizza brick in the oven for about 15 minutes.
    • Carefully remove pizza stone from the oven.
    • After 15 minutes remove the pizza stone from the oven and increase temperature to 400 degrees.

    Cook the Flatbread and Add ingredients

    • Move the flatbread to the pre-heated pizza stone.
    • Lightly top the flatbread with organic extra virgin olive. The oil will make the bread a little crisp and the topping ingredients will not soak into the bread.

    B-Flatbread-IMG_0530

    • Bake the flatbread for about 5 to 7 minutes.
    • Remove from oven.

    B-flatbread-IMG_0532

    • Add your sauce to the flatbread. For this flatbread, I made a beautiful white almond bechamel sauce.

    B-flatbread-IMG_0534

    • Mindfully, add your favorite toppings. Today, I added roasted veggies: tomatoes, then red peppers, then Brussels sprouts, and finally golden beets and watermelon radishes.


    • Cook flatbread for another 5 minutes.
    • Remove from oven.
    • Add any extras. For this flatbread I topped with Pistachio Pesto.

    A-flatbread-wood-IMG_0643

    • Enjoy!

    a-flatbread-plate-top-img_0711.jpg

    In a future blog, I’ll share how I prepped the root veggies (beets, watermelon radishes) Brussels sprouts, and tomatoes.

    Another plating option with lots of editable flowers.

    A-flatbread-plate-triangle-top-IMG_0762

    ACTION: Have fun making your own flatbread, with local farmers veggies, and share your creations with us on Facebook: www.facebook.com/NewViewHealthyEating

    A New View of Healthy Eating” book is available. Melanie is happy to gift-wrap for you and your friends.

    IMG_6585

  • A New View of Healthy Eating: Daily Healthy Recipes by Melanie Albert: How to Make the Perfect Flatbread Everytime. Really!

    by Melanie A. Albert, intuitive cooking expert, author, speaker, Founder & CEO Experience Nutrition Group, LLC

    This weekend I’m cooking the Final Project for the Plantlab Culinary Cooking Course and will be sharing recipes and culinary techniques with you in my blog.  The menu for my project is inspired by our local Arizona farmers produce and our winter citrus season. The menu:

    Arizona Winter Harvest Menu

    • Roasted Carrot Soup. Orange Braised Leeks.
    • Sprouted Spelt Flatbread. Arizona Winter Roasted Veggies. Pistachio Pesto. Almond Bechamel Sauce
    • Sweet Chocolate Chickpea Crepe. Seared apples and pears. Arizona Citrus Marmalade.
    • Root Matcha Latte. Chicory and Dandelion Root Matcha Latte.Cashew Milk. Cinnamon. Cardamom. Nutmeg. Cloves.

    Sprouted Spelt Flatbread

    Today, I prepared the second course, the flatbread. It starts with a sprouted spelt flatbread. Over the last few years of culinary, I’ve learned some simple, important tips that I’ll share with you in the blog today.

    A-flatbread-plate-portrait-IMG_E0720


    FLATBREAD DOUGH

    INGREDIENTS

    B-flatbread-dough-IMG_0205

    • 4 cups sprouted spelt flour
    • 1.5 cups lukewarm water
    • 1 tbsp active dry yeast
    • 1 tsp sea salt
    • ½ tbsp honey
    • 1 tsp organic extra virgin olive oil

    SIMPLE STEPS

    Activate the Yeast

    • Pour warm water in a bowl. Check to be sure the temperature is 110-115 degrees Fahrenheit. The correct temperature is key to activating the yeast.

    B-flatbread-dough-IMG_0206

    • Add the yeast, honey, and olive to the water.
    • Mix with a wooden spoon to dissolve all ingredients. Do not use a stainless steel spoon or fork, which may negatively interact with the activation of the yeast.
    • Set aside to activate for about 20 minutes. The liquid will foam when activated.

    B-flatbread-dough-_0218


    Make the Dough

    • Place spelt flour in a large bowl.
    • Make a well with your hand in the flour and add the water with yeast.
    • Mix to combine ingredients with wooden spoon.
    • Gently knead for about 2 minutes.
    • Form dough into a ball.
    • Grease a bowl with olive oil and put the ball of dough into the bowl to rise in a warm place, covered with a towel, for about 2 hours.
    • Once the dough has risen, split into 2 balls, place back into the bowl and rise for another 2 hours.


    • Once the dough has risen this second time, place half of the dough onto a floured surface (I use parchment paper).
    • With your hands, form dough into desired size and shape.
    • Cover dough with another layer of parchment paper.
    • With a rolling pin, roll dough about ¼ inch thick, then make a small ridge around the edges to hold in sauce and ingredients.


    • Move flatbread to pre-heated pizza stone.

    B-flatbread-dough-IMG_0526

    I look forward to sharing the next steps with creating my beautiful and tasty Arizona Winter Veggie Flatbread.

    If you’re interested in additional recipes and culinary techniques and tips, my book, “A New View of Healthy Eating” is available!

    A-IMG_5209


  • A New View of Healthy Eating: Daily Healthy Recipes by Melanie Albert: Fresh Green Pistachio Pesto

    by Melanie A. Albert, intuitive cooking expert, author, speaker, Founder & CEO Experience Nutrition Group, LLC

    As some of you are aware I’ve been studying in a Cooking Course with Plantlab Culinary and am currently recipe testing for the Final Project. The Second Course for my Project is Sprouted Spelt Flatbread. One of the components of the flatbread is a fresh green pesto to add color, texture, and a sharp flavor to the flatbread.

    I invite you to use the Pistachio Pesto recipe as guide to intutively create your own pesto, with different nuts, such as walnuts or pecans, and different fresh herbs. Enjoy the pesto with flatbread, on a sweet potato, or even with a salad.

    Green Pistachio Pesto

    Ingredients

    • 2/3 cup pistachios, rough chopped
    • 1/2 cup fresh parsley, rough chopped
    • 1/2 cup spinach, roughly chopped
    • 1/3 cup extra virgin olive oil
    • 1/6 cup lemon juice
    • 1 garlic clove, minced
    • 1 tsp lemon zest

    Pistachio-Pesto-ExperienceNutrition

    Simple Steps

    Step 1: Gather your mise en place.

    a-pistachio-pesto-mise-en-place-img_0102.jpg

    Step 2: Spin parsley and spinach in salad spinner to dry the leaves.

    Step 3: Make your dressing with the olive oil, lemon, sea salt, and garlic. Start with 1 part acid (lemon), with 2 parts (olive oil), taste and balance with more oil or lemon. Add sea salt and minced garlic.

    A-pistachio-pesto-dressing-IMG_0112

    Step 4: Add the pistachios, parsley, spinach, and lemon zest to the dressing and toss.

    a-pistacho-pesto-img_0115.jpg

    Step 5: If you’d like the pesto more fine, pulse in a food processor for a minute or two.

    Tonight I enjoyed the pesto with an Arugula Tomato Avocado Salad, with local Arizona farmer’s organic arugula, pea shoots, and mini-tomatoes. Added a few of my favorites olives, capers, and goat cheese.

    A-pistachio-pesto-salad-IMG_0165

    Would love to see your pesto creations on our Facebook page: www.facebook.com/NewViewHealthyEating

    A-pesto-salad-IMG_0179

  • A New View of Healthy Eating: Daily Healthy Recipes by Melanie Albert: Drink Matcha Tea Today!

    by Melanie A. Albert, intuitive cooking expert, author, speaker, Founder & CEO Experience Nutrition Group, LLC

    This morning a friend of mine was asking about my motivational New View of Healthy Eating Card Deck. I let her know that the intention of the deck is to motivate us to take action on our eating, cooking, and self-care. It’s been awhile since I personally used my deck, so I intuitively choose a card for today. This “Drink Matcha Green Tea Today” is the inspiration for today’s blog.

    MatchaTea

    I’ve been drinking matcha tea since 2004. I was just beginning to work in marketing and branding with Dr. Andrew Weil’s organization and learned about matcha and starting drinking it. Honestly, at first matcha was a little bitter for me and it took some time to become accustomed to drinking it. Now, I love matcha and drink it almost every day and enjoy the mindful process of preparing and drinking the tea.

    M-matcha-mel-DSCF9591


    Excerpt from “A New View of Healthy Eating”

    Matcha: Tea of the Japanese tea ceremony

    • High quality Japanese green tea is covered before picking to accentuate its vibrant green color and to increase amino acids, as well as vitamins A and C.
    • The tea leaves are stone-ground, so we actually eat tea leaves when we drink matcha tea and receive the full benefits of green tea.
    • Intense grassy, green taste.

    P-435-M-matcha-DSCF9545-copy

    4 Simple Steps to Prepare Matcha Tea

    Step 1: Place ¼ tsp matcha in matcha bowl.

    Step 2: Add nearly boiled water.

    Step 3: Whisk with a bamboo whisk.

    P-438-M-matcha-DSCF9582-copy

    Step 4: Enjoy the ritual and ceremony.

    M-matcha-DSCF9588

    As a side note, my company created a beautiful matcha tea kit for the 2008 Super Bowl XLII in Phoenix. I have to say, I think we were a little ahead of the trends…

    P-439-M-matcha-DSCF9583-copy

    Action: Try some match tea today! Really!

    Hope you enjoy drinking matcha tea. Please share your experience with us on Facebook: www.facebook.com/NewViewHealthyEating

    186-187_experience-green-tea

  • A New View of Healthy Eating: Daily Healthy Recipes by Melanie Albert: Quick Lentil Quinoa Sweet Potato Soup

    by Melanie A. Albert, intuitive cooking expert, author, speaker, Founder & CEO Experience Nutrition Group, LLC

    A few days ago a friend asked me for some ideas to create plant-based protein meals. Interestingly, when I was teaching former NFL players how to cook, one of the first questions they asked me was: “Mel, will I have to stop eating meat?”. Well, I let them know that if they ate meat, they should eat clean meat. I also let the NFL guys know that there are some great sources of plant protein, including legumes (beans, lentils) and some whole grains, such as quinoa, which is a complete protein. Lentil quinoa soup is quick and easy, as both ingredients do not need to be pre-soaked.

    Today’s soup is one that I taught former Arizona Cardinal, John Bronson how to cook. Take a look at the photos in my book, “A New View of Healthy Eating,” of John enjoying learning how to make Lentil Quinoa Soup with lots of anti-inflammatory turmeric.


    94-95_lentil-soup_July

     LENTIL QUINOA SWEET POTATO SOUP RECIPE

    SIMPLE INGREDIENTS

    • 1 cup lentils
    • 3-4 carrots and/or sweet potatoes, chopped
    • 2-3 cloves garlic, minced
    • 1 onion or 5-6 green onions, minced
    • 3-4 celery stalks, chopped
    • 2 tbsp organic extra virgin olive oil
    • 5-inch strip of kombu seaweed, if desired
    • 1 cup brown rice or quinoa
    • 6-8 cups water
    • ½ tsp cumin seeds, hand-ground
    • 1 tsp black pepper
    • ½ bunch kale, torn or chopped into bite-size pieces

    Simple Steps to create your Lentil Quinoa Sweet Potato Soup

    • Step 1: Gather your mise en place.


    • Step 2: Heat large soup pot at medium-low, add onions and cumin seeds to pot, and sweat for 5 to 10 minutes.
    • Step 3: Add celery and carrots, and cook for about 5 minutes.
    • Step 4: Add garlic and cook for about 30 seconds.


    • Step 5: Add sweet potatoes to pot and cook for about 5 minutes.

    B-lentil-quinoa-soup-IMG_9767

    • Step 6: Add ground turmeric to the pot.

    B-lentil-quinoa-soup-IMG_9772

    • Step 7: Rinse lentils and quinoa and pour into pot.

    B-lentil-quinoa-soup-IMG_9775

    • Step 8: Add about 8 cups of water to the pot.
    • Step 9: Bring soup to a boil.
    • Step 10: Lower to simmer and cook covered for about 30-45 minutes.

    B-lentil-quinoa-soup-IMG_9784

    • Step 11: Enjoy. Today, I topped with fresh pea shoots for freshness.

    C-Lentil-Quinoa-soup-IMG_9799

    If you’re interested in additional simple recipes, “A New View of Healthy Eating” is available.

    C-lentil-quinoa-soup-IMG_9794

  • A New View of Healthy Eating: Daily Healthy Recipes by Melanie Albert: Get Creative with Avocado Salsa

    by Melanie A. Albert, intuitive cooking expert, author, speaker, Founder & CEO Experience Nutrition Group, LLC

    This week, I had the opportunity to lead a cooking class with Gregory’s Fresh Market in Phoenix, with the theme of good fats for heart health. One of my favorite ‘good fat’ dishes is a very simple avocado salsa. It’s so versatile. With a simple avocado, fresh lemon juice, and sea salt base, we can add all kinds of veggies and make a quick healthy lunch or snack.

    P-071-A-avocado-IMG_7985

    Excerpt from Melanie’s book, “A New View of Healthy Eating.”

    EXPERIENCE NUTRITION Signature Avocado Salsa

    Honestly, I had never eaten fresh avocados until a few years ago, and thought I didn’t like them. One of my brothers made a simple, fresh avocado salsa with his home-grown yellow pear tomatoes and fresh garlic. Since that day when I first experienced the deliciousness of creamy avocados, I loved them and have taught the simple avocado salsa recipe to hundreds of people, including kids, MDs, former NFL players, and holistic students at speaking engagements, workshops, and cooking classes.

    Teaching my then 6-year old niece, Meredith how to massage the avocado salsa. She’s now 12 years old and still making avocado salsa for a snack.

    P-076-AvocadoMeredithYoung

    Basic Avocado Salsa

    Have fun intuitively creating your own avocado salsa with the veggies available right in your own refrigerator.

    This simple-to-make avocado salsa (or guacamole) is the best. Make it for lunch, as a snack, or for tailgating parties. It’s so easy to prepare and it’s so delicious that you’ll want to eat it a few times a week. With good monounsaturated fats, fresh veggies, and a squeeze of lemon, enjoy your avocado salsa with your favorite crunchy fresh organic raw veggies.

    Simple Ingredients

    • 4 soft, ripe avocados
    • 2-3 heirloom tomatoes or 6-8 cherry tomatoes
    • 3-5 green onions
    • Handful fresh cilantro or basil
    • 2-3 cloves raw garlic, minced
    • Fresh squeezed lemon juice, to taste
    • Sea salt to taste

    Simple Steps

    • Chop and gently mix all ingredients.
    • Enjoy as a salad or in a wrap.

     “Keep an avocado in your kitchen all the time so you’re always ready to make a quick avocado salsa to enjoy as a salad or in a wrap.” – Melanie Albert

    Create Your Own Avocado Salsa

    Using the Basic Avocado Salsa Recipe as a guide, create your own with your favorite farmers’ market fresh vegetables. Experiment with carrots (orange, yellow, or purple), peppers (red, green, yellow, or purple), cucumbers (green, lemon cucumbers, or Armenian), olives, garbanzo beans, and dehydrated tomatoes.

    7 Simple Ways to Enjoy Avocados

    1. Homemade avocado salsa
    2. Fresh avocado wrap
    3. In sandwiches instead of butter or mayonnaise
    4. Sliced and added to salad
    5. With steamed vegetables
    6. In raw vegan desserts
    7. With fresh lemon or lime juice, a little sea salt, and minced garlic as a simple snack

    ACTION: I invite you to buy a few avocados and have fun adding different veggies to your ‘avocado salsa”.

    Amazing. Take a look a the avocado tree In Cocoa Beach that my parents grew from seed…

    P-075-06-A-avocado-close-DSCF4363

    IMG_9691

  • A New View of Healthy Eating: Daily Healthy Recipes by Melanie Albert: How to get Started with Intuitive Cooking and 2018 Week 1 Recipes

    by Melanie A. Albert, intuitive cooking expert, author, speaker, Founder & CEO Experience Nutrition Group, LLC

    Today has been a full day of fun focusing on recipe creating and testing for the Final Project of the Plantlab Culinary Cooking course I’m currently taking . While working today I was intuitively creating my recipe directions, so I decided to share with you the concept of intuitive cooking and how to easily get started to shop and cook intuitively.

    Excerpt from “A New View of Healthy Eating”:  Cook with Intuition.

    With intuitive cooking, we use recipes as guides. We first learn simple, basic culinary methods and techniques (such as raw, steaming, or roasting) to prepare real whole foods with recipes as our guide. Naturally, over time, we learn to trust our own intuition to cook foods we desire using cooking techniques we’ve learned. Over time, you will not need to rely on recipes; you’ll trust yourself and your culinary skills to create your own healthy dishes with local, seasonal food.

    For instance, we learn the culinary technique to steam carrots in a bamboo steamer and use our recipe to finish the carrots with walnut oil, toasted cumin seeds, fresh lemon juice, parsley, and a pinch of sea salt. After learning the bamboo steamer technique to quickly steam veggies, we cook other steamed vegetables (such as asparagus, broccoli, cauliflower, and peapods) and finish them with different oils, spices, and fresh herbs.

    “With intuitive cooking we also naturally cook more mindfully, meditatively enjoying the rhythm of chopping veggies or the mindfulness of massaging kale or grating fresh spices.” – Melanie Albert

    4 Steps to Get Started with Intuitive Cooking

    • Step 1: Shop at a farmers’ market without a shopping list and purchase a few different veggies and fruit the local farmers’ in your area are growing. Intuitively choose foods that are beautiful to you.
    • Step 2: When you get home intuitively reflect on how you’d like to cook the veggies. Will you prepare a simple saute, a salad, or roasted veggies? Just use your intuition. Is it is warm outside and you’d like a cooling salad? Or, is it is chilly outside and you’d like warming roasted veggies or soup?
    • Step 3: Get your mise en place set. Chop your veggies. Get all your other ingredients, such as olive oil and sea salt ready. Gather the kitchen tools your need to cook: saute pan, flat cooking sheet, parchment paper.
    • Step 4: Enjoy intuitive cooking and mindfully eating your dish.

    P-008-AA-Philosophies-spread-csa-food-table-w9IMG_7631


    2018 Week 1 Healthy Recipes

    Now, let’s take a look at the healthy recipes this first week of 2018. Hope these recipes and culinary techniques give your ideas to cook a few healthy meals with real whole foods.

    Come on over to Facebook, www.facebook.com/NewViewHealthyEating and share your intuitive culinary creations with us.

  • A New View of Healthy Eating: Daily Healthy Recipes by Melanie Albert: Really Quick Veggie Sauté

    by Melanie A. Albert, intuitive cooking expert, author, speaker, Founder & CEO Experience Nutrition Group, LLC

    When our days are full and we don’t have a lot of time to cook, a veggie sauté is a great option for a quickly prepared dinner. Today’s veggie sauté was inspired by several of my purchases from our local Arizona farmers’, including sweet potatoes, I’itoi onions, and arugula. To these veggies, I added a tomato, green pepper, and a few of my favorites, the olives, capers, and sun-dried tomatoes. The quick sauté was a beautiful combination of warming, sweet and earthy.


    Simple Steps to make a Quick Veggie Sauté

    Step 1: Choose a few veggies.  An aromatic onion. Some veggies with more moisture (like tomatoes and bell peppers) and some more dense root veggies, such as sweet potatoes, carrots, or beets. And, some light greens such as arugula or spinach.

    a-experiencenutrition_veggiesaute-img_8808.jpg

    Step 2: Chop veggies in different shapes for visual interest in your dish.

    a-experiencenutriton-veggiesaute-img_8809.jpg

    Step 3: Heat sauté pan at low heat. When the pan is warm, add a few tablespoons of organic extra virgin olive oil. Yes, when we use a high quality olive oil, with low acid level, below .7%, we can cook with it.

    Step 4: Add onions to the pan and gently sweat for about 5 minutes, until the onions are translucent.

    Step 5: Add bell pepper, increase heat to medium, and cook for a few minutes to release the flavors.

    Step 6: Add tomatoes and cook for another few minutes, to build the flavor base for the sauté. Add in a few pinches of sea salt to bring out the sweetness of the tomato.

    Step 7: Add sweet potatoes. Cook for another few minutes until the sweet potatoes are soft.


    Step 8: Add extras such as sun-dried tomatoes (re-hydrated in a simmering pot of water for a few minutes), olives, and capers.

    Step 9: Add a handful of arugula, gently toss, and cook for a minute or two.


    Step 10: Plate the veggies and enjoy.

    A-ExperienceNutrition-veggieSaute-IMG_8844


    Quote from “A New View of Healthy Eating”

    “Have fun preparing quick, delicious veggie stir-fries with a few simple steps. The key is to be organized. Pre-chop all your ingredients and set up your mise en place (all ingredients in place) for your cooking before you start stir-frying.” Melanie Albert


    Culinary Tip from “A New View of Healthy Eating”: What’s the Difference: Sauté vs. Stir-fry

    Sautéing and stir-frying are similar dry-heat cooking methods to cook food quickly. Small, bite-size pieces of food are stirred or tossed and quickly cooked over high heat. With sautéing, usually a pan or skillet is used; with a stir-fry, traditionally a wok is used.  With stir-frying, the heat is higher and the action is faster with the food continuously tossed and stirred.


    ACTION: Have fun shopping at your local farmers’ market and create a quick, simple, delicious veggie sauté and share your creation with us on Facebook: www.facebook.com/NewViewHealthyEating

    A few Veggie Sauté ideas from book, “A New View of Healthy Eating”

    80-81_sir-fry-photos

    78-79_simple-stir-fry_18July

    Interested in more healthy recipes, culinary techniques, and nutrition tips, purchase “A New View of Healthy Eating” today!


    IMG_6585


  • A New View of Healthy Eating: Daily Healthy Recipes by Melanie Albert: Simple Steps to Quick Pickle Veggies

    by Melanie A. Albert, intuitive cooking expert, author, speaker, Founder & CEO Experience Nutrition Group, LLC

    Today was a full day of menu and recipe visioning and farmers’ market shopping for the Plantlab Culinary Cooking Course Final Project. As a result, I did not have a lot of time for cooking and ate left-over roasted veggies and hummus for dinner. With only a little time to share a recipe with you today, I decided to make a very quick pickle to share with you.

    Pickling is basically a way to preserve food by fermentation with with acid (vinegar), salt, and a sweetener. Today’s pickle features fennel bulb, apple cider vinegar, sea salt, agave, black peppercorns, plus an orange and fresh thyme.

    A-pickle-IMG_8585

    Simple Ingredients

    • 2 cups sliced veggies, such as cabbage, cucumbers, carrots, or fennel, green beans, beets, Brussels sprouts.
    • 1 citrus fruit, such as orange or lemon
    • Few sprigs fresh herbs, such as thyme, dill
    • 2-3 tbsp sea salt
    • ½ cup vinegar (apple cider vinegar, white wine vinegar, rice vinegar)
    • ¼ cup sweetener (agave, honey, maple sugar, coconut sugar, palm sugar)
    • ½ cup water, as needed
    • Extras: ½ tsp dried spices such as coriander, fennel seeds, caraway seeds, dill seeds, mustard seeds

    A-pickle-IMG_8583

    The Simple Steps to Prepare Your Pickled Veggies

    Step 1: Choose a veggie, such as fennel, cabbage, carrots, or cucumbers, beets, green beans, or Brussels sprouts.

    Step 2: Thinly slice the veggies with a knife or mandoline. If you use a mandoline to thinly slice the veggies, they will absorb the vinegar mixture more and become more sour.

    Step 3: Massage the veggies, citrus with the salt, pepper, and fresh herbs in a large bowl.

    A-pickle-IMG_8592

    Step 4: Whisk the vinegar and sweetener in a small bowl.

    Step 5: Place the massaged veggies into a quart sterilized Mason Jar.

    Step 6: Pour the vinegar and sweetener mixture into the jar to cover the veggies.

    A-pickle-IMG_8597

    Step 7: Add enough water to fully cover the veggies, leaving about 1” space at top of jar.

    A-pickle-IMG_8603

    Step 8: Cover the top of the veggies with a lettuce or cabbage leaf to make sure all veggies stay submerged in the liquid to prevent bacteria growth.

    A-pickle-IMG_8609

    Step 9: Store the jar at room temperature, out of direct sunlight for 5-7 days to allow for fermentation.

    Step 10: After 5-7 days, taste the pickled veggies.  When you like the level of sourness, store in your refrigerator for about 2 weeks.

    Step 11: Enjoy your pickled veggies with a slice of avocado or nut cheese.


    ACTION: Have fun experimenting with quick pickling with veggies from your farmers’ market and with different spices.

    For more simple recipes, culinary and nutrition tips, I’m happy to mail a copy of my book,  “A New View of Healthy Eating,” to you or your friends.

    IMG_6585

  • A New View of Healthy Eating: Daily Healthy Recipes by Melanie Albert: How to Roast Beautiful Veggies: Romanesco and Sweet Potatoes

    A New View of Healthy Eating: Daily Healthy Recipes by Melanie Albert: How to Roast Beautiful Veggies: Romanesco and Sweet Potatoes

    by Melanie A. Albert, intuitive cooking expert, author, speaker, Founder & CEO Experience Nutrition Group, LLC

    Roasting veggies is such a simple culinary technique that I taught my 88- and 91-year old Mom and Dad how to prepare them while in Cocoa Beach during the Christmas 2017 holiday. The key is to choose a few of your favorite veggies, add some organic extra virgin olive, oil, and sea salt or a mix of dried herbs. I was so excited to purchase a Romanesco cauliflower, a beautiful blend of cauliflower and broccoli and local Arizona farmers’ sweet potatoes for today’s roasted veggies.


    Simple Steps to Roast Romanesco and Sweet Potatoes

    Inspired by the beautiful Romanesco!

    A-romanesco-IMG_8282


    Step 1: Get set with your mise en place – all ingredients in place: Romanesco, sweet potato, organic extra virgin olive oil, and sea salt.


    Step 2: Steam Romanesco. Prior to roasting, steam chopped romanesco in bamboo steamer for about 5 minutes. The romanesco is ready when fork easily slides into the veggie.


    Step 3:  Gently toss sweet potato and romanesco with organic extra virgin olive oil and pinch of sea salt.

    A-romanesco-IMG_8332


    Step 4: Mindfully place veggies on a sheet pan. Be sure the veggies do not touch, to prevent them from steaming.

    A-romanesco-IMG_8346


    Step 5: Roast veggies in 400 degree oven for 15 minutes. Flip and roast another 8-12 minutes. Sweet potatoes will be crisp on outsie and soft inside.

    A-romanesco-IMG_8376


    Step 6: Get set for plating. Today, I added home-made hummus, olives, and capers to the roasted romanesco and sweet potatoes.

    a-romanesco-img_8378.jpg


    Step 7: Have fun mindfully plating your veggies. Be intuitive and remember, we eat with our eyes first.

    a-romanesco-img_8404.jpg


    Step 8: Mindfully enjoy your meal!

    A-romanesco-IMG_8408


    YOUR ACTION: Choose a few of your favorite veggies, roast and plate them. Enjoy. And, share your culinary creation with us on Facebook: www.facebook.com/NewViewHealthyEating


  • A New View of Healthy Eating: Daily Healthy Recipes by Melanie Albert: Mindfully Drink Green Tea.  Try Sencha Today.

    A New View of Healthy Eating: Daily Healthy Recipes by Melanie Albert: Mindfully Drink Green Tea. Try Sencha Today.

    by Melanie A. Albert, intuitive cooking expert, author, speaker, Founder & CEO Experience Nutrition Group, LLC

    While I’m a huge fan of matcha green tea, today I decided to enjoy a pot of Sencha tea while getting settled back into the entrepreneurial routine. For me, preparing all kinds of tea is very mindful and meditative. From looking at the beauty of the dried leaves, to gently pouring almost boiling water over the tea, to quietly enjoying a sip of the tea are all part of the mindfulness of tea. The process is very calming and grounding, plus we get the health benefits of drinking green tea.


    Today’s Sencha Tea: Simple Steps to enjoy your tea!

    • Step 1: Pause and enjoy the beauty of the sencha tea leaves


    • Step 2: Pour a few teaspoons of sencha tea leaves into a mesh tea pot strainer.


    • Step 3: Bring water to almost a boil, and pour water over the tea leaves. Steep for a few minutes.


    • Step 4: Calmly and mindfully enjoy your tea.

    A-sencha-IMG_8221

    Your Action: I invite you to buy real tea leaves, rather than teabags and to mindfully enjoy the tea process. Come on over to our Facebook page and share photos of your tea experience with us. www.Facebook.com/NewViewHealthyEating


    Excerpt from book, “A New View of Healthy Eating:  Simple Intuitive Cooking with Real Whole Foods

    Start with High-quality Tea

    To really enjoy tea, be prepared with high-quality tea and the right tea accessories. Purchase a few different high-quality loose green teas. Start with 1-2 ounces of green teas such as Sencha and Gyokuro.

    Top 6 Reasons Why Green Tea is Good for You

    1. The antioxidant ECGC, in green tea, is an anti-inflammatory.
    2. Research has found that green tea benefits heart health and brain health, and helps prevent cancer.
    3. It is full of catechins and polyphenols, which help the brain relax and stimulate dopamine levels.
    4. Theanine in green tea helps improve mood and provides a sense of relaxation.
    5. Green tea has less caffeine than coffee.
    6. It tastes delicious, so enjoy a few cups every day.

    3 Popular Green Teas

    Matcha: Tea of the Japanese tea ceremony

    • High quality Japanese green tea is covered before picking to ac¬centuate its vibrant green color and to increase amino acids, as well as vitamins A and C.
    • The tea leaves are stone-ground, so we actually eat tea leaves when we drink matcha tea and receive the full benefits of green tea.
    • Intense grassy, green taste.

    Gyokuro: High-quality Japanese tea

    • The tea bushes are covered for two weeks prior to harvesting with nets or trellises to reduce the amount of sunlight the plants receive.
    • The emerald leaf takes on a lustrous, splinter-like appearance.
    • Deep, intense, rich green color and grassy, fresh taste.

    Sencha: Most popular Japanese tea

    • An excellent starting point for those just beginning to explore green tea.
    • The splintered green leaf delivers a vegetal, yellow-green cup.
    • In Japan, Sencha is served hot in the cooler months and usually chilled in the summer months.

    My book, “A New View of Healthy Eating:  Simple Intuitive Cooking with Real Whole Foods” is available. I’m happy to mail a copy to you, and hope you enjoy learning some simple culinary skills, intuitive cooking, and of course enjoying green tea.


    OP_176-177_Tea_final


  • A New View of Healthy Eating: Daily Healthy Recipes by Melanie Albert: Hummus & Avocado Salsa Combo

    A New View of Healthy Eating: Daily Healthy Recipes by Melanie Albert: Hummus & Avocado Salsa Combo

    by Melanie A. Albert, intuitive cooking expert, author, speaker, Founder & CEO Experience Nutrition Group, LLC

    I love hummus and have been making home-made hummus for years. I always come back to a basic hummus recipe that my company served at the VIP Tailgate Party at Super Bowl XLIV in Miami. Today, I paired the hummus with a quick avocado salsa prepared with a tomato, celery, lemon, and sea salt.

    A-avocado-hummus-words-IMG_7972

    Make Your Own Hummus: EXPERIENCE NUTRITIONTM Super Simple Organic Hummus

    SIMPLE INGREDIENTS

    • 2 cups cooked chickpeas (garbanzo beans)
    • ⅓ cup chickpea water
    • 3 tbsp tahini (sesame seed paste or sesame seeds)
    • 3 cloves garlic
    • 2 tbsp fresh lemon juice
    • ¼ tsp black pepper
    • ⅛ tsp cumin seeds, ground
    • ⅛ tsp coriander seeds, ground (seeds from cilantro)
    • 2-3 tbsp organic extra virgin olive oil

    SIMPLE STEPS

    1. Place all ingredients into high-speed blender (such as Vitamix) or food processor.
    2. Blend until smooth.
    3. Stream in organic extra virgin olive oil, to taste.
    4. After the hummus has been blended, taste and add more of any of the ingredients to suit your taste.

    90-91_organic-hummus

    New Culinary with Matthew Kenney Culinary & Plantlab Culinary

    In 2017 I had the wonderful opportunity to participate in several culinary courses with Matthew Kenney Culinary and Plantlab Culinary and learned how to plate food more beautifully. One way to take a simple dish to the next level is to use a ring mold. In the hummus and avocado salsa dish, I layered the avocado salsa with hummus in the ring mold to create this simple lunchtime meal.


    If you’re interested in purchasing my latest book, “A New View of Healthy Eating” I’m happy to mail a copy to you.


    A-Book-Ship-01-2016-0823-IMG_7819