Within the Experience Nutrition Corporate Wellness Programs, we offer private online communities where we share healthy eating tips and recipes, and employees share their recipe creations and ask food and nutrition questions.
This week one of the participants wanted to know how to cook asparagus. While asparagus is not growing in season in Arizona right now, I shopped in a few different stores to find fresh organic asparagus.
Simple Asparagus
Happy to share with you two ways to enjoy cooking and eating asparagus, starting with steaming asparagus in a bamboo steamer to enjoy as a side or in a fresh salad. And, the next recipe is Roasted Asparagus. Corn-on-the Cob. Heirloom Tomatoes. Turmeric Hummus.
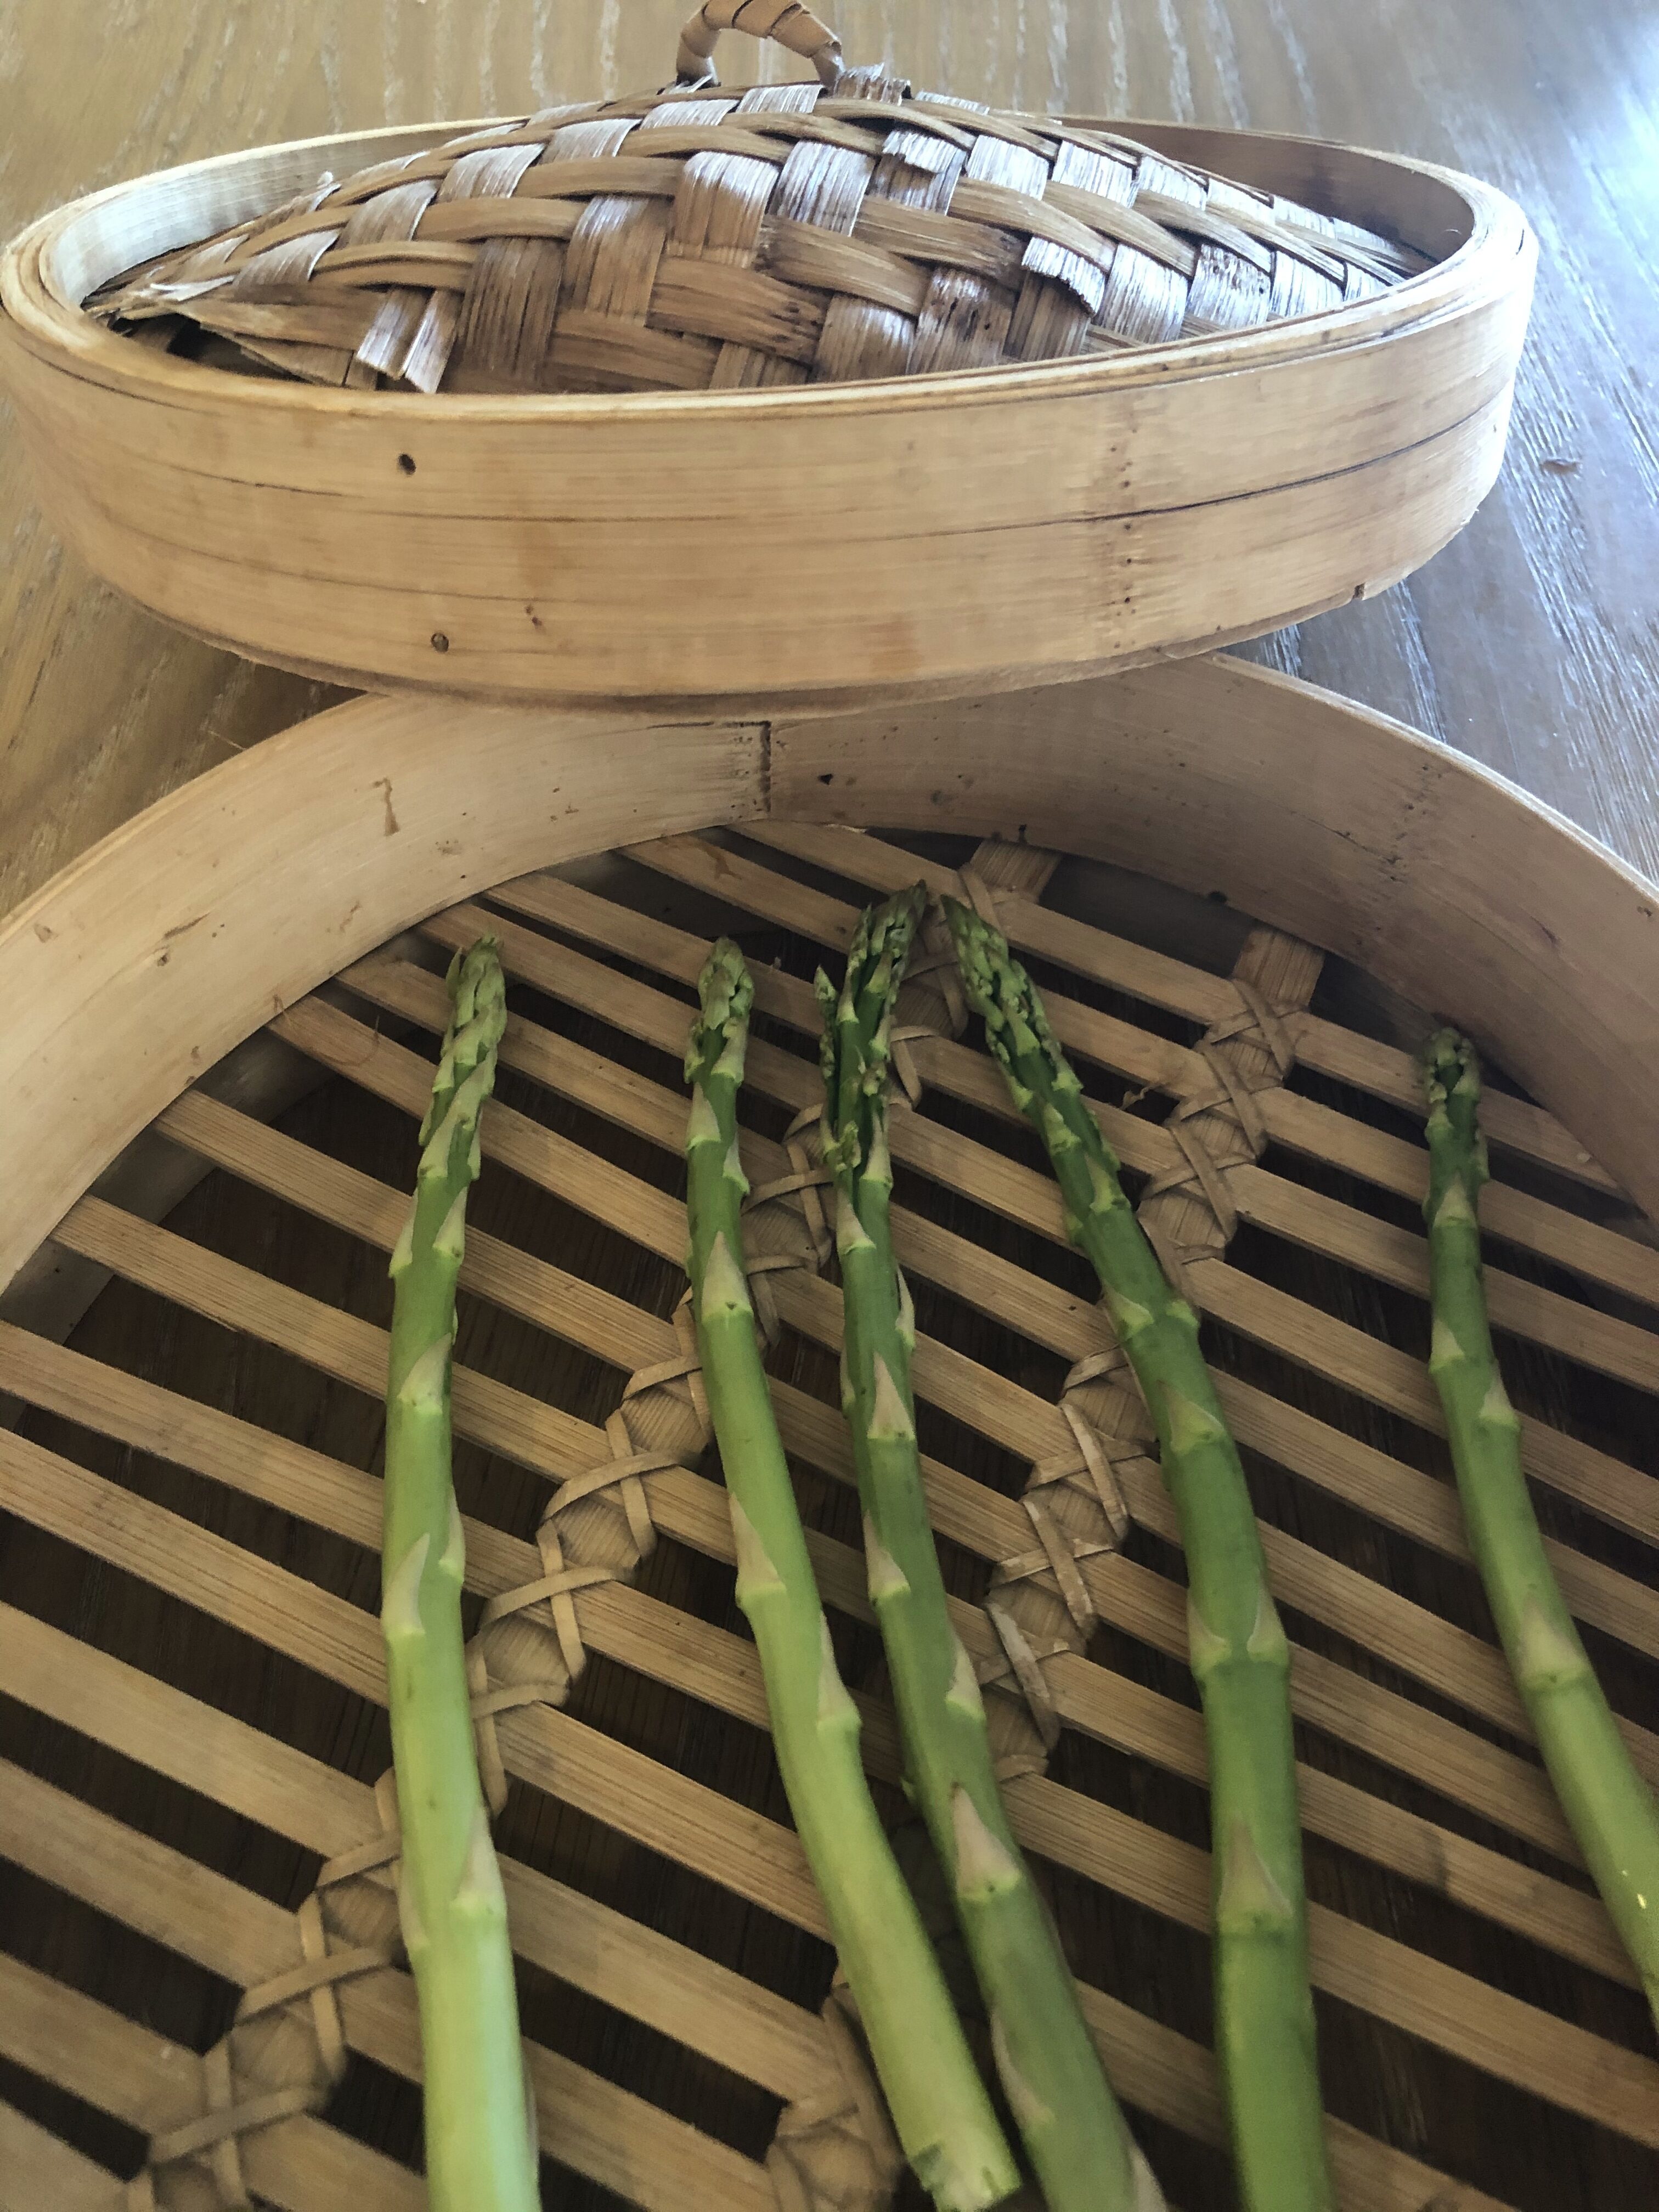
Bamboo Steamer Asparagus Recipe
Use this simple bamboo steamer culinary technique to steam asparagus, as well as other fresh vegetables.
SIMPLE INGREDIENTS
Bamboo Steamer Asparagus
8-10 asparagus stems
Pinch sea salt
Basil Finishing Oil
2 tbsp extra virgin olive oil
3 tbsp basil leaves
SIMPLE STEPS
Basil Oil
Since it only takes about 5 minutes to steam the asparagus in the bamboo steamer, first prepare this very simple Basil Oil as a finishing dressing for the asparagus.
Pour oil and basil into a small blender.
Blend for about 2 minutes.
Use the oil as a finishing oil for the asparagus.
Simple Basil Oil IngredientsPour olive oil and fresh basil into small blender.Blend olive oil and basil for 2-3 minutes.The Simple Basil Oil.
Bamboo Steamer Asparagus
Pour a few cups of water into a large pot.
Place pot on the stove top and bring to a boil.
Place asparagus stems onto bamboo steamer rack, spaced a part and not touching.
Sprinkle asparagus with sea salt.
Place asparagus onto bamboo steamer. Drizzle with sea salt.
Cover bamboo steamer.
Place steamer on top of the pot of boiling water.
Steam asparagus for about 5 minutes.
Allow the steam to cook the asparagus for about 5 minutes.
Test the asparagus for doneness.
When the asparagus easily falls off the fork, it is cooked.
Asparagus is ready when it falls off the fork.
Take the asparagus off the bamboo steamer.
Drizzle the Basil Oil on the asparagus.
Mise en Place: Asparagus. Basil Oil.Toss asparagus with Basil Oil.
Mindfully plate or enjoy the asparagus in a salad.
As always, it is my honor to create recipes with the produce grown for the CSA (Community Supported Agriculture) by passionate farmer Billy Anthony at the Soil & Seed Garden, at The Farm at South Mountain in Phoenix, Arizona.
It is especially touching this week, during the Coronavirus Pandemic while we are all staying at home, and cooking more. And, in Arizona we are transitioning from the Spring to the Summer crops, so we still have roots, along with summer crops, such as zucchini. – Melanie Albert
When I picked up my CSA this week, The Farm felt very still and calm, in align with the quietness of our Earth…a little video capture:
For the CSA Members, the items in the May 9, 2020 CSA include:
This week’s recipe was inspired by the peaches, and paired with beets, carrots, and grapefruit. Since grapefruits are still available, enjoy a simple dressing with a few extras: honey, mustard, and mint.
Serves 2
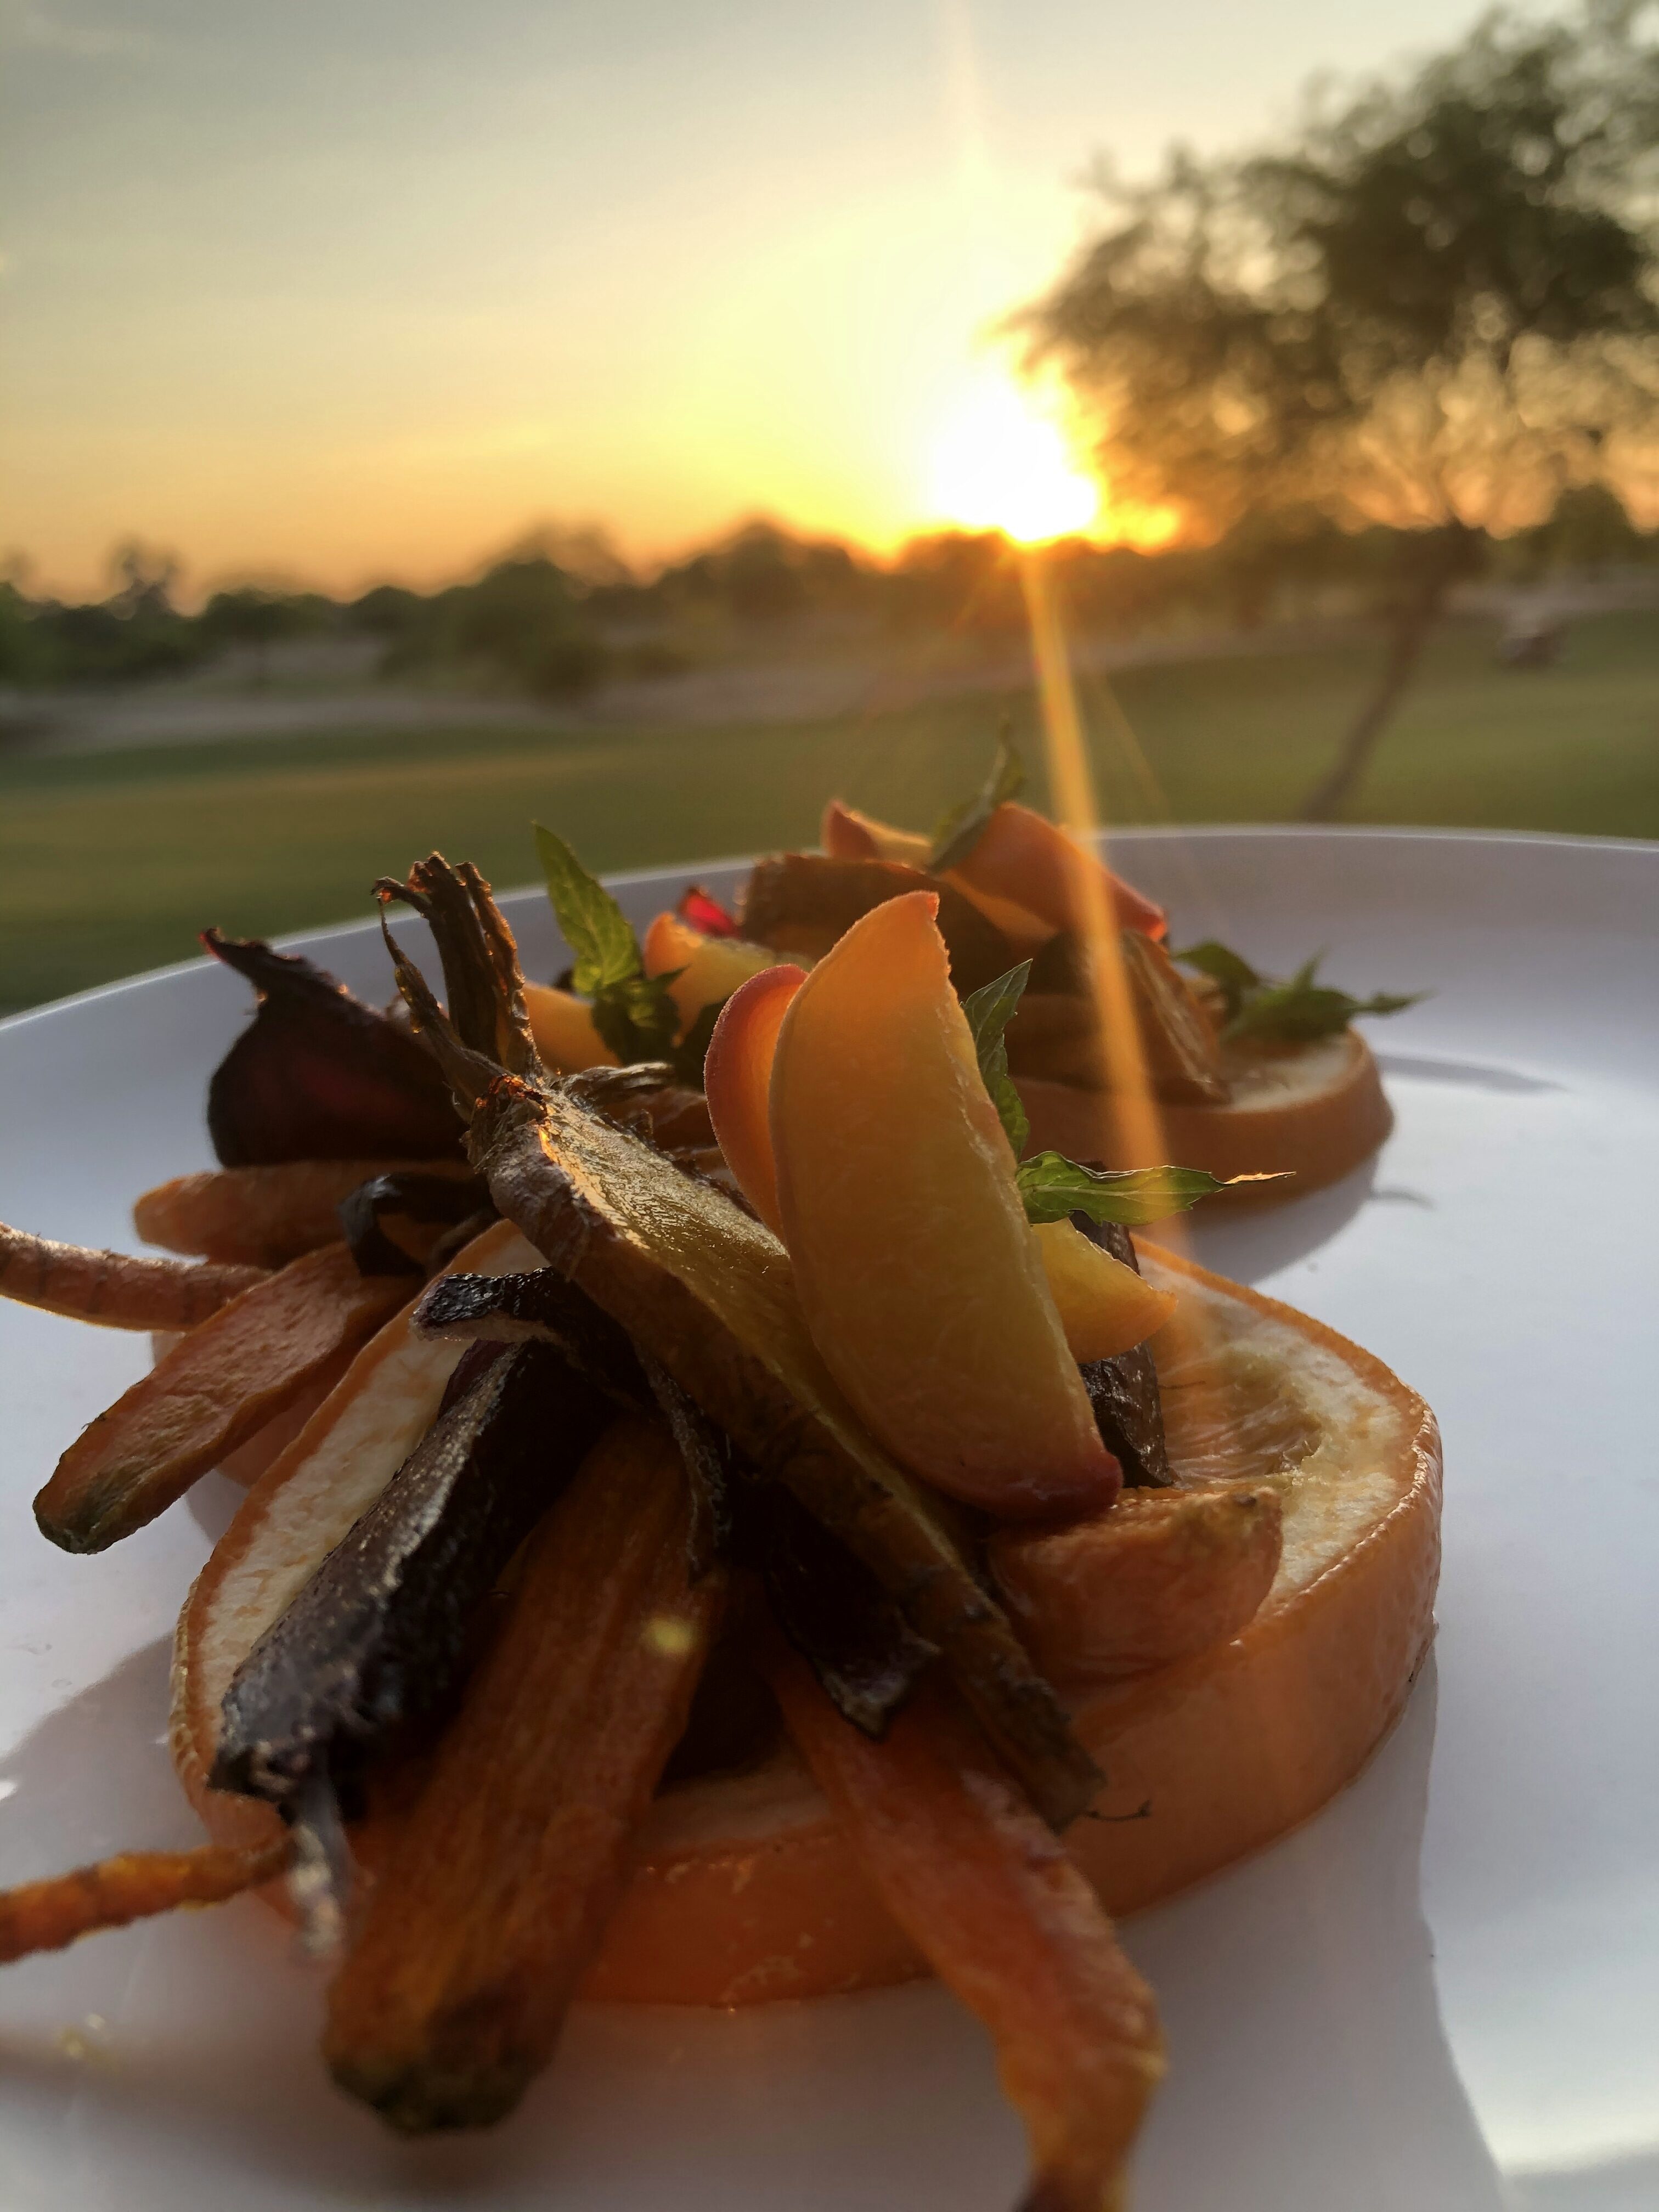
Roasted Roots & Fruit
Enjoy creating this dish, inspired by The Farm’s sweet fruit and roots: peaches, grapefruit, beets, and carrots.
SIMPLE INGREDIENTS
1 peach
1 grapefruit
1 golden beet
1 red beet
5-6 small carrots
Not from The Farm CSA: ½ red onion
3 TBSP olive oil
1 TBSP honey
Pinch sea salt
SIMPLE STEPS
Pre-heat oven to 425 degrees F.
Chop all veggies in small bite-size pieces.
Veggie-by-veggie toss in olive oil and sea salt.
Place veggies, spread apart on parchment-paper lined sheet pan.
Place grapefruit and peaches on parchment-lined sheet pan. Drizzle with ¼ tsp of honey.
Cook for 12 minutes.
Flip the veggies and fruit.
Cook another 10-12 minutes.
Honey Grapefruit Dressing
SIMPLE INGREDIENTS
2 TBSP grapefruit juice
1 ½ tsp honey
1 ½ tsp stone ground mustard
1 tsp red wine vinegar
3 TBSP extra virgin olive oil
6-8 mint leaves, rough chopped
Pinch sea salt
SIMPLE STEPS
Into bowl, place grapefruit juice, mustard, vinegar.
Whisk until blended.
Add olive oil.
Whisk until blended.
Add more acid (grapefruit juice) or fat (olive oil) to balance.
Add sea salt. Whisk.
Add honey. Whisk.
Add mint. Whisk.
SIMPLE PLATING
Mindfully plate.
Place grapefruit slices on plate.
Layer veggies and fruit on top of the grapefruit slices.
Dressing Options: Drizzle dressing on top of the veggies. Or, when eating, use dressing as dipping sauce.
Plating Mise en Place…
Plating…
The beautiful, tasty Arizona Spring Roots & Fruit Dish
Stay in touch with us on www.facebook.com/ExperienceNutritionAZ and Instagram @experiencenturitionaz and tag us #experiencenutrition on your plant-based culinary creations.
We are now beginning to think about Plant-Based Farm-to-Table Experiences for Fall 2020…hands-on cooking, team building, catering. Please reach out to me to brainstorm ideas for your organization. Contact Melanie Albert at 602.615.2486 or Mel@MelanieAlbert.com
By Melanie Albert, Plant-Based Culinary Leader, Founder & CEO, Experience Nutrition in Phoenix, Arizona. Award-winning cookbook author, speaker, corporate wellness, team building, retreat leader, and caterer.
So beautiful…one more view of the Arizona Roasted Roots & Fruit and our incredible sunset.
It is again such an honor to create recipe articles for the Natural Awakenings Magazine, Phoenix and Northern Arizona during the last few years. And, I am humbled to contribute to the important May 2020 issue during the Coronavirus Pandemic, to bring a little joy to our lives, with beautiful food. – Melanie Albert
Recipes in the Natural Awakenings, May 2020 article include: Three Beautiful, Simple Plant-Based Recipes
Enjoy mindfully and intuitively creating these simple dishes. Take time to appreciate the beauty of the food, the mindfulness of the cooking process, and the final food art of your culinary creations.
Simple Avocado Salsa. Intuitively create with the veggies, aromatics, and herbs in your kitchen. (Today’s recipe.)
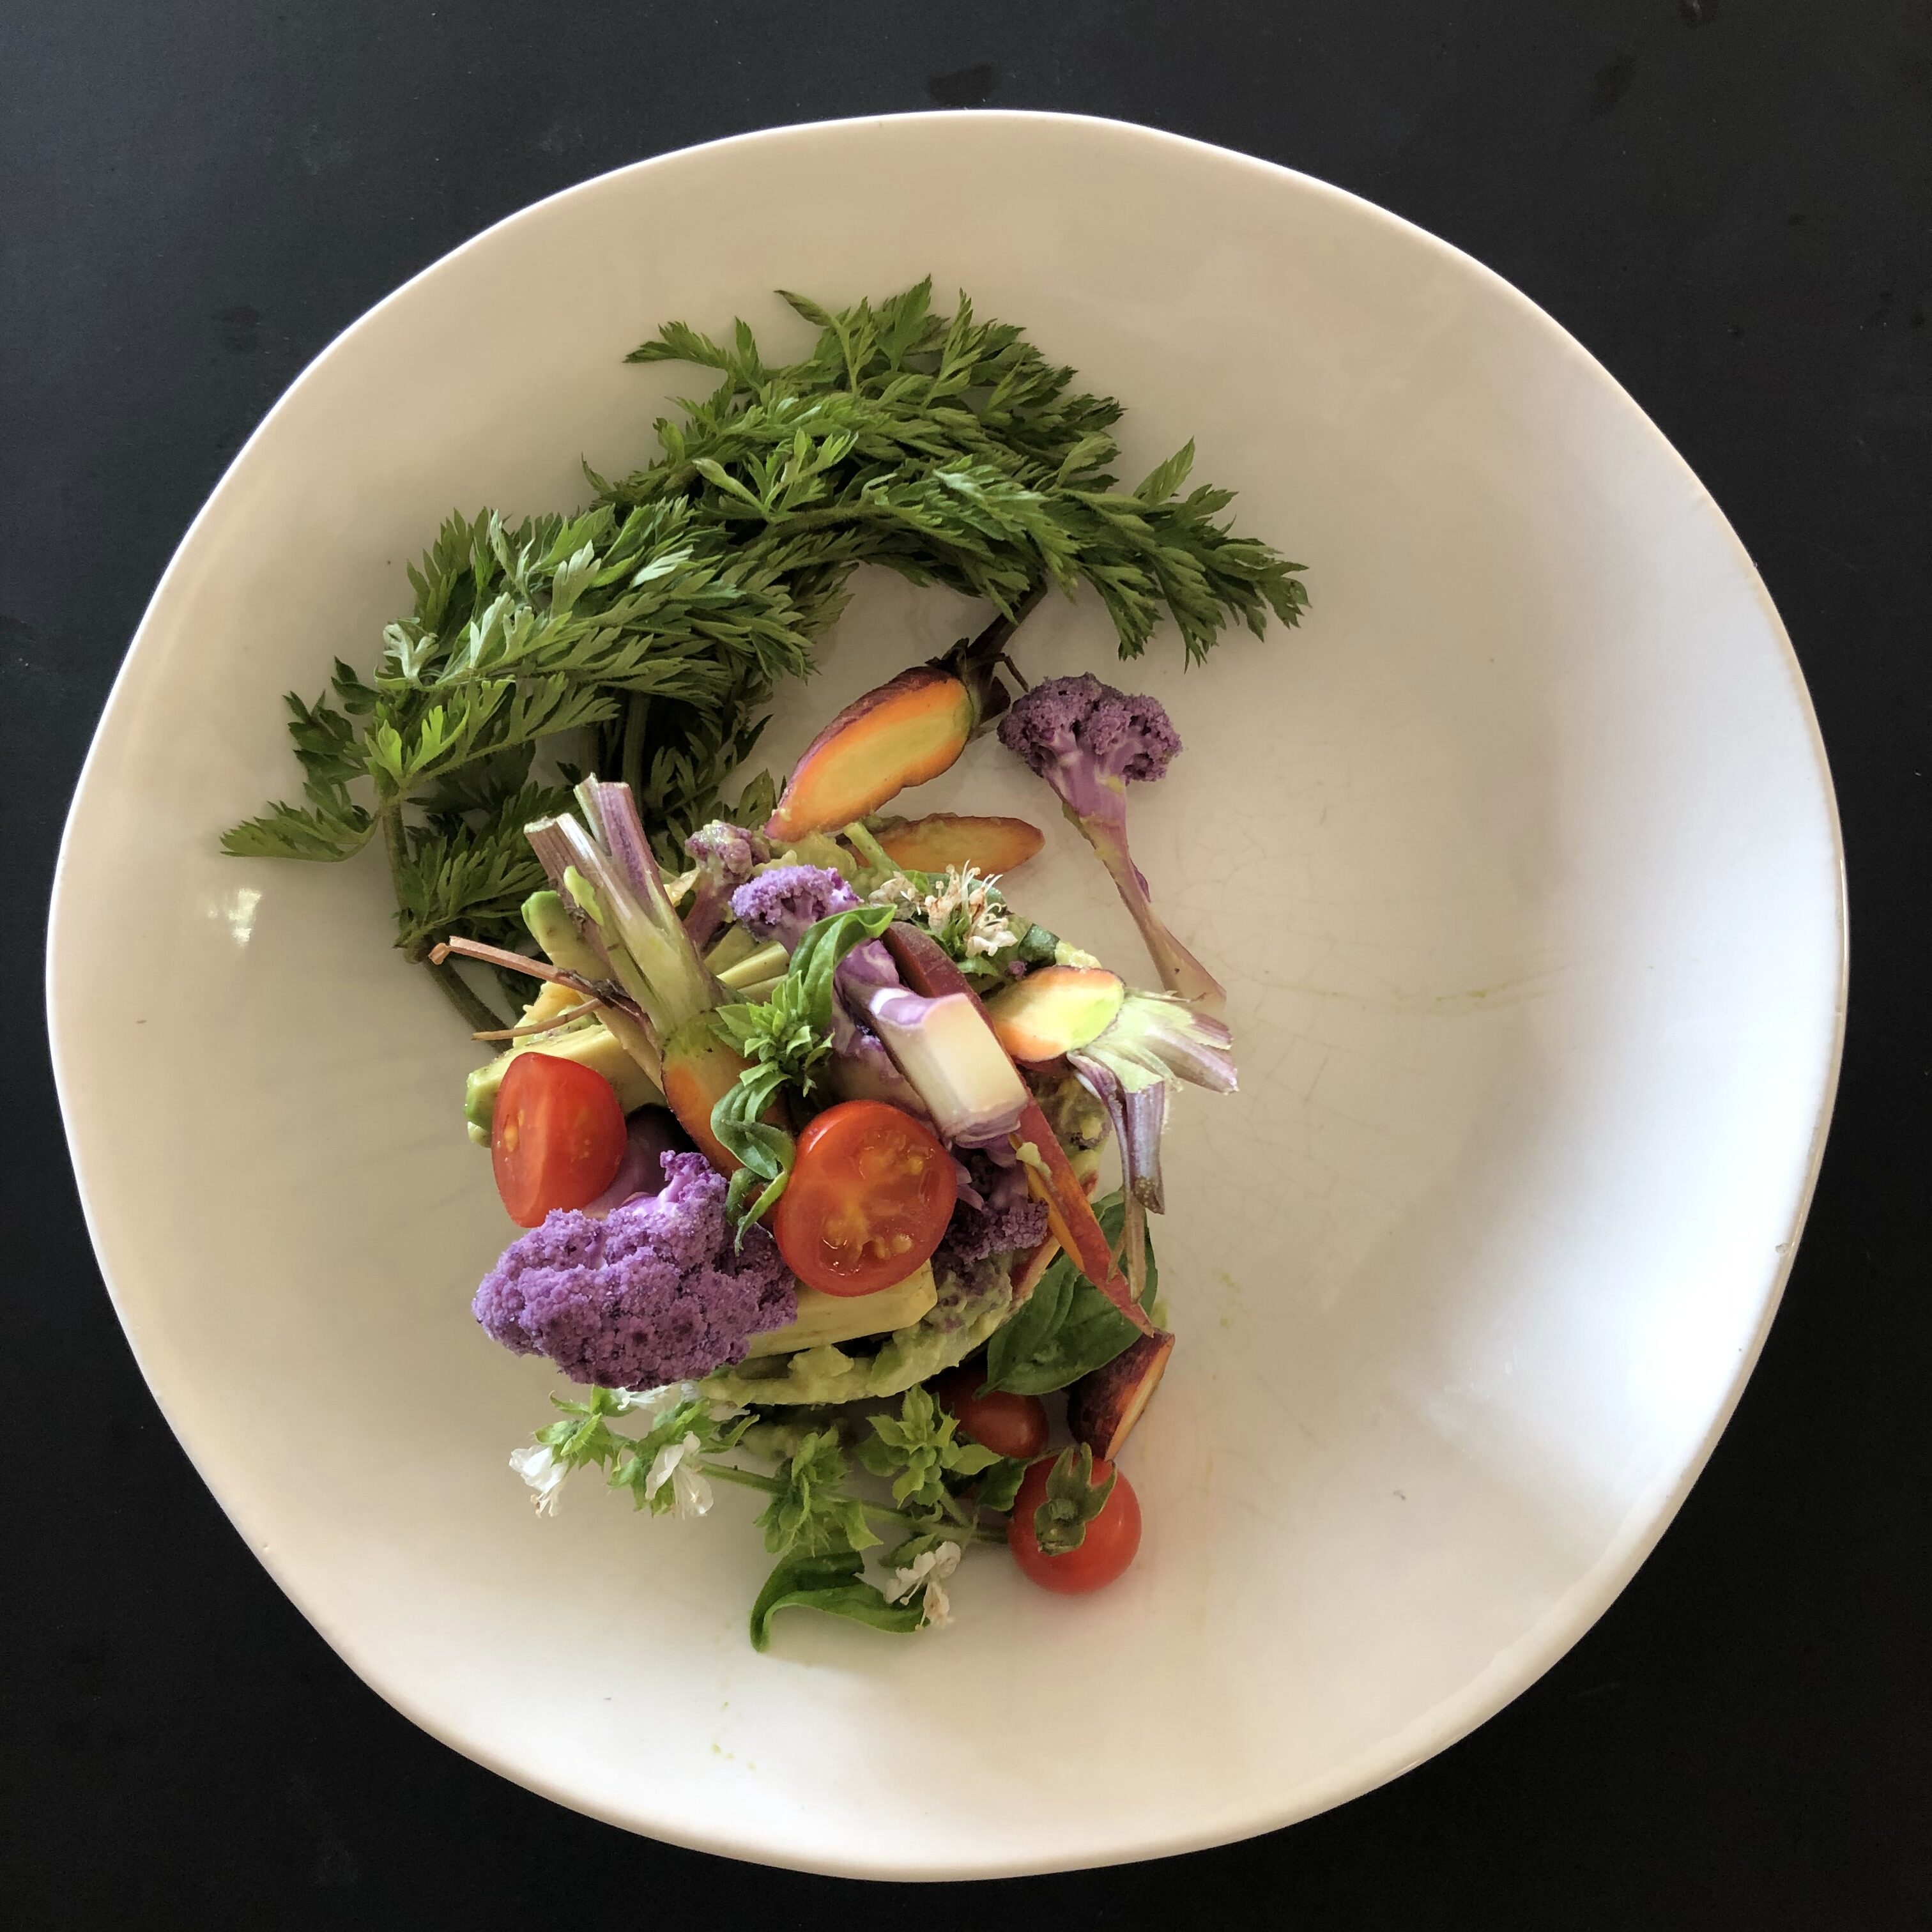
Simple Avocado Salsa
I hope you are inspired by this simple to-prepare, tasty avocado salsa, along with “food art.”
Enjoy the video with the steps to prepare and plate your own avocado salsa.
Serves 1
Have fun intuitively creating your own avocado salsa with the veggies grown by our local farmers and available right in your own refrigerator. With the avocado as a base, add in your choice of aromatics (onion, garlic), citrus (lemon or lime), favorite veggies, such as carrots, green or red peppers, radishes, cauliflower, tomatoes), and a fresh herb (basil, cilantro, marjoram).
Thanks to my Arizona farmer friends for the beautiful produce in this Avocado Salsa.
Blue Sky Organic Farms, Litchfield Park: Grafitti (purple) Cauliflower, Green Onions
Pinnacle Farms Phoenix: Mini-Carrots, Spring Garlic
Add all other ingredients to the bowl and gently mix all ingredients.
Simple Avocado Salsa: Mise en Place
Simple Plating
Place ring mold onto plate or bowl.
Scoop avocado salsa into the ring mold.
OPTION: If you do not have a ring mold, place a mound of the avocado salsa onto the plate.
Garnish with basil leaves and mini-tomatoes.
Enjoy!
Stay in touch with us on www.facebook.com/ExperienceNutritionAZ and Instagram @experiencenturitionaz and tag us #experiencenutrition on your plant-based culinary creations.
I’m feeling that very soon we will ease out of our Coronavirus Stay-at-Home, so if you or your organization is looking for a live in-person hands-on interactive plant-based cooking experience, I’m happy to chat with you to explore opportunities. Feel free to call (602.615.2486) or e-mail (Mel@MelanieAlbert.com) – Melanie
By Melanie Albert, Plant-Based Culinary Leader, Founder & CEO, Experience Nutrition in Phoenix, Arizona. Award-winning cookbook author, speaker, corporate wellness, team building, retreat leader, and caterer.
Use this quick and easy culinary technique to roast any kind of veggies in your refrigerator, if possible, grown by your local farmers. All you’ll need is a few of your favorite vegetables, extra virgin olive oil, and sea salt. That’s it. A few simple ingredients and easy cooking method to create a tasty, healthy veggie side dish. – Melanie Albert
Thanks to our local Arizona farmers who are working so passionately to bring great, local food to our community while we’re all social distancing and cooking more at home. Thanks to my long time farmer friends at The Farm at South Mountain, Blue Sky Organic Farms, The Farm at Agritopia, Crooked Sky Farms, Rhiba Farms, Whipstone Farms, Steadfast Farm, Phoenix Pinnacle Farms, Maya’s Farm, and the Community Exchanges. From my heart, I really appreciate you.
Thank You Farmers Markets
Here in Arizona, I’d also like to thank our local farmers markets to continuing to stay open as grocery stores, so we have a safe place to purchase the quality food from our farmers, and our farmers have a place to sell the produce that is growing so abundantly right now. Special thanks to my friends at the Downtown Phoenix Public Market, where I’ve been leading cooking demos for several years.
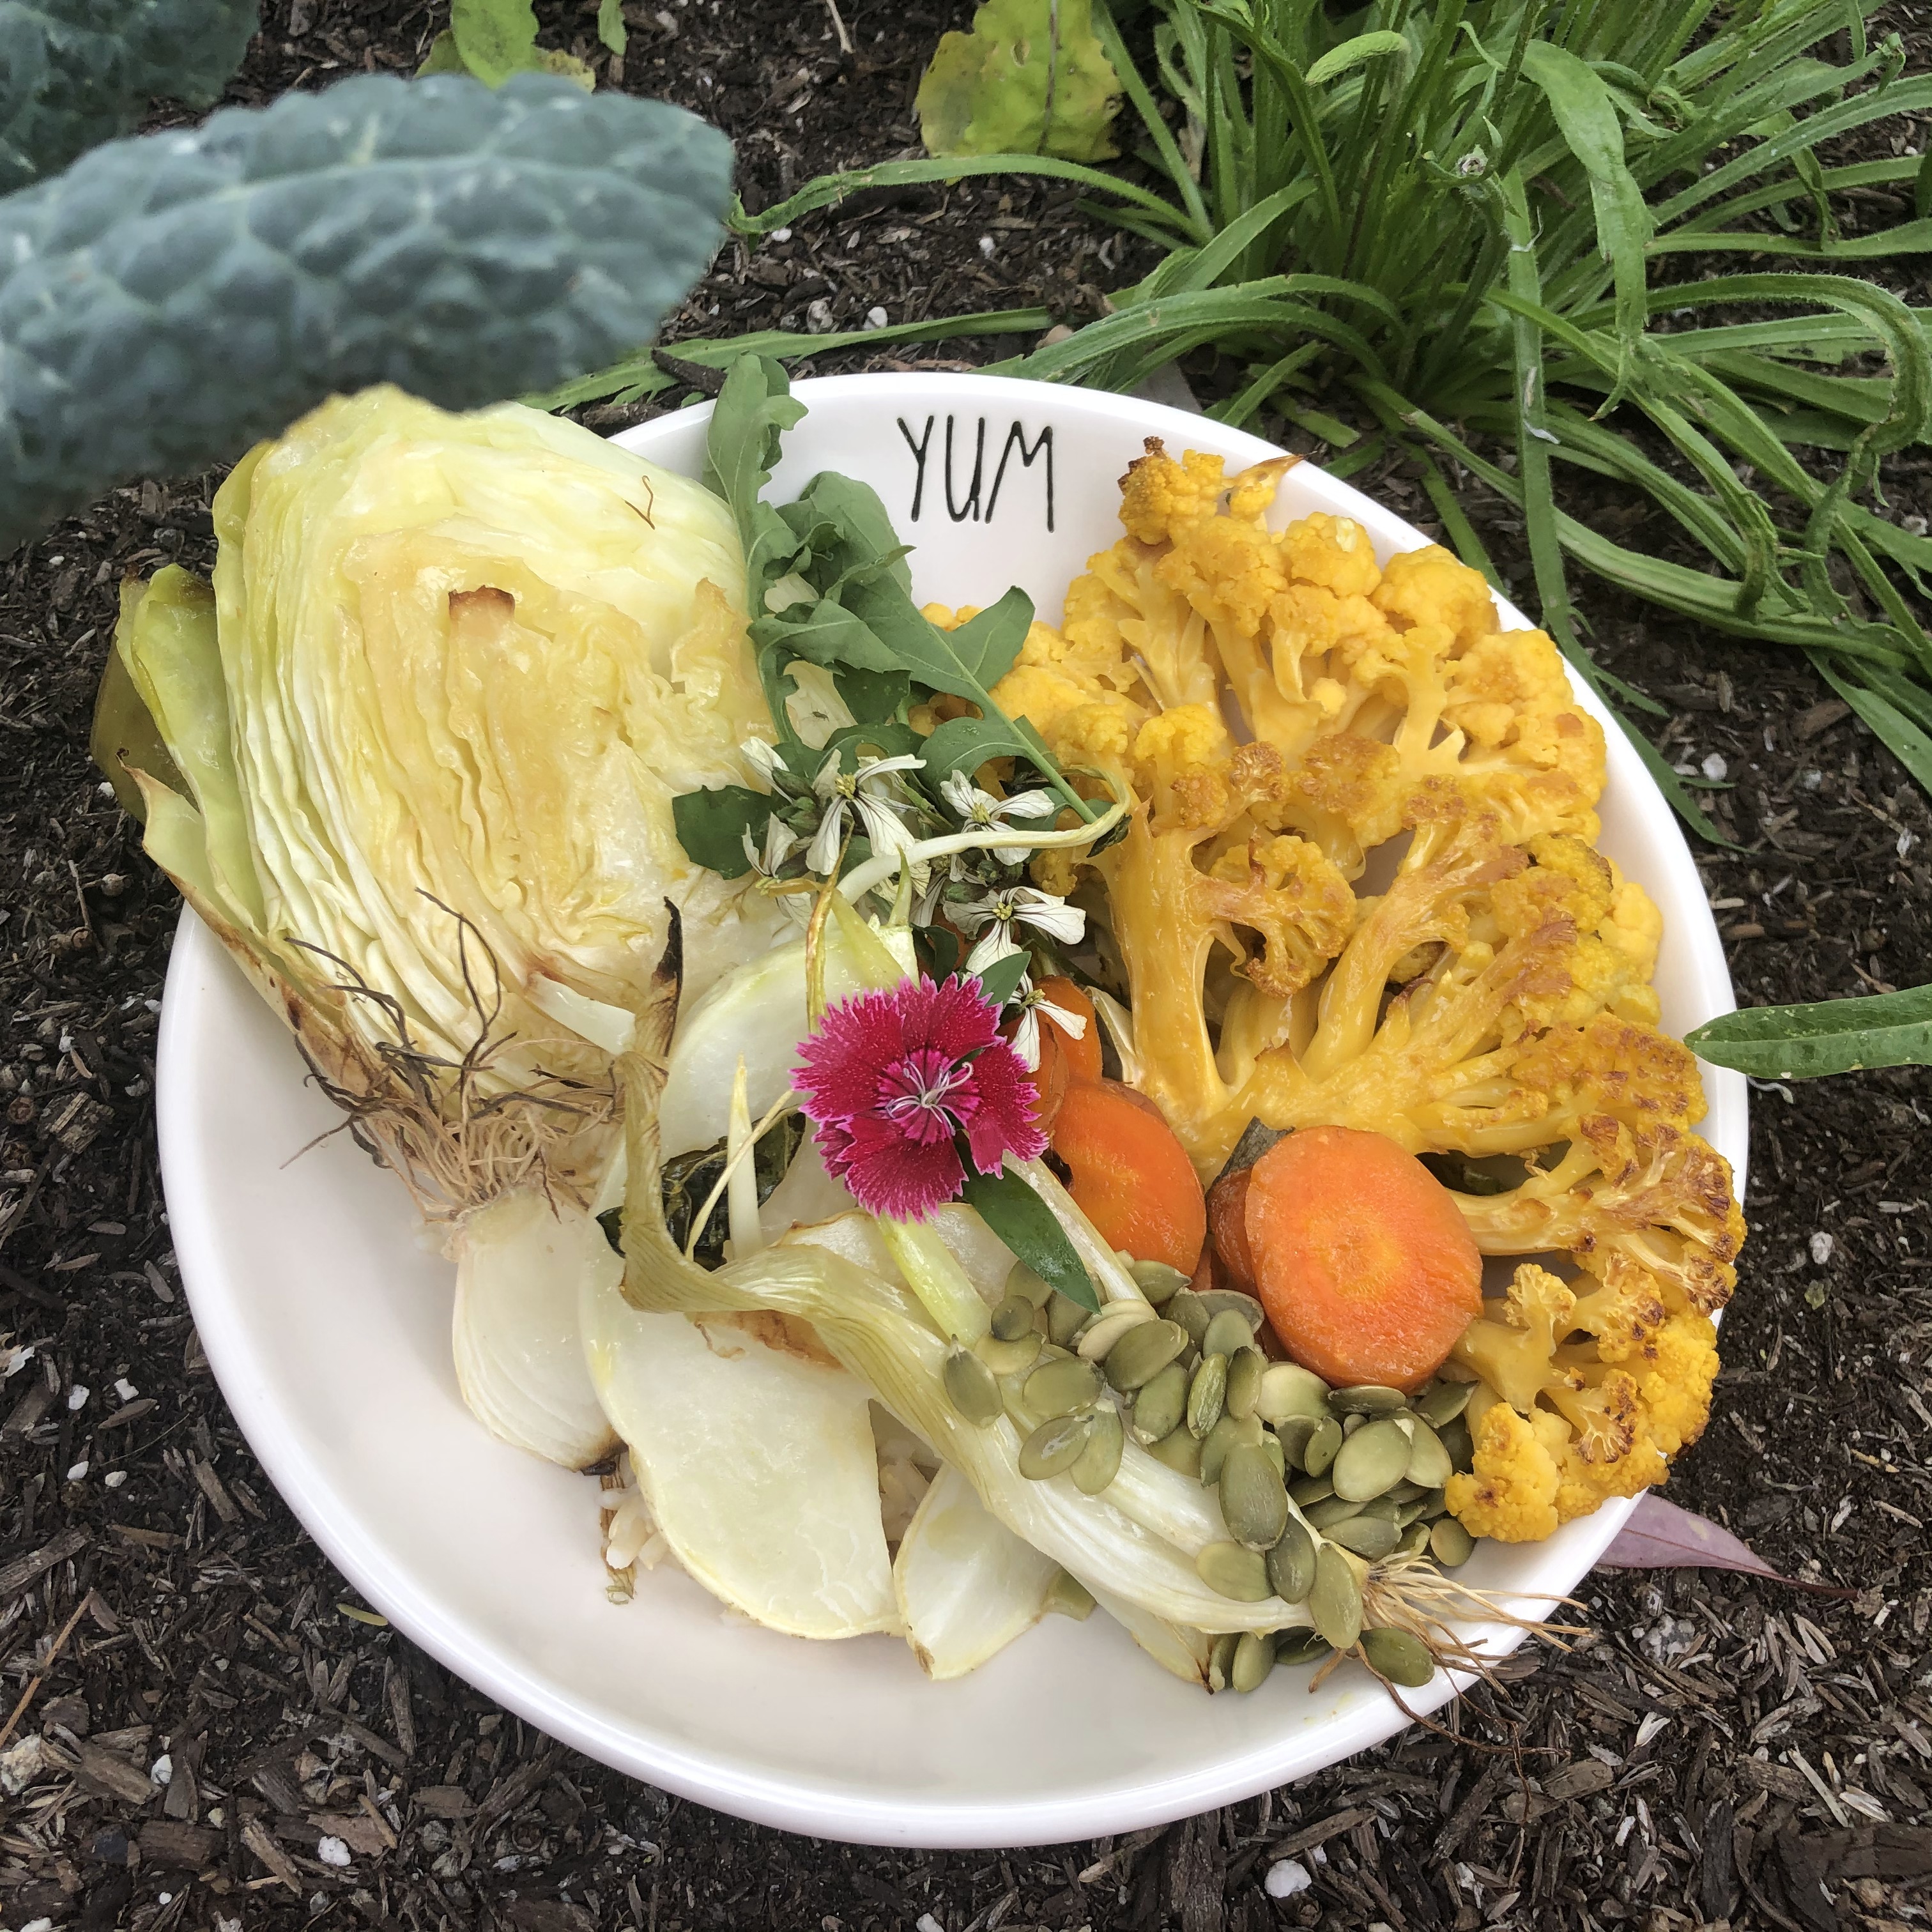
Quick Roasted Veggies Recipe
Create this quick roasted veggie dish with a few of your favorite veggies in your kitchen and enjoy it with quinoa or brown rice.
Cooking Tip:Since some veggies cook faster than others, be sure to remove veggies from the pan when they have been cooked.
Simple Ingredients
Four to six of your favorite veggies.
For this intuitively created recipe, I pre-ordered a CSA (Community Supported Agriculture) from Blue Sky Organic Farms in Litchfield Park, Arizona. I then quickly picked it up at the Saturday Downtown Phoenix Farmers Market.
½ Caraflex cabbage (sweet and mild)
4-5 orange carrots, sliced
1 large green onion, sliced
½ kohlrabi, sliced
½ yellow (cheddar) cauliflower, sliced
2-3 tbsp extra virgin olive oil
Pinch sea salt
Garnish: Sunflower seeds, arugula, edible flowers
Extras: Cooked brown rice or quinoa
Quick Roasted Veggies: Ingredients
Simple Steps
Pre-heat oven to 425 degrees F.
Slice all veggies into bite-sized pieces.
Place veggies into baking pan.
Drizzle veggies with the olive oil and sea salt.
In to the Pan: Veggies, Olive Oil, and Sea Salt
Roast for 12 minutes.
Toss veggies.
Roast for another 12-15 minutes.
Enjoy veggies with quinoa or brown rice.
Plating
Plate the veggies in a veggie bowl with quinoa or brown rice, along with pumpkin seeds, arugula, and edible flowers.
During our Coronavirsus social distancing, stay-at-home, this 5 minute braising greens cooking method is a simple way to cook the greens your local farmers are growing. Choose any mix of dark, leafy greens such as kale, chard, collards, mustard, bok choy, dandelion, turnip, broccoli, or cauliflower, or Brussels sprouts greens.
This recipe was inspired by farmer Billy Anthony of the Soil & Seed Garden at The Farm at South Mountain, less than a mile from my home in Phoenix, Arizona. As part of this week’s Spring 2020 CSA (Community Supported Agriculture), Billy harvested beautiful white and red Swiss chard leaves that are perfect for cooking with quick stove-top braising. Add flavor to the greens with green onions and fresh dill.
A look at The Farm at South Mountain…April 2020
Beautiful White Chard at The Farm at South Mountain
Nutrition Tip: Dark leafy greens are fiber-rich and good sources of vitamins (such as A, C, and K and folate) and minerals (including iron and calcium). Our body needs a little fat to absorb some of the vitamins in leafy greens.
Braised Leafy Greens Recipe
Use this simple method to cook Spring braising greens while we are at home with our families and loved ones. Mix and match whatever greens your local farmers are growing to create a simple veggie side dish.
By Melanie Albert, Plant-Based Farm-to-Table Leader, Award-Winning Cookbook Author and Speaker, Founder & CEO, Experience Nutrition
It has been such an honor to intuitively create recipes for the CSA (Community Supported Agriculture) for The Farm at South Mountain, in Phoenix, Arizona, an urban farm located less than a mile from my home since October 2018. The Farm at South Mountain Soil & Seed Garden farmer, Billy Anthony, passionately grows and harvests beautiful, incredible tasting produce, herbs, and edible flowers. Billy and his team harvest on Friday, I stop by the farm Friday evening to pick up my CSA, and then I intuitively create a recipe for the CSA members, which they receive Saturday morning with their CSA.
This is Week 1 of the Spring 2020 CSA. After seeing the Sugar Snap Peas growing at The Farm the last month or so, I was very excited to prepare a simple dish with them. Also, The Farm has a Pecan Orchard on the property, so I was looking forward to include them in the dish.
Prior to sharing the recipe, a look at The Farm this week.
Let’s take a look at all of the products in the CSA.
The Farm at South Mountain. Soil & Seed Garden. CSA March 14, 2020.
Love the Sugar Snap Peas growing at the Soil & Seed Garden.
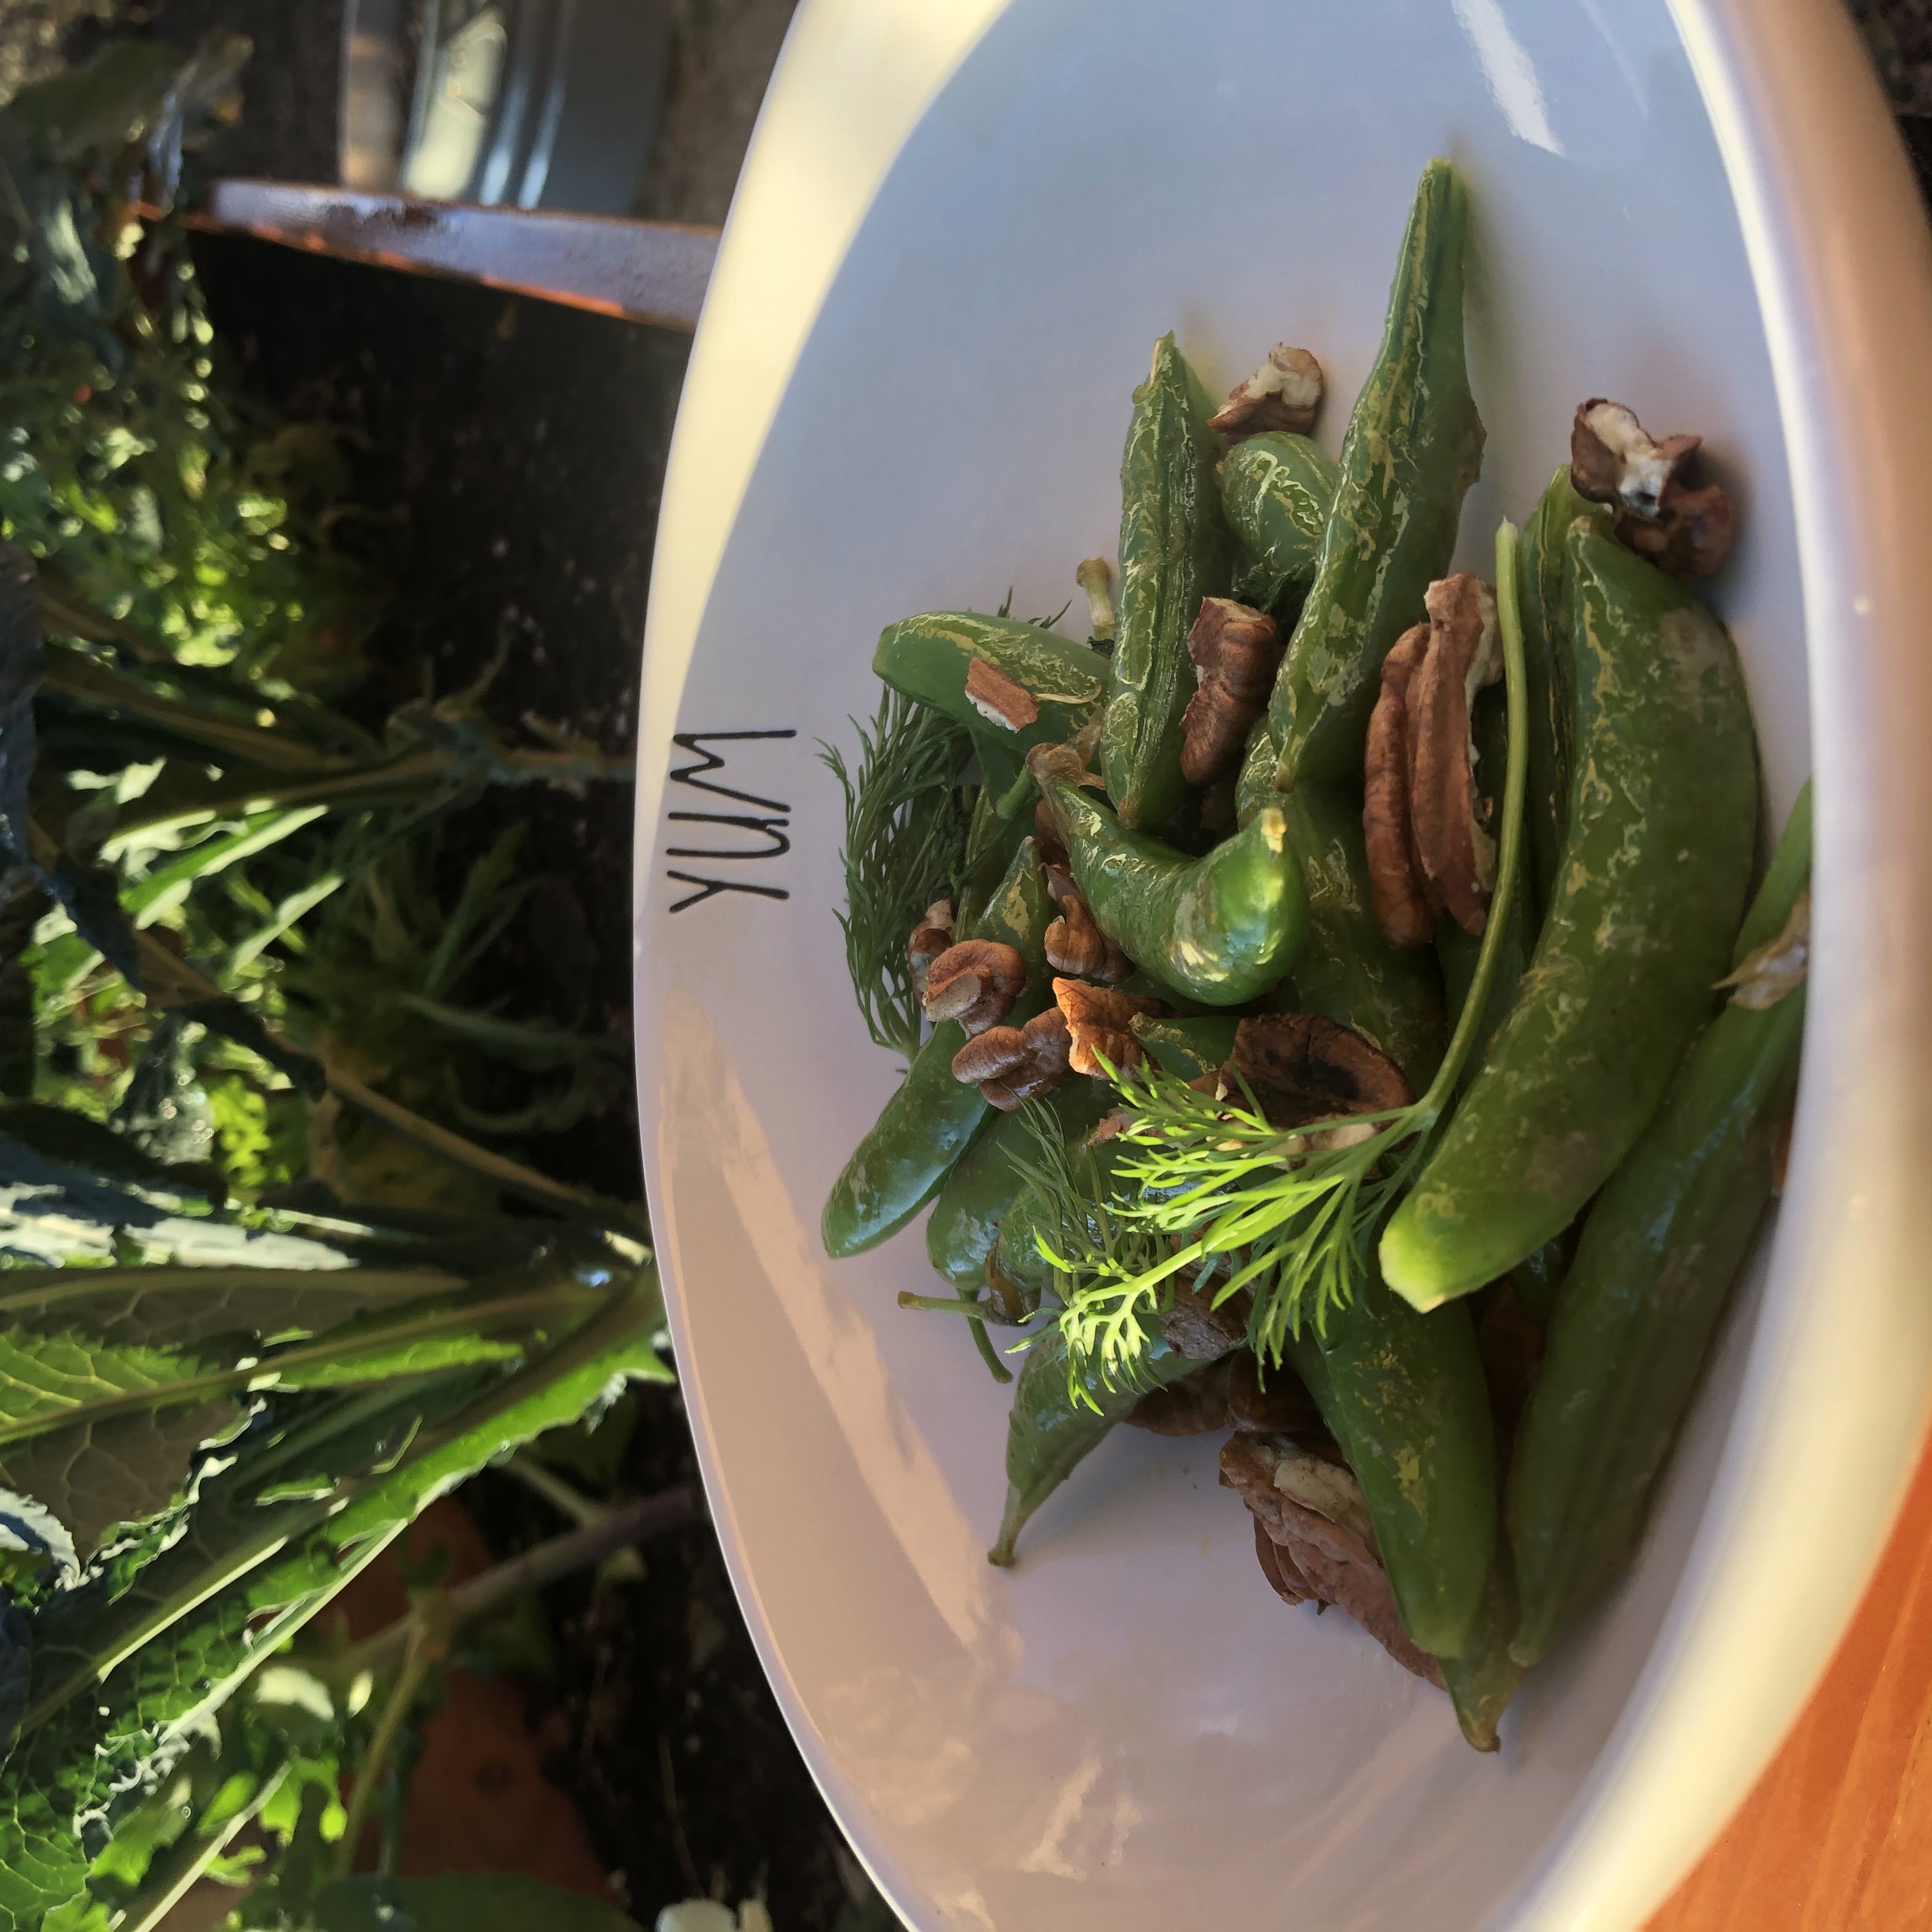
RECIPE: Simple Sugar Snap Pea Sauté
Simply sautéing Sugar Snap Peas are a great way to enjoy this fresh veggie. Along with this week’s dill, grapefruit, and pecans, create this tasty side dish.
SIMPLE INGREDIENTS
2 cups sugar snap peas
1 tbsp grapefruit zest
3-4 sprigs of fresh dill
6-7 pecans, cracked
1 tbsp organic extra virgin olive oil
Pinch sea salt
Mise en Place: Sugar Snap Peas. Dill. Saute.
SIMPLE STEPS
Mise en Place
Zest the grapefruit.
Crack the pecans.
If desire, remove the stems and pod strings from the snap peas pods.
All set to quickly saute the Sugar Snap Peas.
Cook
Pre-heat a sauté pan on medium for about a minute.
Add olive oil to coat bottom of the pan.
When the oil is warm, add the sugar snap peas and sea salt to the pan. Continuously toss the snap peas with tongs.
Cook for about 2 minutes.
Add the grapefruit zest and dill to the pan.
Toss the snap peas with the zest and dill for about 2 minutes.
Plate
Plate the sugar snap peas with the pecans.
Enjoy.
Sugar Snap Pea Plating Mise en PlaceThe Soil & Seed Garden Sugar Snap Pea Saute.
2020 Sedona Plant-Based Cooking & Self Care Retreats
Interested in a weekend of Plant-based Cooking, Self Care, Hiking and Special Sedona Ceremonies?
2020 Retreat Dates: June 12-15, 2020; September 18-21, 2010
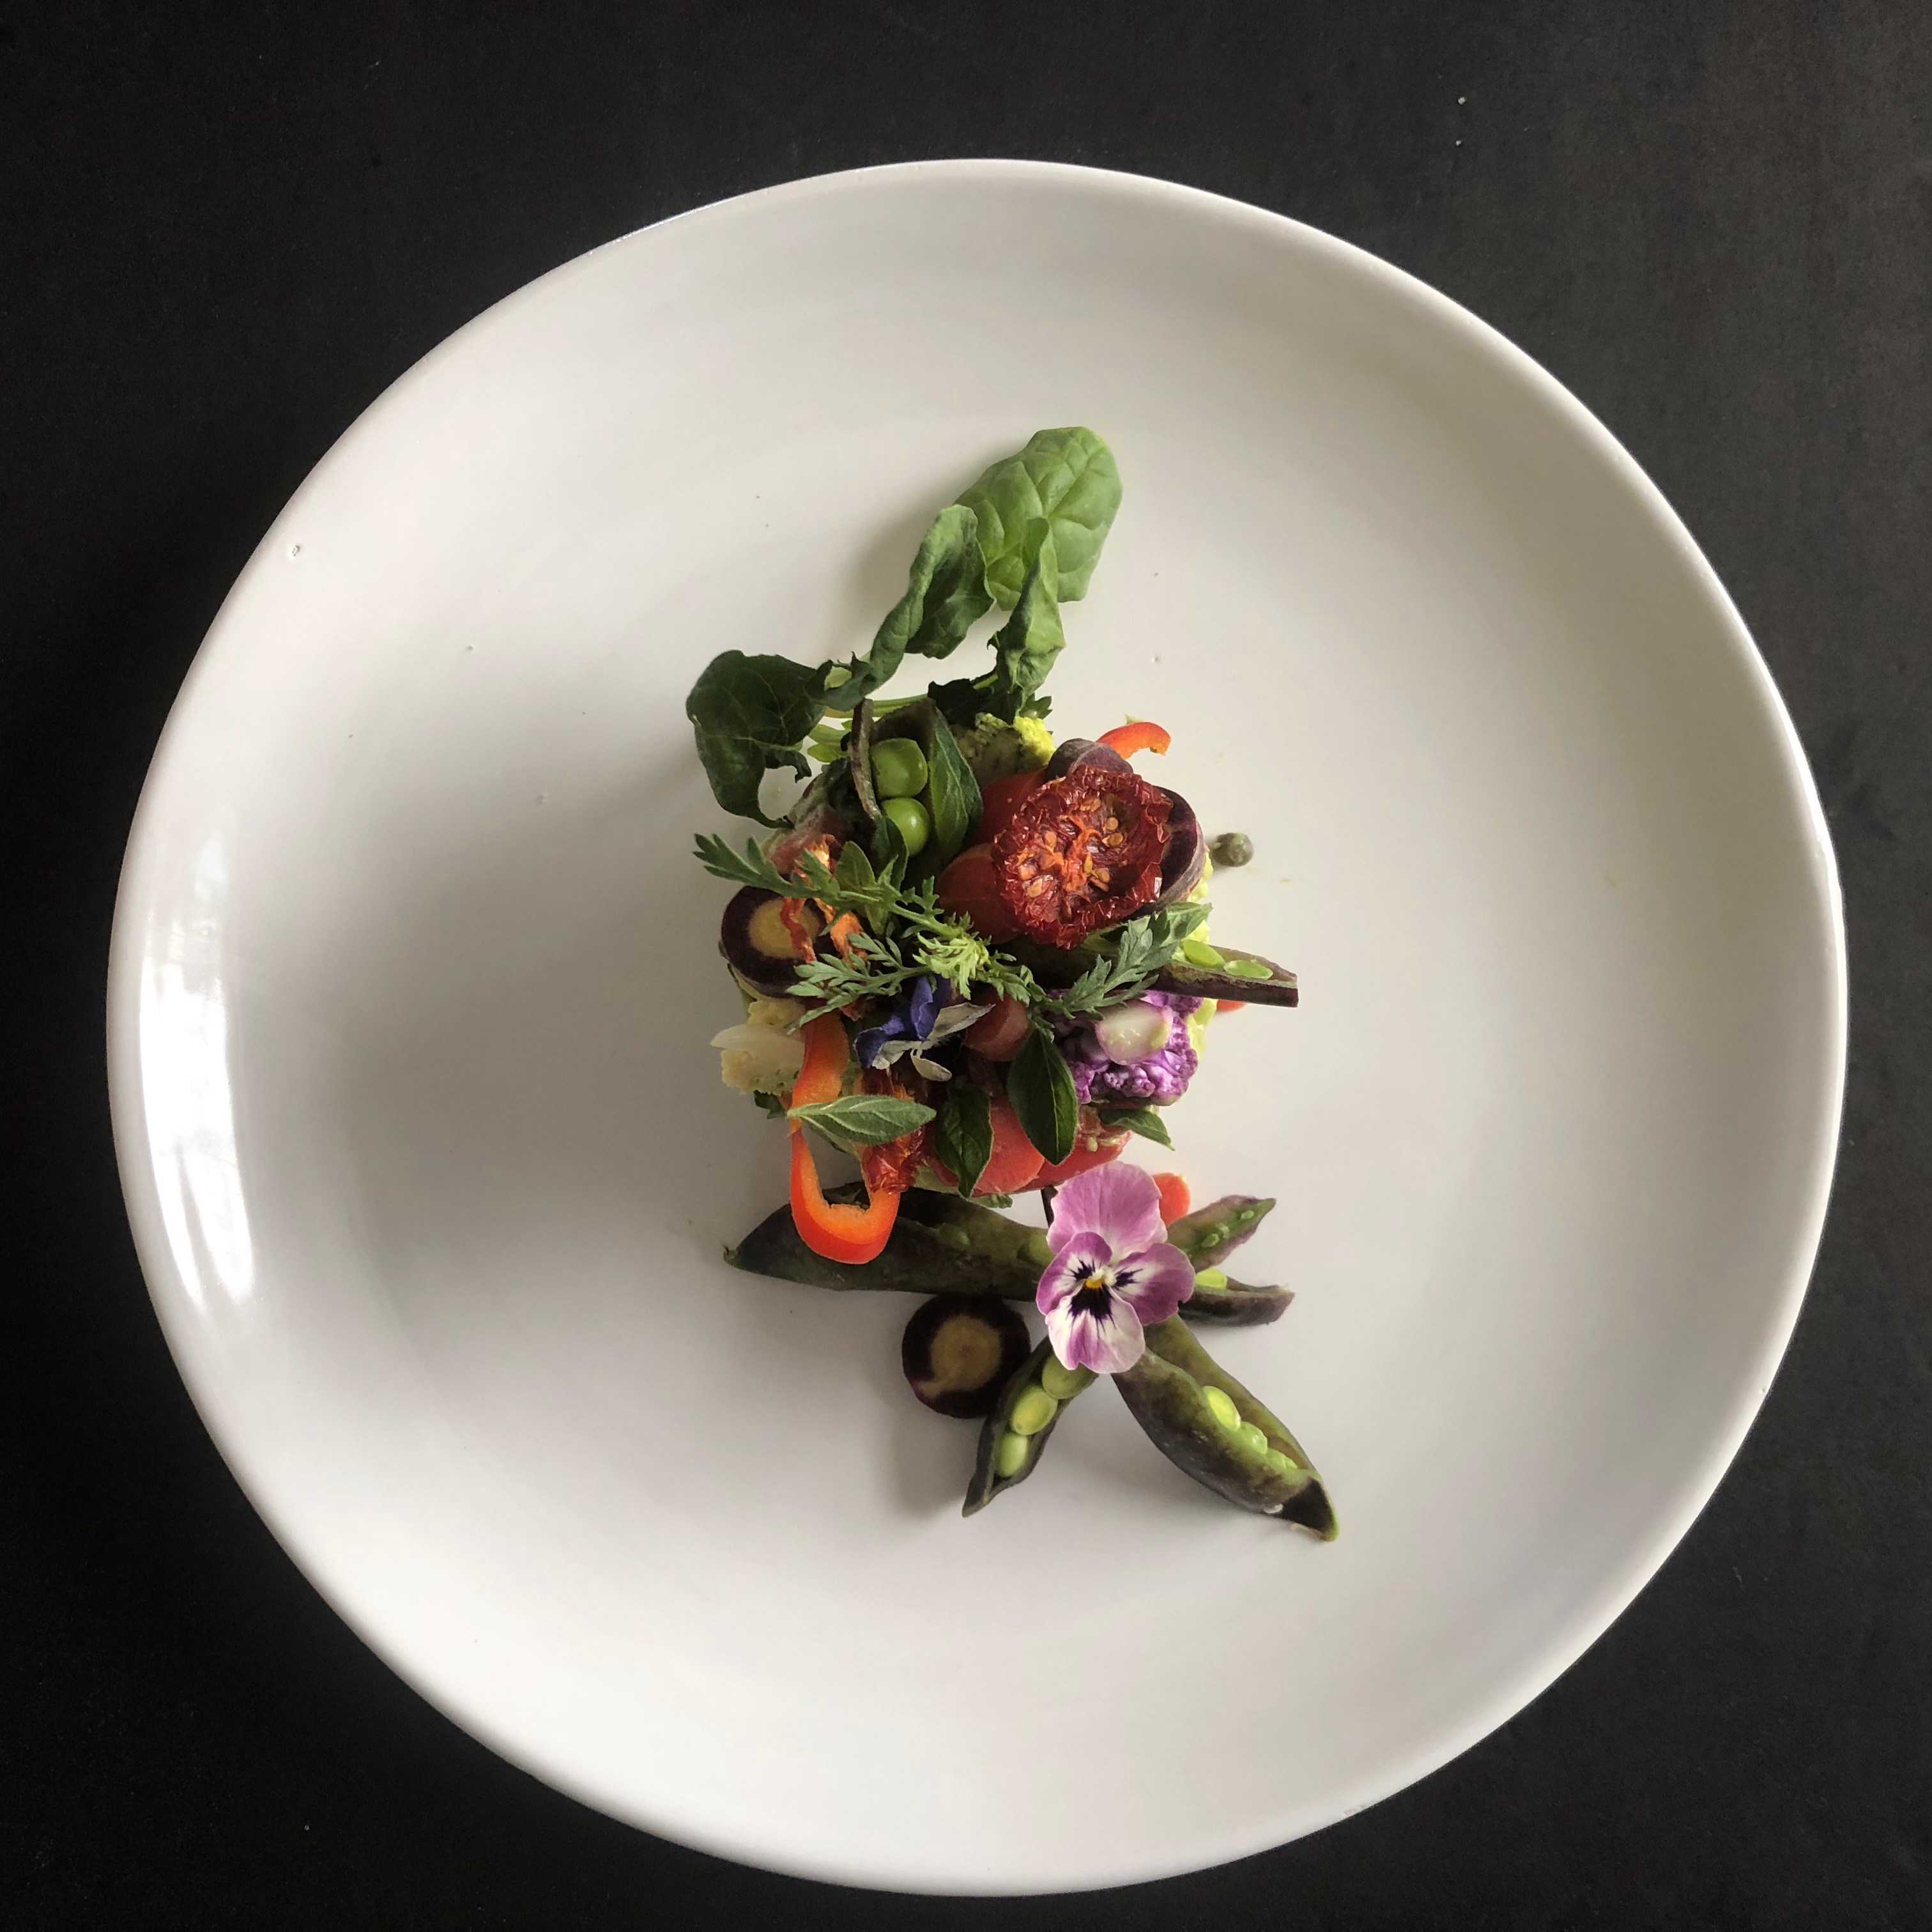
Getting started with our mindful chopping for our fresh Tomato Gazpacho and Avocado Tartare.Beautiful Plant-Based Lunch Creation: Avocado TartareYoga at one of my very favorite spots in the world: Cathedral Rock in Sedona, Arizona.
2020 Authentic Farm-to-Table Plant-Based Cooking Experiences at The Farm with Lead Grower Billy Anthony and award-winning cookbook author, Melanie Albert.
Classes held at The Farm at South Mountain, 6101 S. 32nd Street, Phoenix, Arizona
By Melanie Albert, Founder & CEO Experience Nutrition, Plant-Based Intuitive Cooking Expert, and Award-Winning Cookbook Author
During the summer in Arizona, our local farmers work very hard to grow beautiful produce for us in our 100+ degree weather, so I love to create beautiful dishes with it.
Earlier this week while I was chatting with a friend who reminded me that there are often “behind-the-scenes” steps in creating a beautifully plated dish. So with this Summer dish, I’m sharing with you the full steps from the vision of the dish to the final plate.
I hope you enjoy this “food art” lesson.
Step 1: Stop by the farm and farmers markets to see what’s in season.This was especially important to me the last few weeks, as I was traveling in the Boston area, Cocoa Beach, Florida, and Barbados, so I lost track of what would be growing seasonally in Arizona.
My first stop was The Farm at South Mountain, where Farm Operations Manager, Billy Anthony is growing hundreds of pounds of beautiful heirloom tomatoes.
The Farm at South Mountain: Beautiful Heirloom Tomatoes
My next stop was the Downtown Phoenix Public Market, where I often shop and lead cooking demos. I was happy to see that the farmers were growing some of my summer favorites. Thanks Blue Sky Organic Farms for the collard greens and leeks; and thanks to Maya’s Farm for the rainbow carrots.
Step 2: Pause and enjoy the beautiful produce from our farmers. Begin to visualize the creation of a beautiful dish. With intuitive cooking, once we learn cooking techniques and practice with recipes, we can intuitively create beautiful, tasty meals.
Step 3: Pause again and choose a few different types of produce with different colors and textures.
Step 4: Cut the veggies and fruit in different shapes.
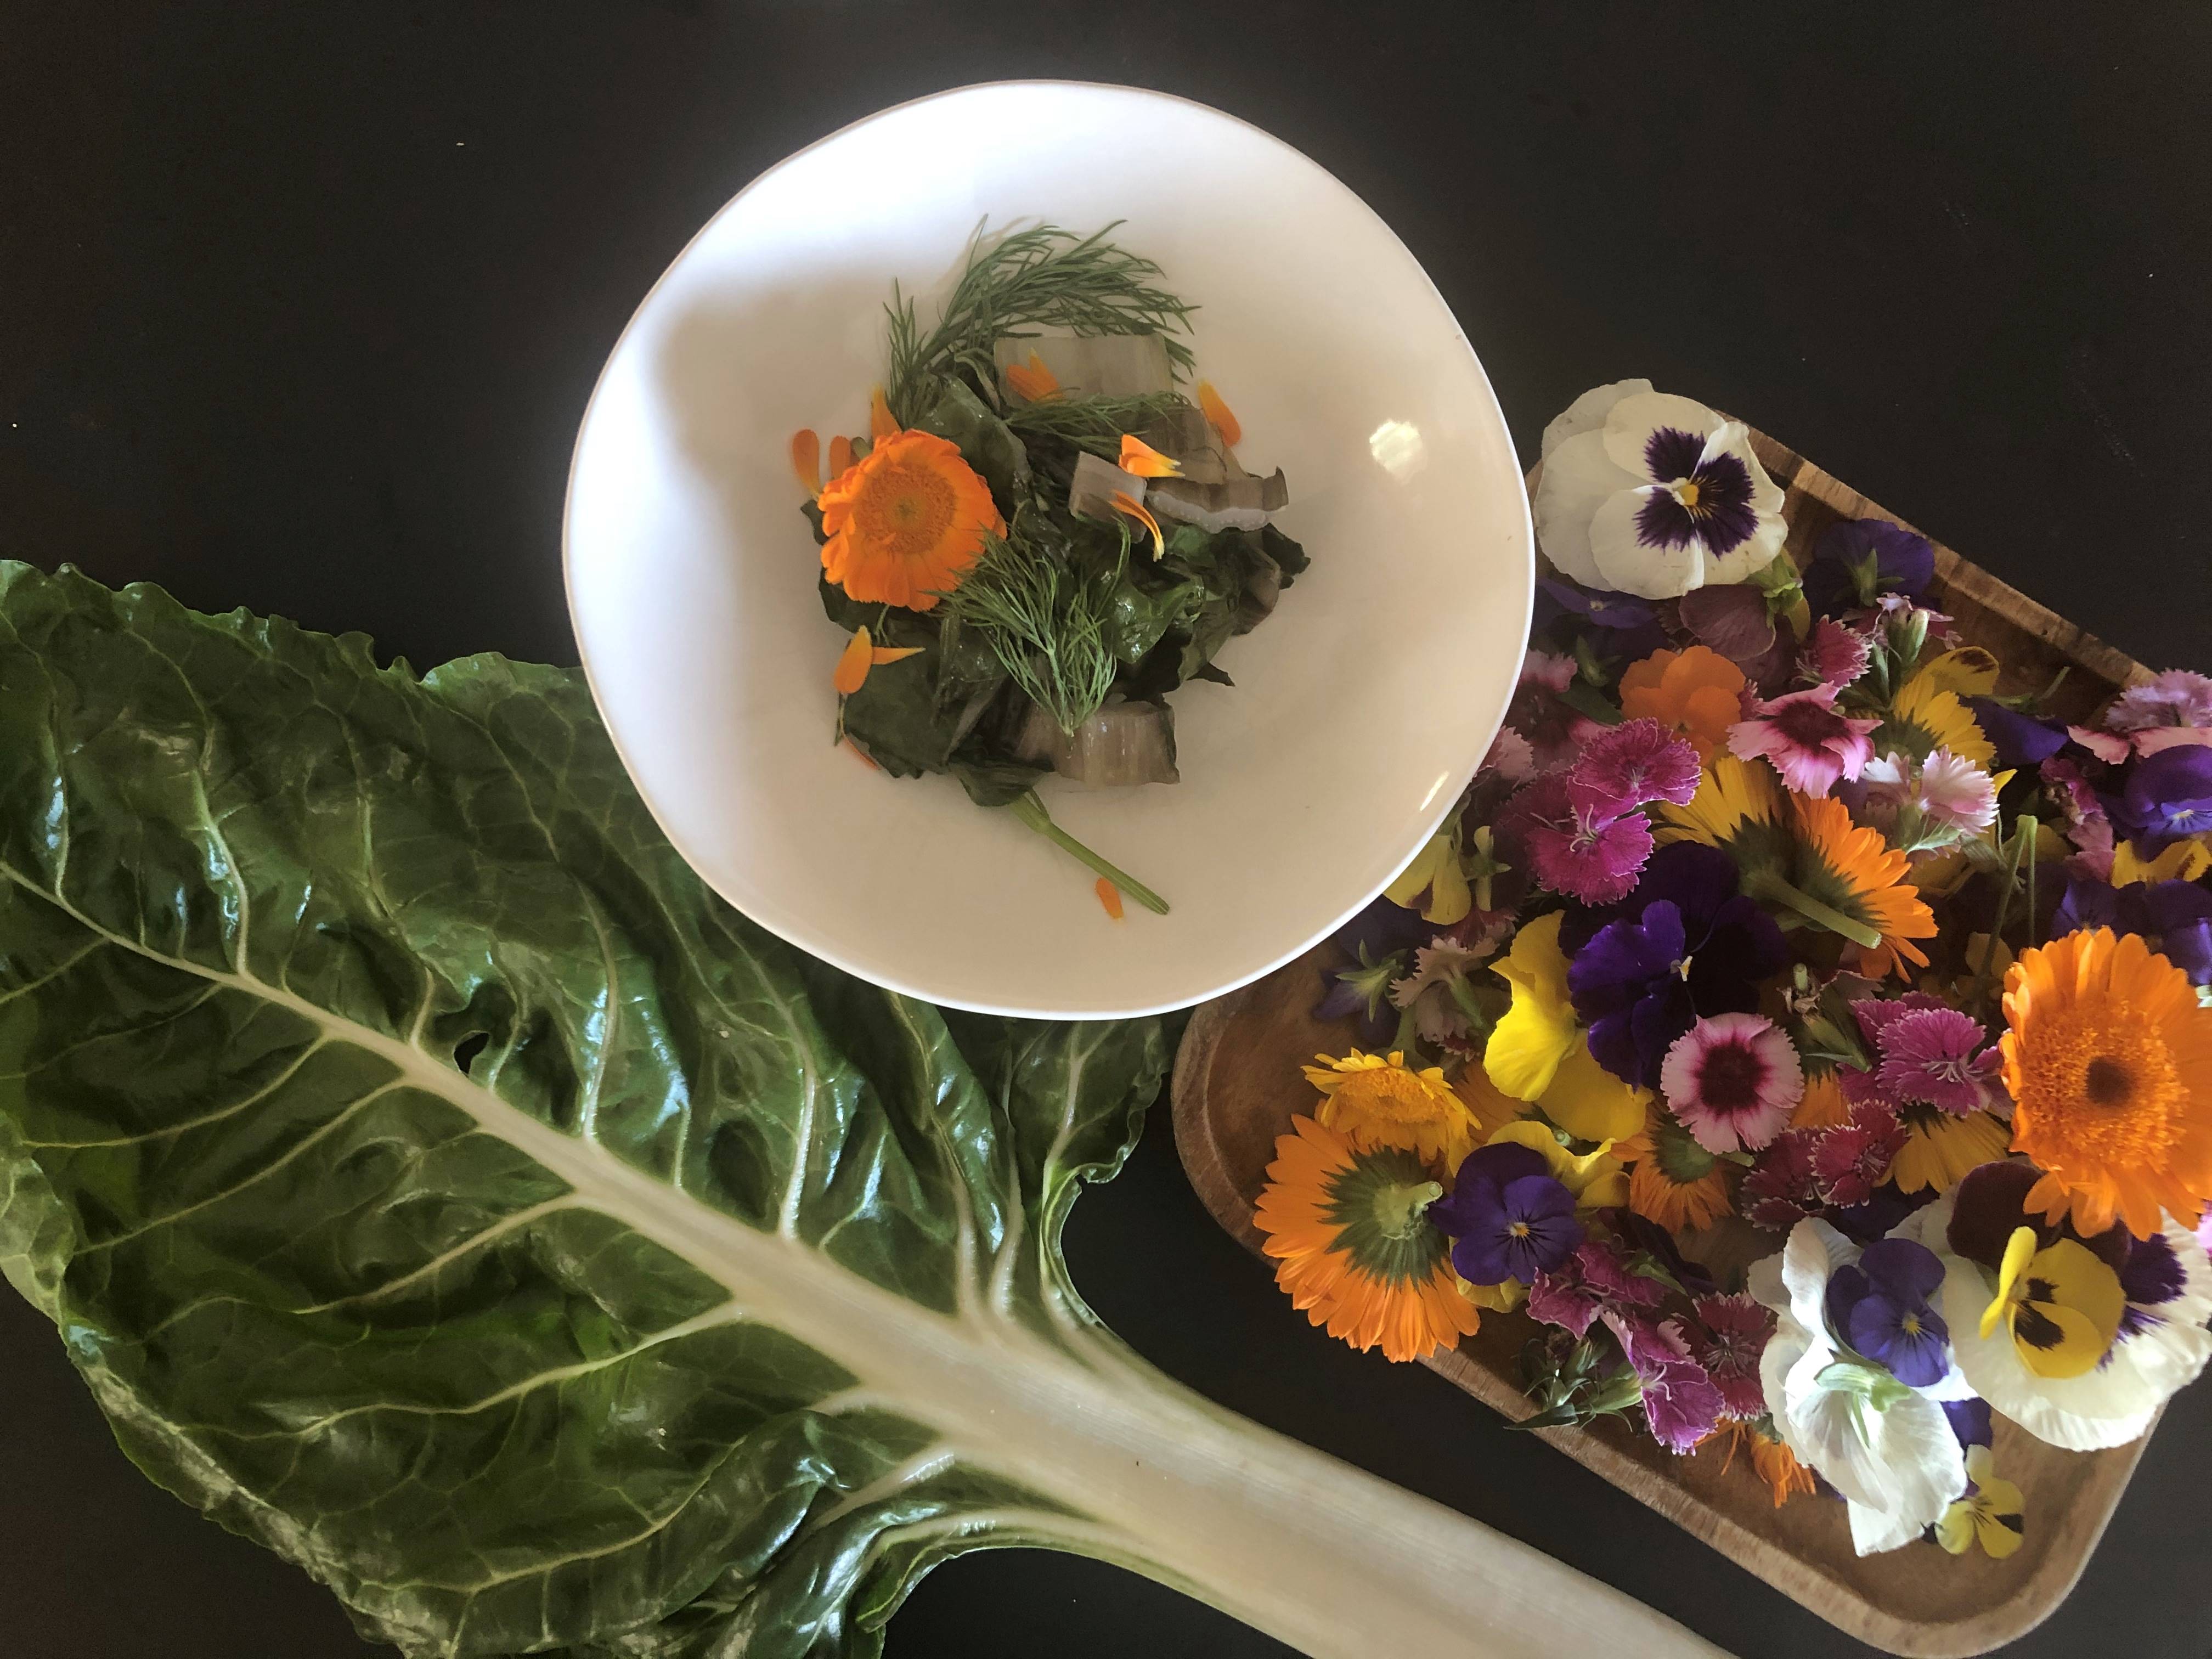
Step 5: Pause, yet again, and intuitively notice if any of the produce “fits” together. Today, for me, it was a simple avocado salsa (or guacamole) with the tomatoes, avocado, colorful carrots, lemon, and sea salt. And, the fresh peaches and butterscotch melon with a squeeze of lemon seemed to go together nicely.
Avocado Salsa
Peaches & Melon
Step 6: Arrange all of the ingredients and components (the Avocado Salsa, Peaches & Melon) in a plating “mise en place.” That is, all ingredients mindfully organized to be ready for plating.
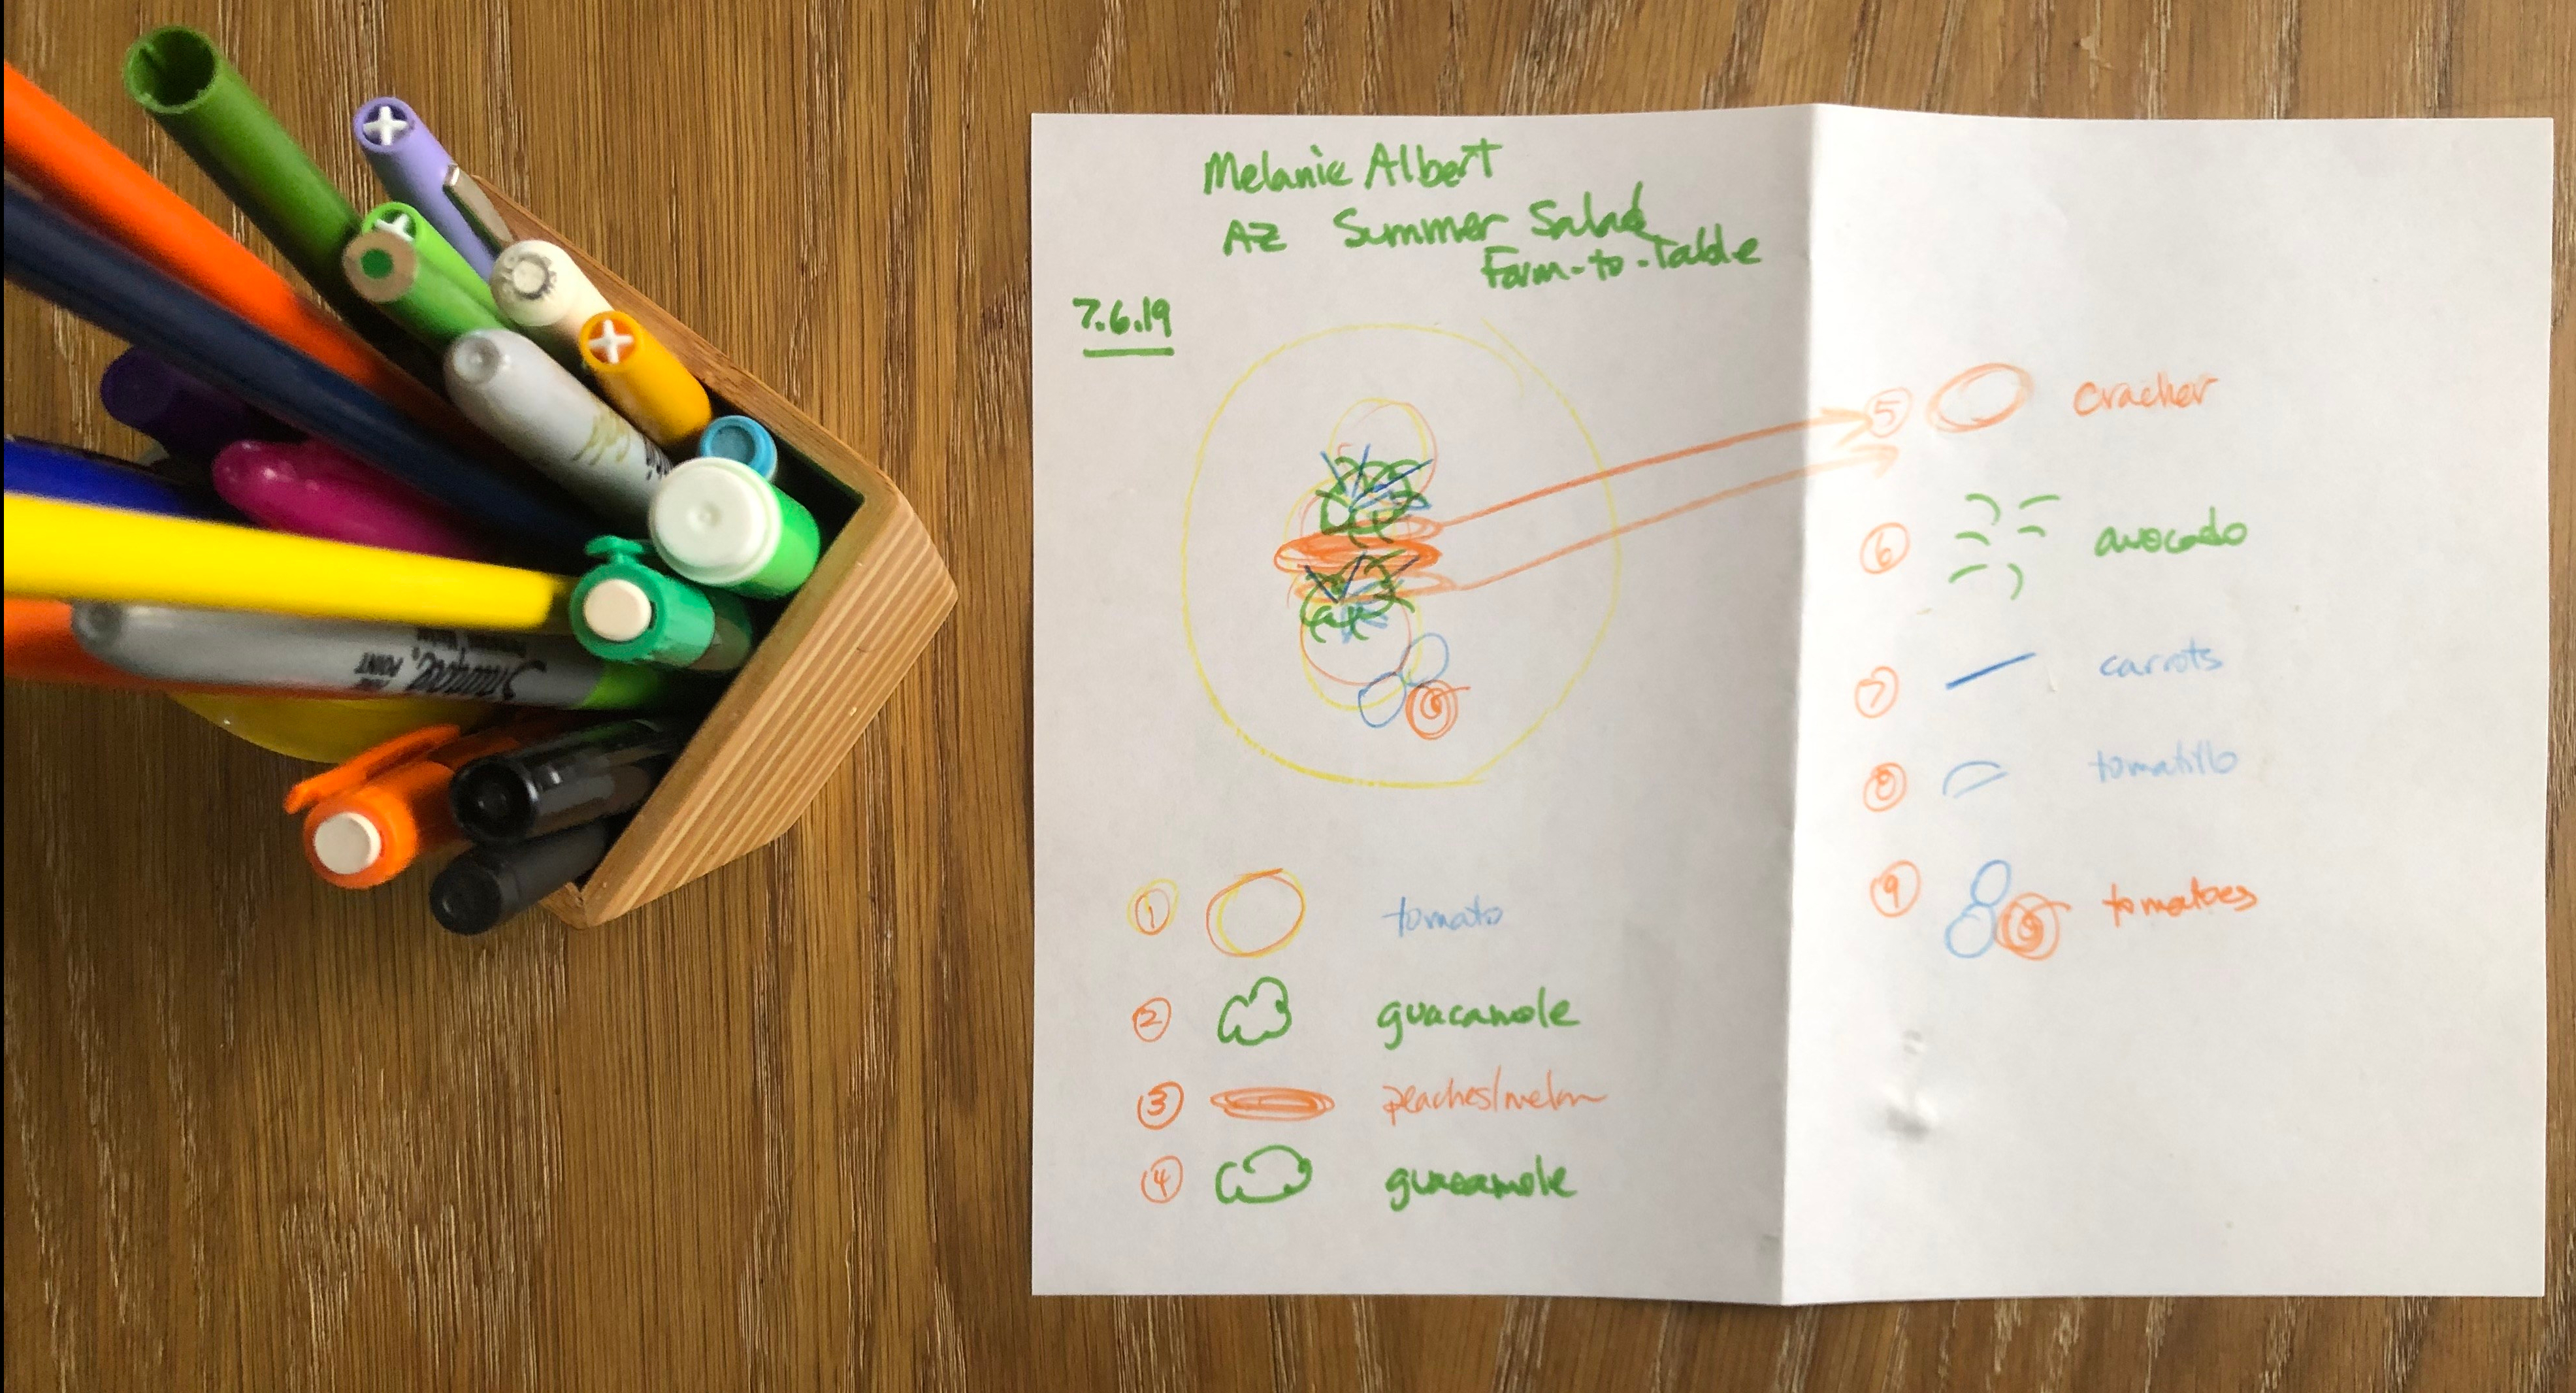
Step 7: Looking at the plating “mise en place” begin to visualize how the plate will look. Then, sketch out the plating of the dish, using colored pencils or markers. In the sketch include where the different foods will go onto the plate and the order to plate them.
I’ve been mindfully plating for a few years now, and this process does take practice. Once we get into our own rhythm of sketching our dishes and plating, it becomes fluid and fun. Key is to practice, practice, practice.
Step 8: Mindfully plate the food, following your plating sketch. Know that this phase is also part of the food art process, so if your plate does not look exactly like your sketch, no worries at all. Enjoy it!
All set to plate.
Step 9: Finally, mindfully enjoy eating your plate.
Of course, first pause and enjoy your “food art”.
Enjoy…
We are only two months away from our Plant-Based Cooking & Self-Care Retreat in Sedona, Arizona September 13-16, 2019.Along with plant-based culinary skills we will also focus on mindfully plating and creating our own style of “food art”.
Please feel free to call (602.615.2486) or e-mail if you’d like to chat about the retreat and take a look at the information about the retreat on ExperienceNutrition.com/sedona-retreats
By Melanie Albert, Founder & CEO Experience Nutrition, Intuitive Cooking Expert, and Award-Winning Cookbook Author
Upon returning to Phoenix after traveling the last few weeks to my niece, Mallory’s wedding in Massachusetts, visiting with my parents in Cocoa Beach, and scouting villas for retreats in Barbados, I’m getting back into my local farm-to-table shopping and cooking rhythm.
This week I visited my farmer friend, Billy Anthony Lead Grower at the Soil & Seed Garden at Farm at South Mountain, in Phoenix, to catch up and see what was growing in our 100 degree weather. I was especially happy to see hundreds or thousands of beautiful tomatoes, zucchini, and edible flowers.
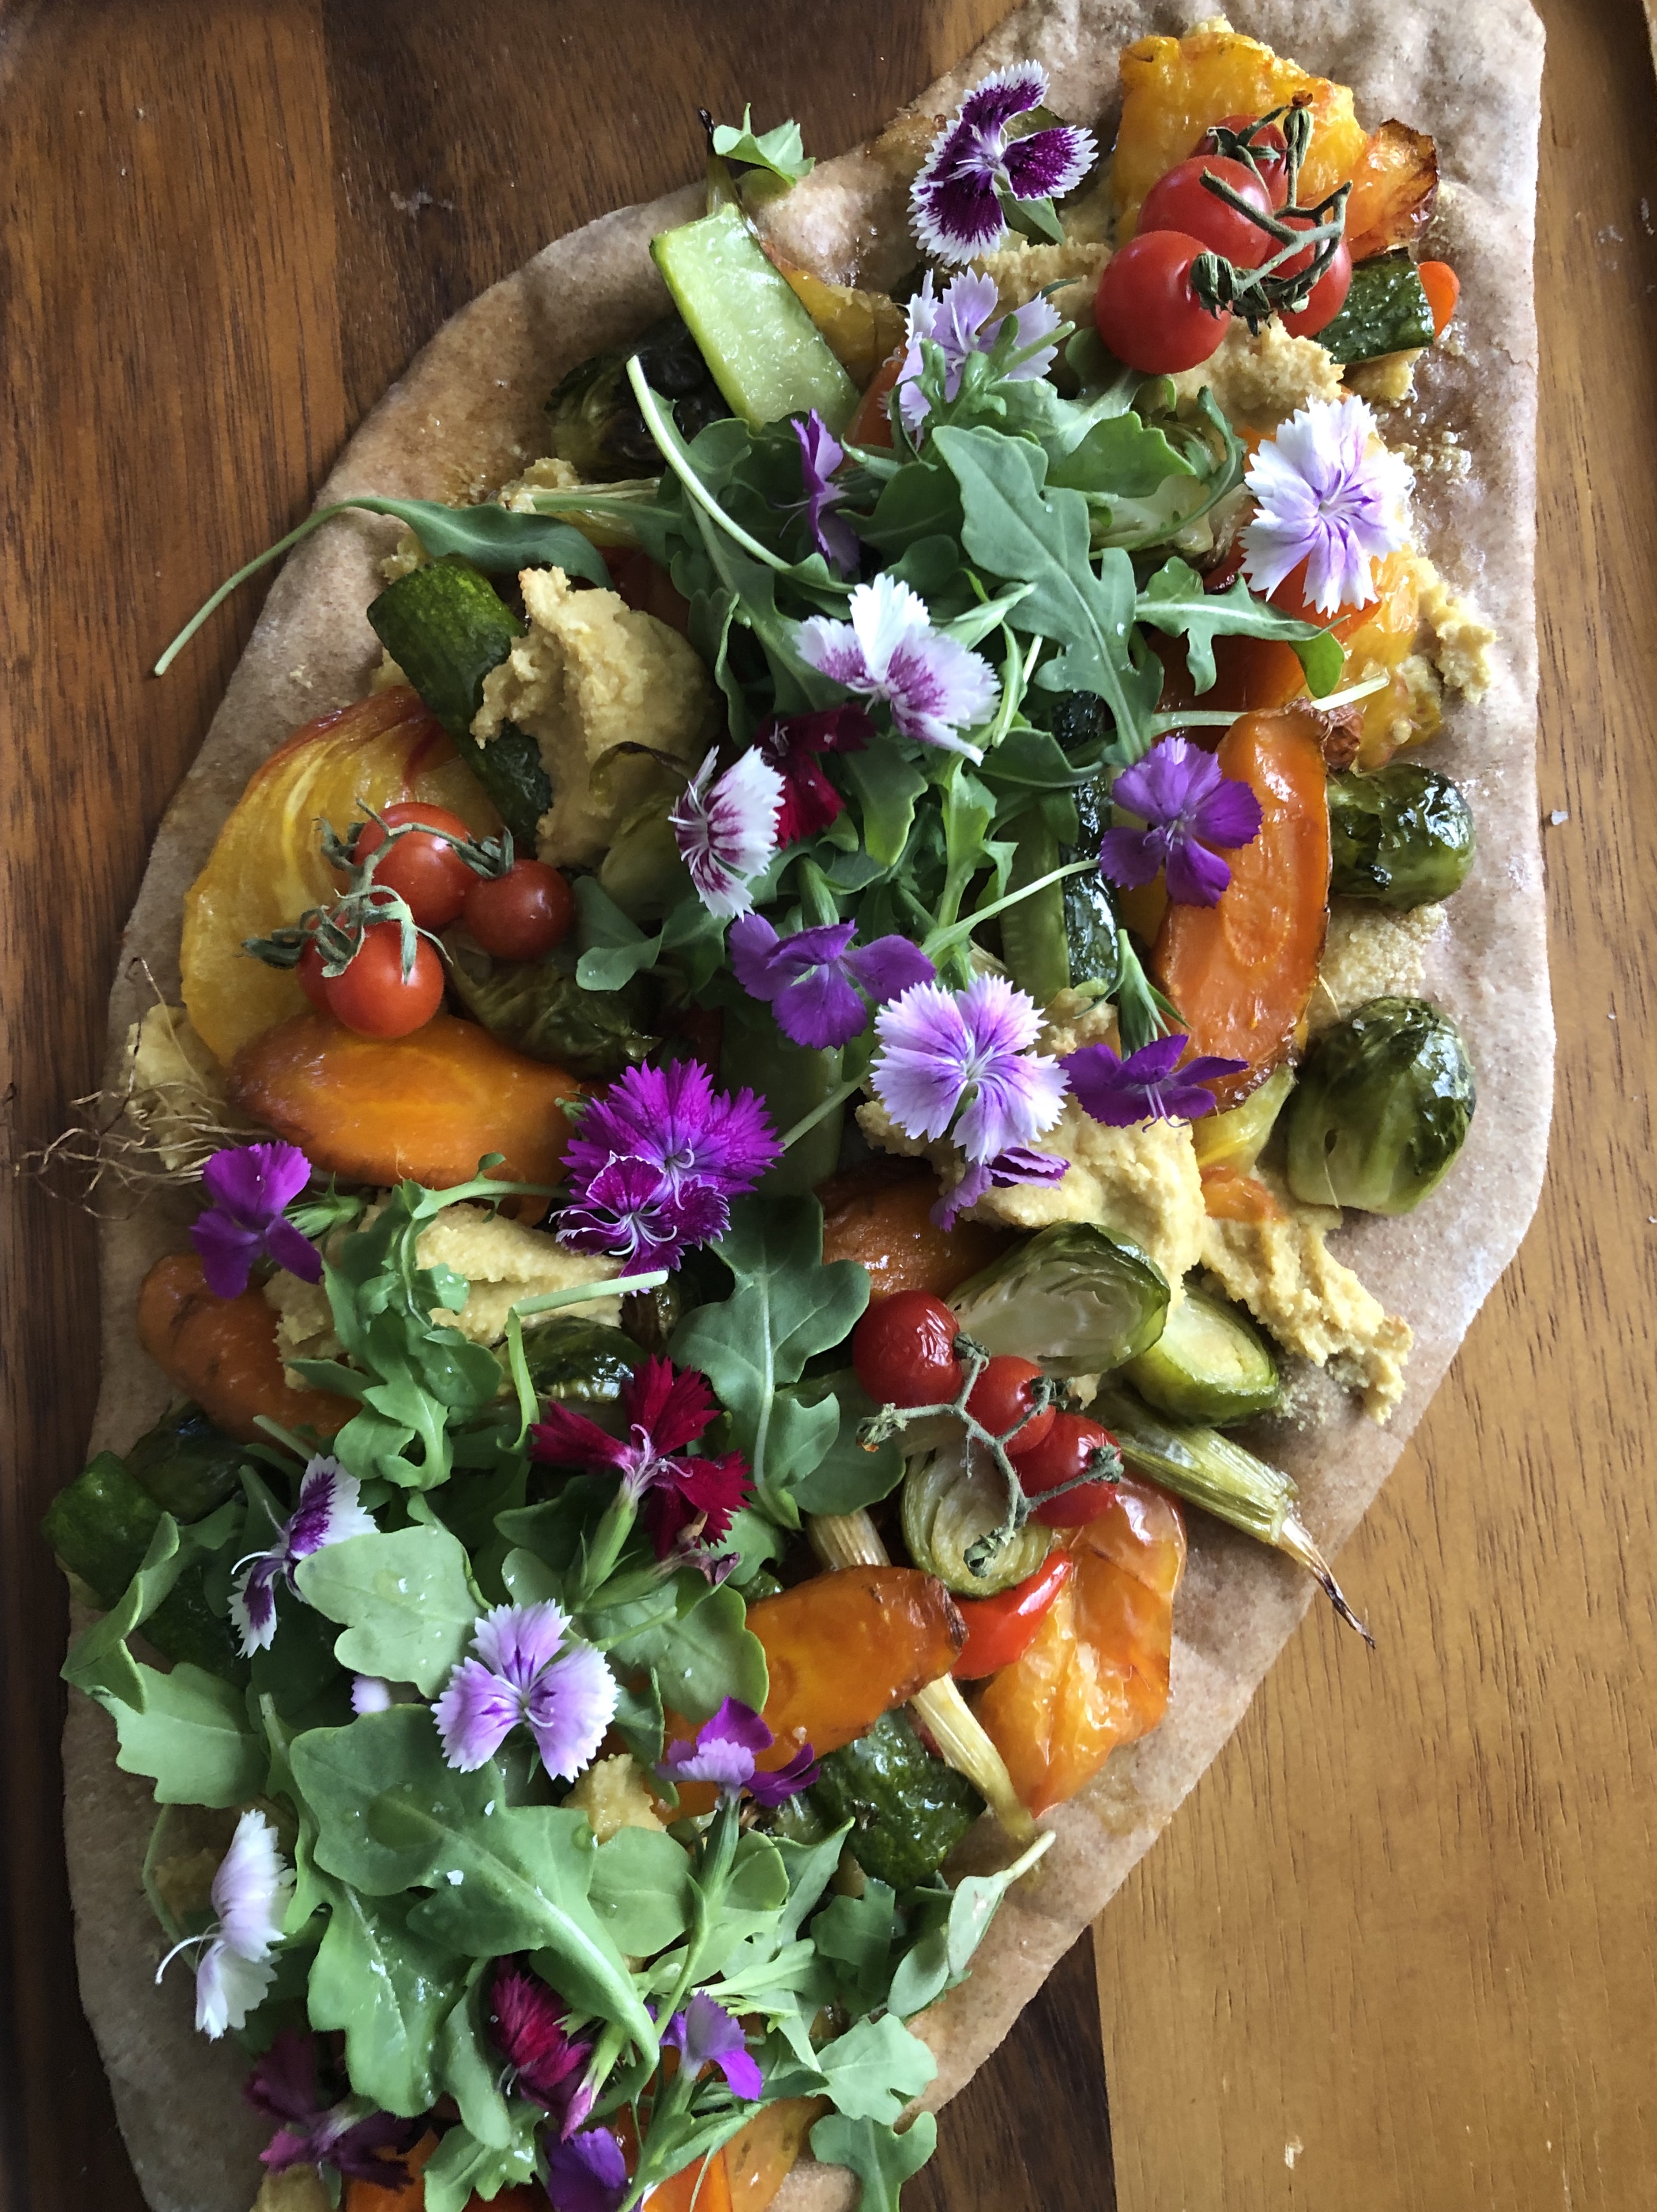
Inspired by the tomatoes, I intuitively created a Summer Flatbread with other veggies purchased from local Arizona farmers at the Downtown Phoenix Public Market. I purchased beautiful baby arugula and carrots from Blue Sky Organic Farms in Litchfield Park and Matt’s tomatoes from the Community Exchange.
Let’s take a look at The Farm at South Mountain, at the beginning of our hot Arizona Summer.
The Summer Flatbread highlights our local Arizona tomatoes, zucchini, arugula, and carrots, and also features one of my favorite roasted veggies, Brussels sprouts, plus red peppers for flavor and color. The yeast-free flatbread is a quick recipe to prepare when your time is limited as we do not need to wait hours for the dough to rise. The cashew cream is a very simple raw nut cream that works well as a cheesy taste in the flatbread. Finally, the beautiful, colorful edible flowers bring life to the dish.
View food differently with mindful cooking and eating.
Enjoy urban farm-to-table cooking experience.
Experience self-care with hiking and yoga.
Take home retreat experiences to be healthier & make positive long-term lifestyle changes.
During our Sedona Plant-Based Cooking Fall 2019 Retreat, you’ll experience several days of hands-on, simple plant-based cooking with organic food, mindfulness in the kitchen and eating. We’ll enjoy a farm-to-table cooking experience at a local urban farm. You’ll experience self-care with hiking and yoga in the beauty of Sedona.
In the memorable life-changing retreat, our intention is for you to enjoy the cooking and self-care experiences during the retreat and then most importantly take home the experiences and plant-based cooking learning from the retreat to make positive lifestyle changes in your lives.
By Melanie Albert, Founder & CEO Experience Nutrition, Intuitive Cooking Expert, and Award-Winning Cookbook Author
After two full weeks of traveling to Boston for my niece Mallory’s beautiful, loving wedding; to my parents’ home of 30 years in Cocoa Beach; to a stop in Barbados (while on the East Coast, of course, it makes sense to visit Barbados to explore the island and scout villas for plant-based culinary retreats.
For my close friends, an Albert family photo at Mallory’s wedding. xoxo
The Albert Family. Mallory and Phil’s Wedding. June 2, 2019.
Self-care in Cocoa Beach…breathing in the beauty of the Atlantic Ocean.
Self-Care in Cocoa Beach.
Barbados. So beautiful, I have to share right away, one of my favorite spots in the paradise of Barbados. The iconic Sandy Lane Beach.
Enjoying the serenity of Sandy Lane Beach in Barbados with my Tree Pose.
Back Home in Arizona
As soon as I was back in Phoenix, I shopped at our downtown Phoenix Public Market to purchase kale for a cooking event with the Maricopa County Summer Reading Program and bought a few seasonal goodies from our local farmers.
Saturday Stop: Phoenix Public Market
Honestly, I was not planning on cooking that morning before the Kale Salad event, but I could not resist, so I’m happy to share with you my first Arizona Summer Farm-to-Table Salad after returning to our desert.
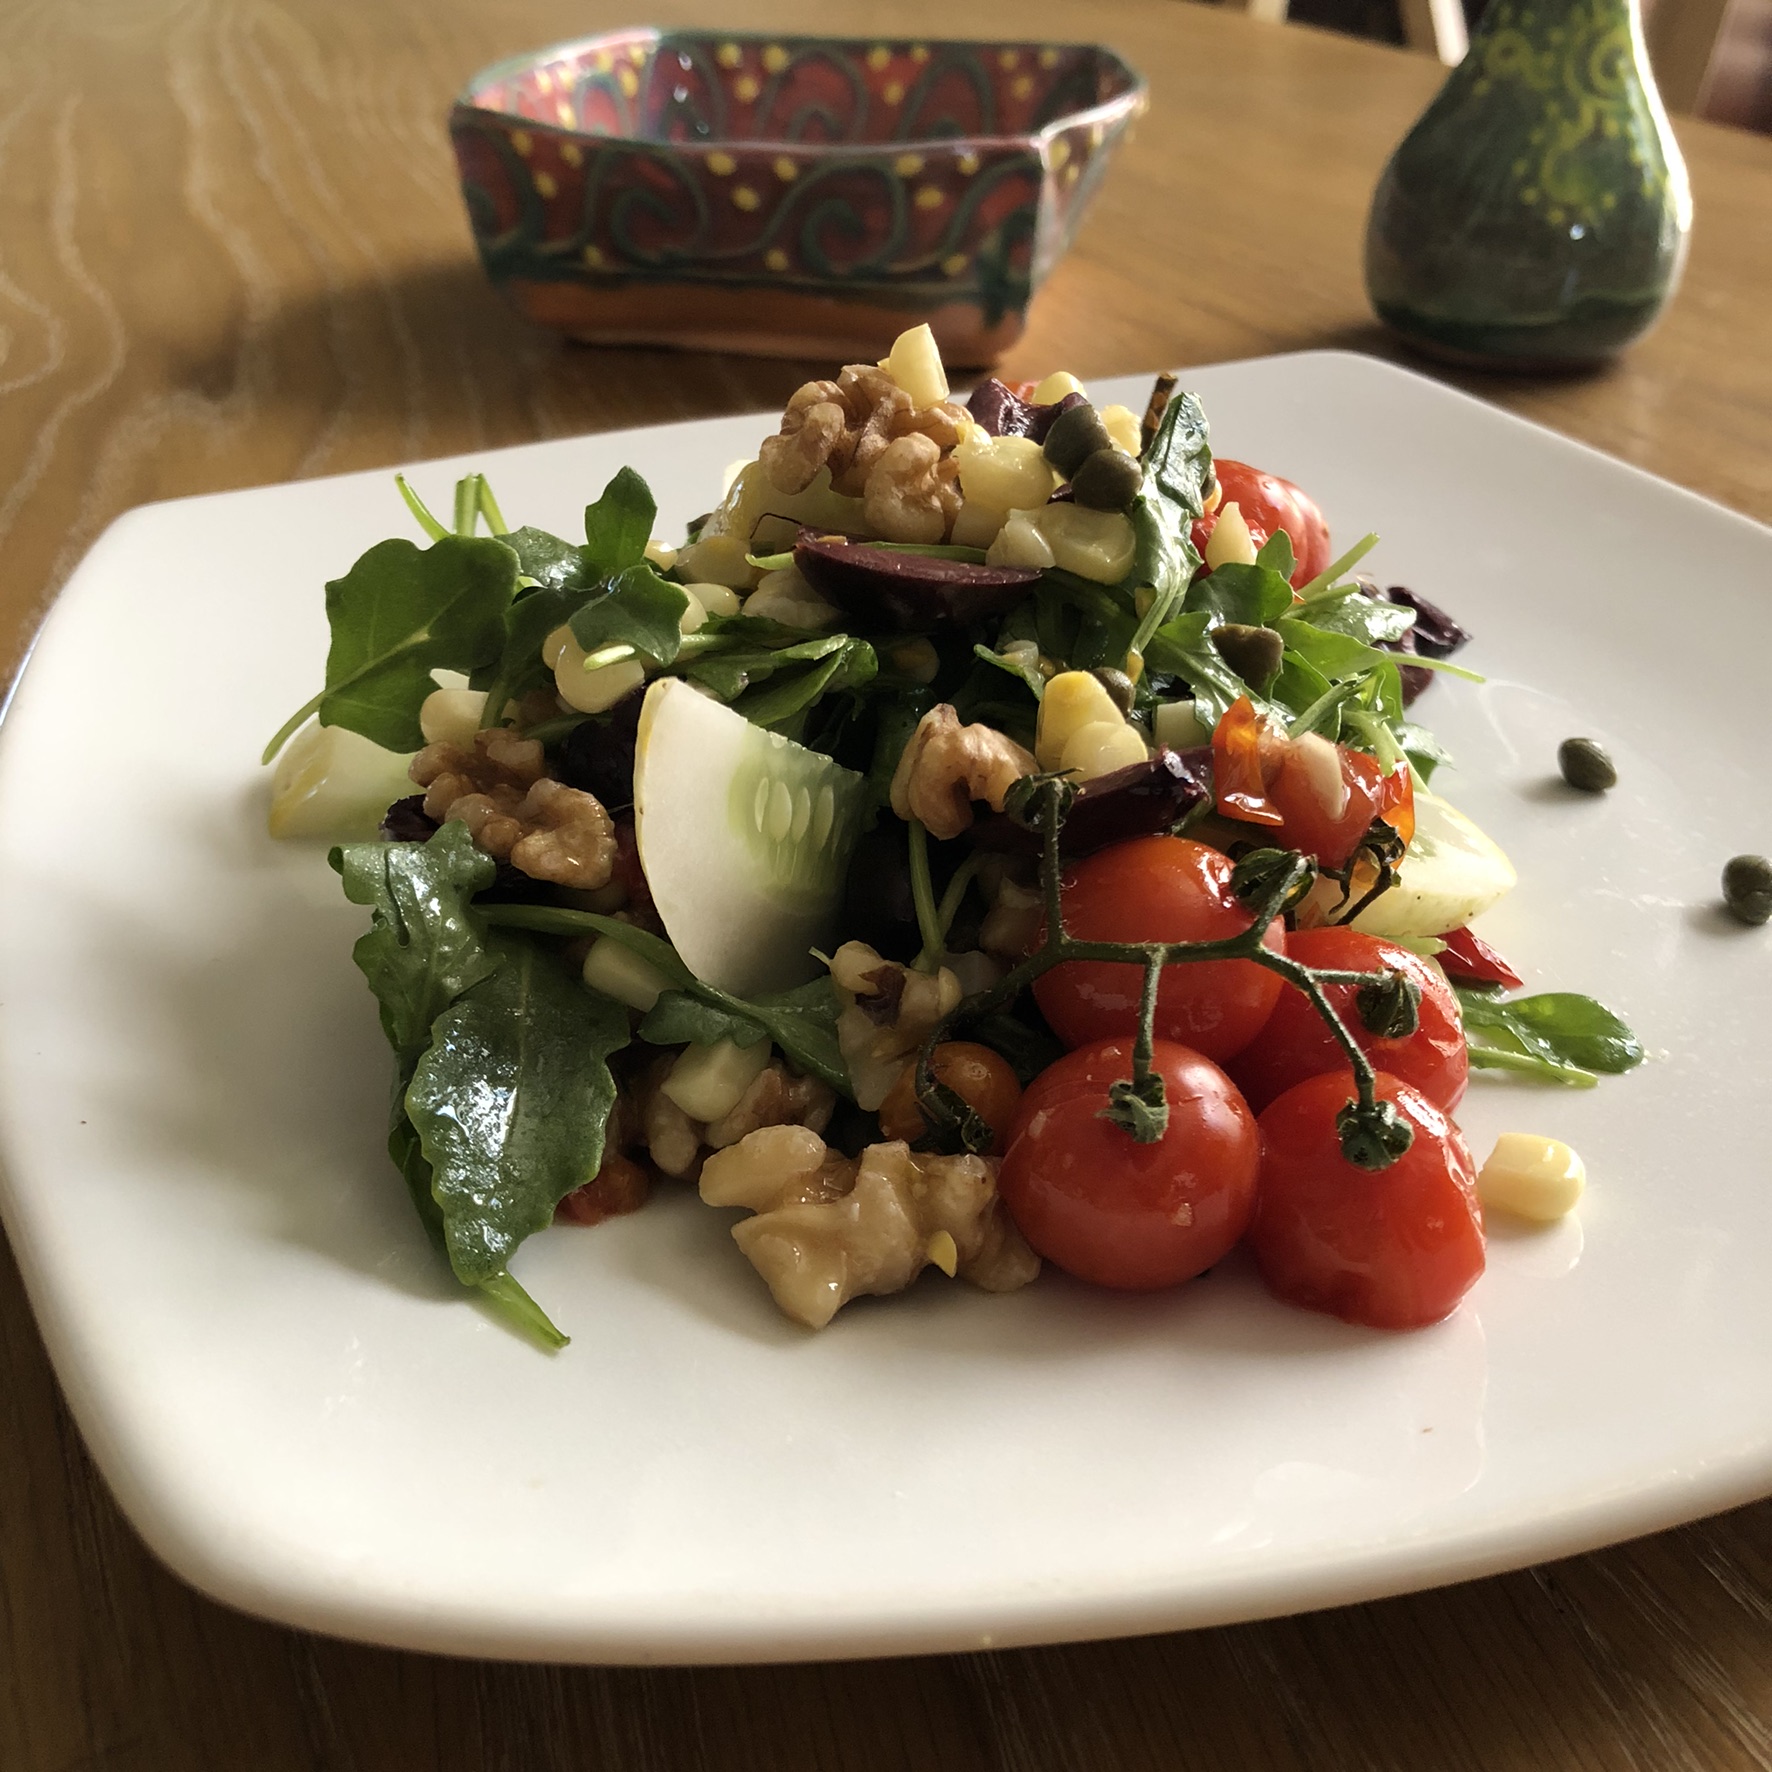
Arizona Corn. Tomato. Arugula Summer Salad.
This salad was inspired by three of my summer favorites. Fresh corn-on-the-cob grown by long-time Farmer Frank of Crooked Sky Farms in Phoenix; Matt’s tomatoes from the Community Exchange; and baby arugula grown by Blue Sky Organic Farms in Litchfield Park. Plus, I picked up flavorful Hatun Oregano Cold Pressed Extra Virgin Olive Oil.
Fun shopping for Hatun Olive Oil at the Phoenix Public Market
Simple Ingredients
½ ear corn-on-the cob, kernels cut off the cob
1 cup tomatoes
1 cup arugula
1 lemon cucumber, sliced
1 lime, juiced
2 tbsp olive oil
Pinch sea salt
¼ cup walnuts
¼ cup Kalamata olives, sliced
1 tbsp capers
Arizona Summer Goodies. Thanks farmers!
Simple Steps
Pre-heat oven to broil.
Slice corn off the cob.
Slice the corn off the cob.
Place corn and tomatoes on a flat sheet pan.
Drizzle with olive oil and sea salt.
Drizzle olive oil onto corn and tomatoes.
Broil for 5 minutes, stirring occasionally.
Gather Mise en Place (all ingredients in place) to prepare the salad.
Be mindful. Mise en place to create the Arizona Summer Salad.
Place all ingredients into a small bowl.
Place all ingredients into bowl. Then gently toss.
Gently toss with hands.
Plate mindfully.
Enjoy.
Pause and enjoy your mindful plating.
Pause. Enjoy your mindful plating.
We eat with our eyes first. Enjoy your Summer Salad.
We eat with our eyes first. Enjoy your summer salad.
Plant-Based Culinary & Self-Care in the Magic of Sedona, September 13-16, 2019.
I’m excited to participate in the Local First Arizona Independents Week, June 29 – July 7, 2019. During that time, save 20% (up to $500) on the retreat. Contact Melanie Albert if you are interested: Mel@MelanieAlbert.com or 602.615.2486.
To stay in touch, visit us on Facebook and Instagram: @nutritionauthor
By Melanie Albert, Founder & CEO Experience Nutrition, Intuitive Cooking Expert, and Award-Winning Cookbook Author
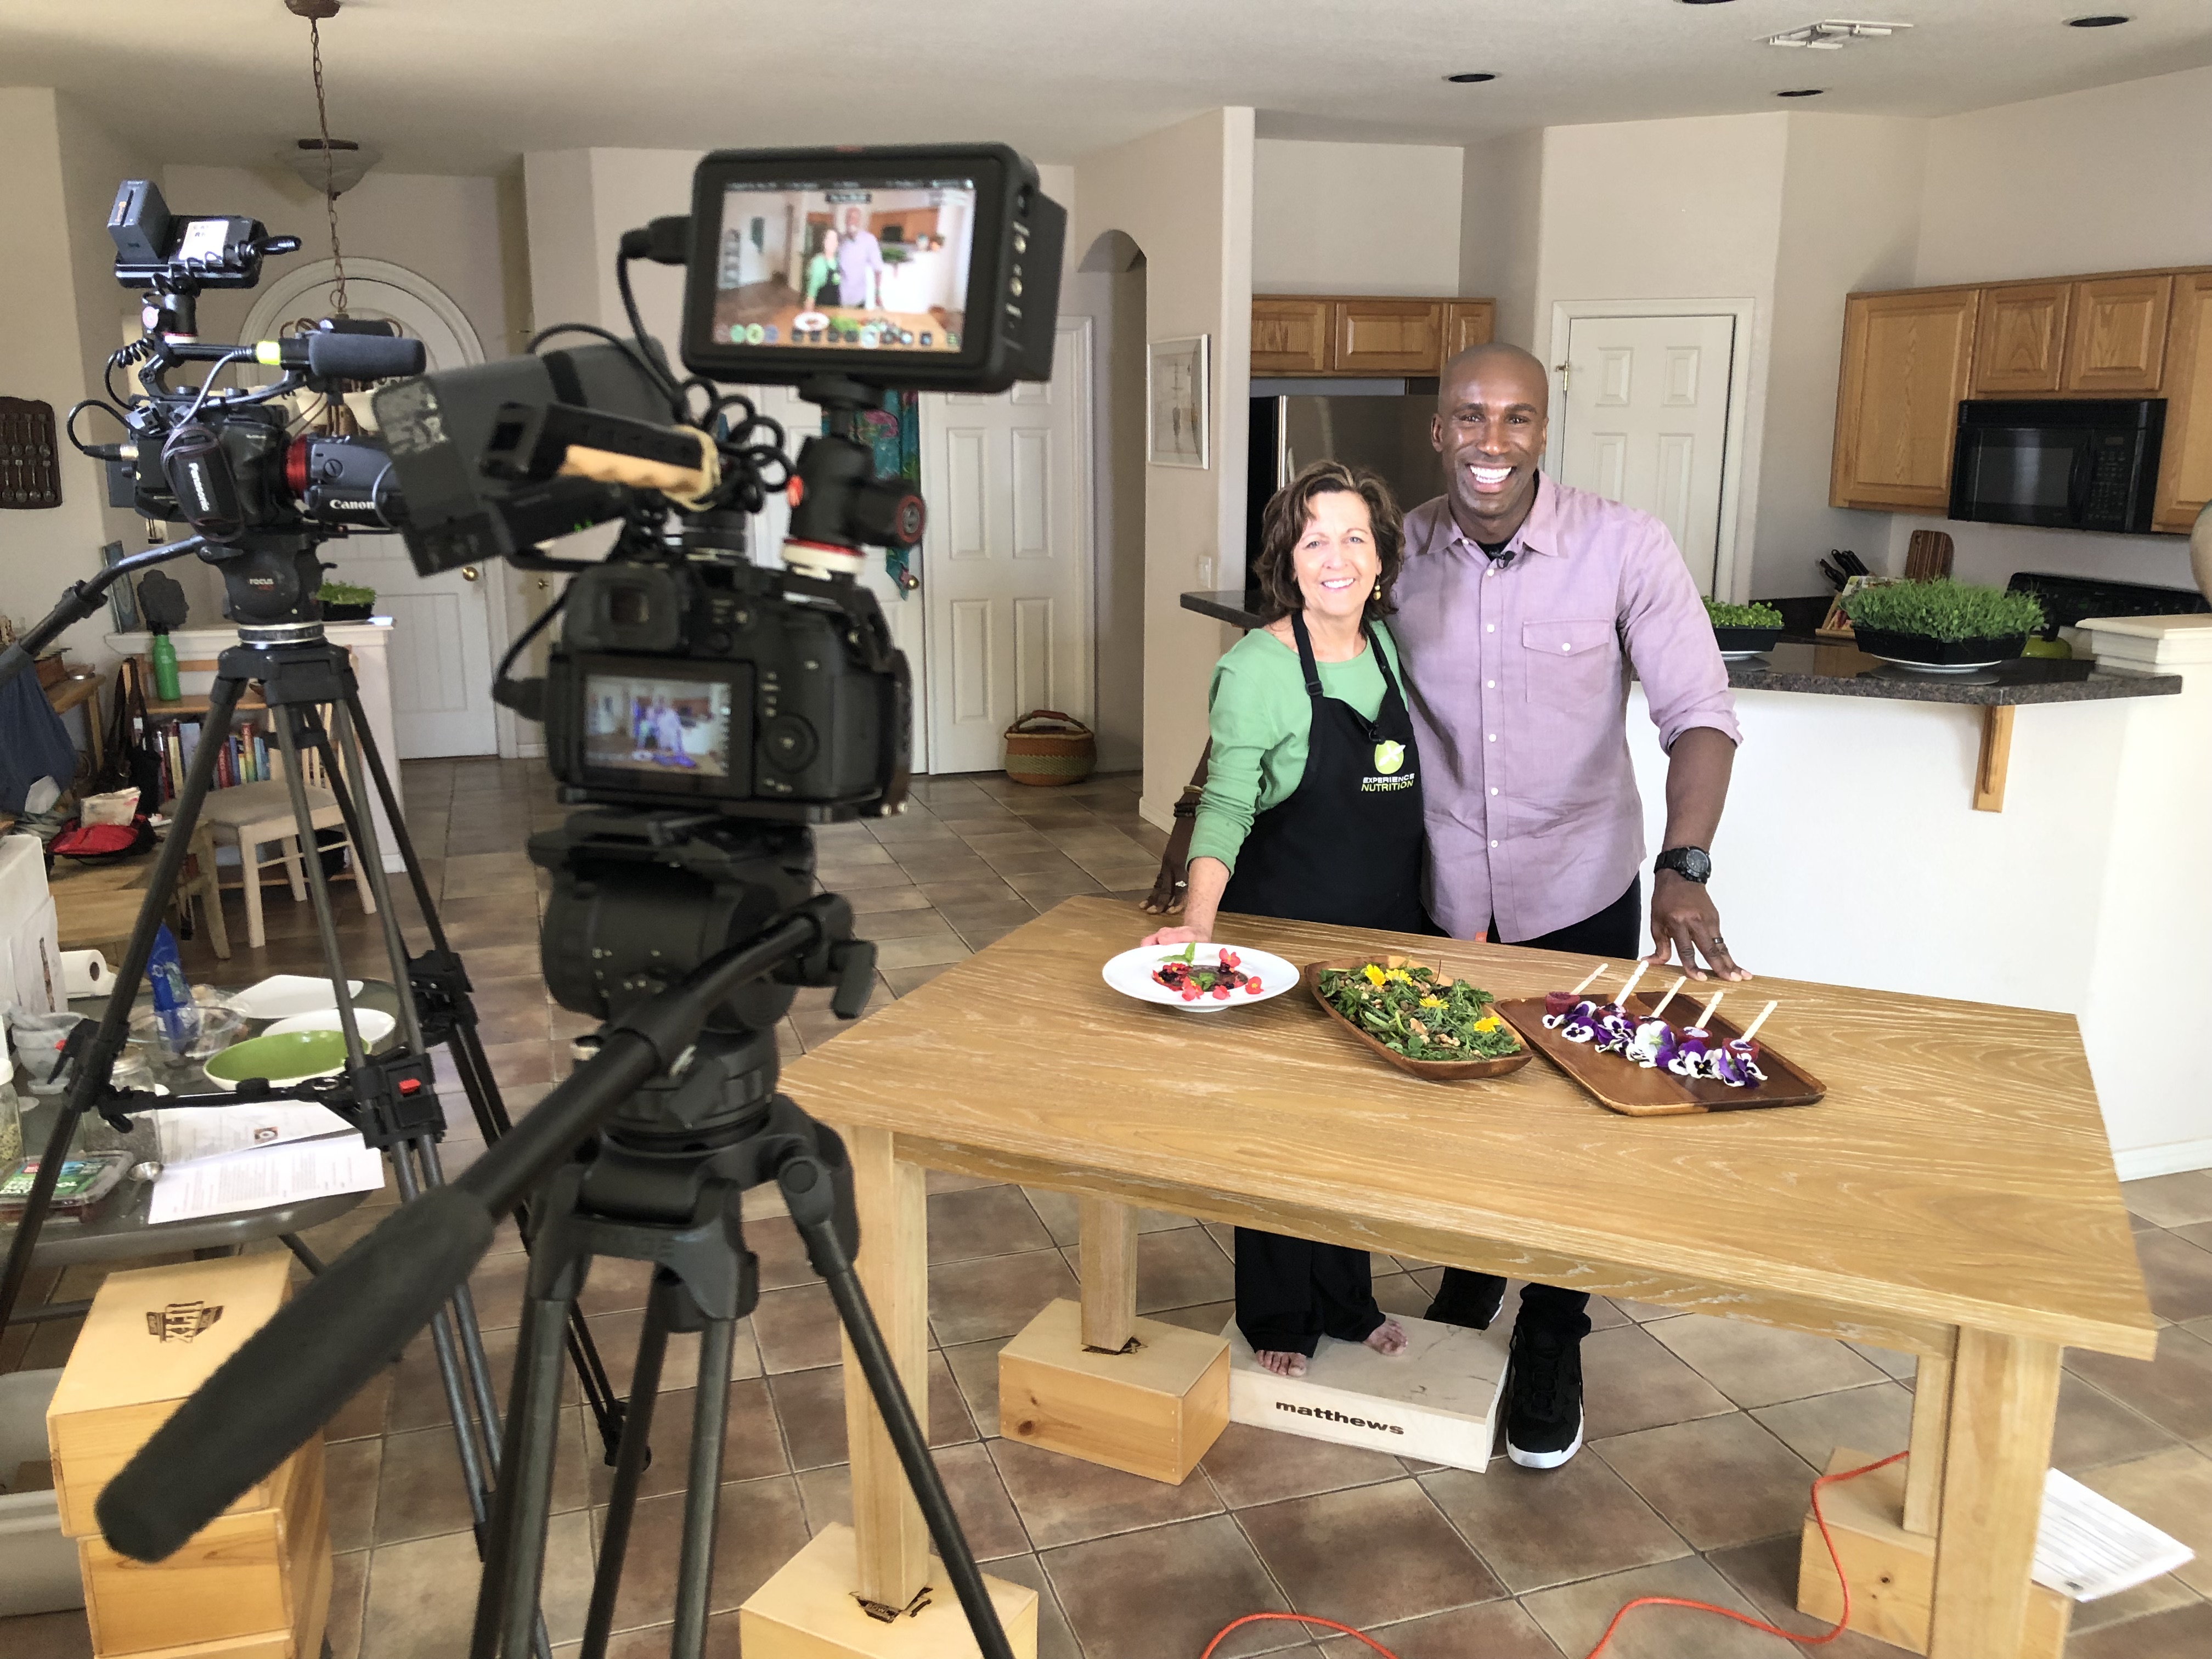
I am so honored to share my passions for healthy, beautiful plant-based food on The List TV Show to the show’s audience in 41 markets across the USA. This segment was a lot of fun to create and shoot with Producer Jacqui Denker and Co-host Segun Oduolowu.
Producer Jacqui Denker asked me if I knew how to work with “Chokeberries.” Well, in all honesty, I had not heard of Chokeberries, but did a quick “Google Search” as we all do, and found that they were also called Aronia. Chokeberries sounded as though they would be similar to the superfood berries, Acai or Macai. I thought it would be fun to create with Chokeberries which I had never even tasted and agreed to work on the Chokeberry tv segment on Chokeberries with The List.
Northwest Wild Foods: Our Chokeberry Source
Little did I know after spending half a day driving around Phoenix that Chokeberries were not readily available locally here in Arizona. I was not able to find frozen, dried, or powdered chokeberries anywhere.
With a little more research, I was thrilled to find Chokeberries at Northwest Wild Foods an incredible family-owned company located between the temperate Puget Sound and the rugged Cascade Mountains of the Pacific Northwest in Burlington, Washington. Northwest Wild Foods grows and harvests rare and natural berries of their region.
Within two days my supply of frozen, dried and powdered Chokeberries and other beautiful Wild and Organic berries arrived at my home. It was time to begin recipe testing for The List TV show segment. Honestly, I had so much fun creating these recipes to receive the antioxidant benefits of the chokeberries while enjoying a tasty Smoothie Bowl, Salad, and Dessert.
Get to Know Chokeberries
Chokeberries have been extremely popular in Europe for over 50 years, and grow extremely well in the northern US climate. Chokeberries are similar in size to blueberries with a deeper darker blackish blue color and are rich in anthocyanins, which have high anti-inflammatory effects in the body.
The Farm at South Mountain. Soil & Seed Garden
Meanwhile, to bring our local Arizona farmers into the dishes, I reached out to my friend, passionate Lead Gardener Billy Anthony at the Soil & Seed Garden at The Farm at South Mountain, a beautiful urban farm where I hold cooking events and located less than a mile from my home. We discussed what was growing and brainstormed the local seasonal greens we could include in the salad along with edible flowers and herbs for garnish.
Some of my favorite greens were growing, including Glacier Lettuce (Ice Plant), Minutina, Spinach, and my favorite floral Shungiku (chrysanthemum). Plus, fresh herbs oregano, mint, and basil were in season. And, this time of year, in Phoenix, Billy is growing a wide range of stunning, tasty edible flowers that offer beauty and taste to dishes. I was especially excited about Pansies, Chrysanthemum, Violas, and red Begonias.
Morning of The List TV Shoot: Chokeberry Recipe Prep
The morning of The List TV Shot, I prepared all three recipes before the crew arrived. For my own pleasure I enjoyed the Chokeberry Superberry Smoothie Bowl. Plus, I made another batch of the Chokeberry Lemon Pops with fresh pansies grown at The Farm at South Mountain and made the simple delicious Chokeberry Dressing.
The Refrigerator Set for the 3 Chokeberry Recipes
Our Set for The List TV Segment
Honored to invite The List crew into my kitchen: Multi-talented fun co-host Segun Oduolowu, creative Producer Jacqui Decker, and talented, meticulous cameraman, Ryan. Such a joy filming and enjoy our Chokeberry creations together.
A few outtakes from the tv shoot, with a behind the scene video and photos.
Segun’s Chokeberry Creations
During the shoot, I guided Segun to prepare the three Chokeberry recipes and, as always, so in awe of his willingness to have fun with the food and to creativity plate the dishes.
Enjoy a few photos from the shoot and the Dishes we created during the shoot.
Chokeberry Superberry Smoothie Bowl
Simple Greens & Berry & Walnut Salad with Chokeberry Dressing
Frozen Chokeberry Lemonade Pops
A little fun, getting set for the Chokeberry Lemonade Pops
The Chokeberry Recipes
Intuitively create a full day of meals with the power antioxidant-rich chokeberries (Aronia) which score 3-4 times higher on ORAC as blueberries. While chokeberries are tart and a little bitter, they are a powerful superberry for delicious smoothie bowls, salad dressings, and even frozen pops.
Chokeberry Superberry Smoothie Bowl
Simple Greens & Berry & Walnut Salad with Chokeberry Dressing
Frozen Chokeberry Lemonade Pops
Chokeberry Superberry Smoothie Bowl
Start the morning with an antioxidant- and protein-rich smoothie featuring powerful chokeberries (Aronia berries). Add hemp and chia seeds for plant protein and fats. Plus, dates and banana add sweetness to the smoothie. Enjoy with your favorite fresh or frozen berries, herbs, and edible flowers.
In our recipe with The List, we garnished with a superberry antioxidant frozen blend of wild Blueberries, wild Lingonberries, and wild Sea Buckthorn from Northwest Wild Foods.
Smoothie (1 serving)
Simple Ingredients
2 tsp chia seeds, pre-soaked in ¼ cup coconut water for 20 minutes
1 cup coconut water
1/4 cup hemp seeds
1 tsp chokeberry powder
¼ cup frozen chokeberries
1 Medjool dates, pitted and rough chopped
1 ripe bananas
Garnish: Edible flowers, fresh basil, frozen berries (such as wild blueberries, lingonberries, and sea buckthorn)
Chokeberry Smoothie Mise en Place
Simple Steps
Blend all ingredients in food processor or blender.
Add additional dates for sweetness, if desired.
Pour smoothie into a bowl.
Garnish with frozen berries, fresh basil, and edible flowers.
Mindfully enjoy.
Blend all ingredients.
Blend all ingredients in food processor.
All set to plate the Chokeberry Smoothie
Mindfully Plate and Enjoy your Chokeberry Superberry Smoothie
Enjoy your Chokeberry Smoothie.
Simple Greens & Berry & Walnut Salad with Chokeberry Dressing
Enjoy a simple fresh greens salad with tasty Chokeberry Honey Mustard Garlic Dressing. Add a few fresh or frozen berries, figs, and walnuts for a nutrient-rich fresh salad. For taste and beauty, garnish with fresh herbs (mint, basil, or oregano) and edible flowers.
Serves 2
Chokeberry Honey Mustard Garlic Dressing
Simple Ingredients
2 tbsp stone ground mustard
¼ cup organic extra virgin olive oil
Pinch sea salt
1 ½ tsp local honey
1/8 cup frozen chokeberries, mashed with spoon
1-2 garlic cloves, minced
Chokeberry Dressing Mise en Place
Simple Steps
Pour mustard, organic extra virgin olive oil, and sea salt into a small bowl.
Whisk until well combined.
Add honey, chokeberries, and garlic to the bowl.
Whisk until well combined.
Taste, and adjust flavor, as needed for more sweetness or saltiness.
Save to toss with the salad.
Whisk all ingredients until well combined and add more honey, mustard, or oil to suit your taste.
Greens & Berry Salad
Simple Ingredients
2 cups of greens, such as Spinach, Arugula, or Shungiku (Chrysanthemum greens)
3-4 fresh herb stems: Oregano, mint, or basil
¼ cup walnuts
3 dried figs, sliced
¼ cup fresh or frozen berries. Fresh mulberries or blueberries; Frozen wild blueberries, lingonberries, and blackberries.
Garnish: Edible flowers
Greens & Berry Salad Plating Mise en Place
Simple Steps
Place greens and fresh herbs into medium bowl.
Pour dressing over the greens and herbs.
Lightly toss to coat all greens and herbs with the dressing.
Add figs, walnuts, and berries to the greens.
Lightly toss.
Plate and garnish with extra berries and edible flowers.
Enjoy!
Frozen Chokeberry Lemonade Pops
Enjoy Superberry Chokeberry Lemonade Frozen Pops this Spring and Summer. Make your own home-made lemonade, add chokeberry powder, a few berries, a few edible flowers, freeze, and enjoy.
Makes four 3 ounce pops
Simple Ingredients
Chokeberry Lemonade
1 cup coconut water
¼ cup fresh lemon juice
1 apple, sliced
1 tsp chokeberry powder
1 date, rough chopped
Additional date(s), for desired sweetness
Garnish
Edible flowers
¼ cup frozen berries (such as wild blueberries, lingonberries, and sea buckthorn)
All set to make the Chokeberry Lemonade
Chokeberry Lemonade Pop Mise en Place
Simple Steps
Chokeberry Lemonade
Place coconut water, lemon juice, and apple in food processor or blender.
Add date and blend until smooth.
Taste and add lemon juice, apple, or date for desired sweetness.
Add chokeberry power and blend.
Freeze the Pops
Place frozen berries, banana slices, and/or edible flowers into frozen pop molds.
Pour Chokeberry Lemonade into the molds.
Freeze for 6 hours.
Remove from mold.
Chokeberry Frozen Pops ready for plating with Edible Pansies, Blueberries, Lingonberries, and Sea Buckthorn Berries
Enjoy a refreshing spring and summer treat.
Enjoy Chokeberry Lemonade Frozen Pops
A fun outtake video from The List TV Shoot with Segun Oduolowu. Thanks Jacqui Denker for the capture! Love working with both of you!
As a final note, if you are interested in learning about our Sedona Plant-Based Cooking & Self Care Retreat, September 13-16, 2019, you can learn more on the Experience Nutrition website, and if you are interested please let me know and we can chat.
By Melanie Albert, Founder & CEO Experience Nutrition, Intuitive Cooking Expert, and Award-Winning Cookbook Author
I love avocados, and often when I buy several at a time I love making Avocado Tartare with the avocados and local Arizona farmers’ produce and fresh herbs. As part of my mindfulness in cooking, I love having fun creativity plating the dishes differently every time I make Avocado Tartare.
I invite you to use the ingredients in the recipe as a guide and then have fun creating your own Avocado Tartare with your local farmers produce.
A few key base ingredients include: a ripe avocado, citrus such as lemon or lime, a few fresh herbs like basil or oregano, a pinch of sea salt to balance the acid of the citrus and fat of the avocado.
By Melanie Albert, Founder & CEO Experience Nutrition, Intuitive Cooking Expert, and Award-Winning Cookbook Author
I’m very excited to share that this first weekend of Spring 2019, I planted my first “real” edible backyard garden in Phoenix, Arizona. And, I’m happy to share my learning with you.
Honestly, while I feel really confident with guiding people to cook beautiful, tasty farm-to-table plant-based food, I am going out on a limb with sharing my new gardening adventure with you.
When I was a kid, my parents always had a garden and fruit growing in our yard in Dallas, Pennsylvania. I especially remember the asparagus, carrots, cucumbers, and sweet peppers. Plus, we enjoyed all kinds of berries, my favorites being raspberries and strawberries. Today, my 92-year old Dad still gardens in Cocoa Beach, Florida, primarily with his banana and onion crops.
I’ve never grown a ‘real garden’ in Phoenix. Until now.
Melanie’s Personal Goals with the New Edible Garden
Sharing my personals goals with you, which might motivate you to plant your own garden!
Get out of my comfort zone. Do something new, while learning.
Enjoy edible gardening as self care. Time away from the computer. Time out with nature.
Garden-to-Table. Ultimately, enjoy my garden bounty with my culinary creations.
Three Steps to Get Started with an Edible Garden
Since gardening in Arizona is different than the East Coast of the US, I reached out to an expert in the farming and gardening in Phoenix, my friend, Billy Anthony, who is the Garden Operations Manager at The Farm at South Mountain. Billy has been growing at the beautiful The Farm, which is about half-mile from my home for a few years. I admire his passion, knowledge, and hard work ethic and knew that he’d be a talented guide for my small edible garden project.
Step 1: The Elevated Garden.
A few months ago I started researching elevated gardens online and purchased a simple rectangle 22”x 66” wooden garden that is right outside my back patio, on the West side of my home facing the golf course. The first step, was, of course, building the elevated garden. Thanks to Phoenix urban farmer Billy Anthony for assembling it for me and in choosing the right location for the garden, where it will get full sunlight during most of the day.
Step 2: The Right Soil.
Billy guided me to purchase the “right” soil for our Arizona climate. I used two 2cu feet of Kellogg Garden Organics – Organic Plus for the bottom layer of the garden. For the top layer, at Plant Stand, a garden supply store in my neighborhood, purchased two 1.5 cu feet of Fox Farm Ocean Forest Potting Soil, made from earthworm castings and bat guano.
Step 3: What to Plant in the Spring (in Phoenix, Arizona)
In the Arizona desert, right now our local urban farmers are doing their Spring planting, so I took their lead and visited Billy at The Farm at South Mountain to be sure to plant the “correct” veggies, herbs, and edible flowers for this time of year.
Picked up a few Spring goodies from my urban farmer friend Billy Anthony who has been such an inspiration around growing beautiful food.
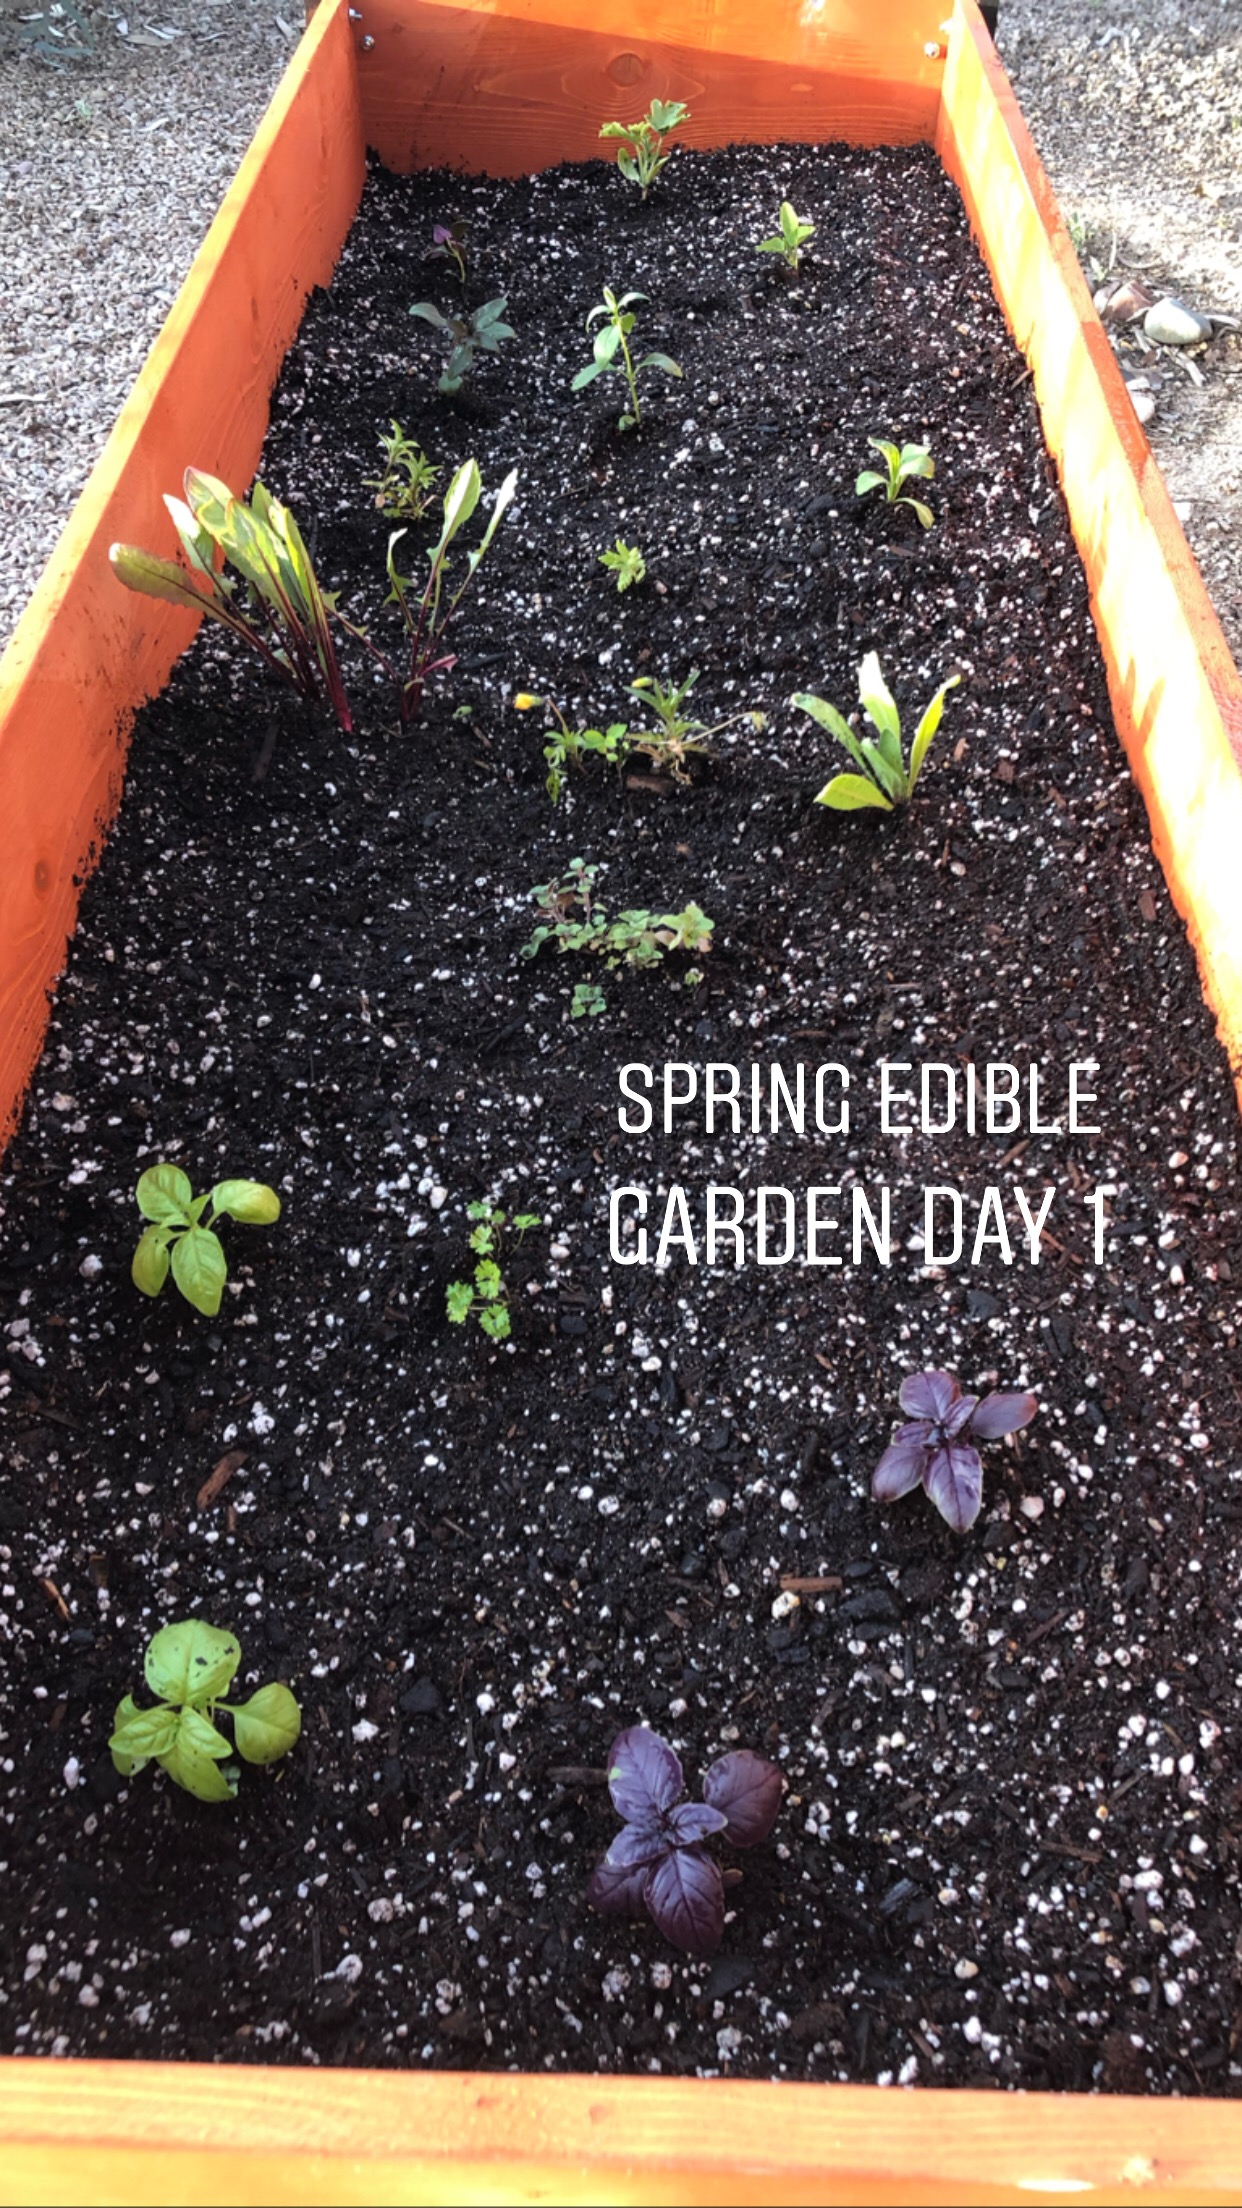
Herbs: Oregano, Genovese Basil and Amethyst Basil, French Lavender, Flatleaf Italian Parsley
Edible flowers: Viola, Calendula, Snapdragon
Greens: Dandelion
Melon: Sugar Baby Watermelon
Cucumbers: Gherkins
Tomatoes: Blush Tomato
Berry: Pinchuberry
5 Tips on Planting Layout from Phoenix Urban Farmer, Billy Anthony
Since I wanted to get it “right,” Billy gave me a few tips on where to plant the different plants in the garden. A few tips:
Watermelon near the edge of the garden, so it could grow down the side towards the Earth.
Basil plants at the end of the planter, as they will become quite large.
Lavender in the middle surrounded by the edible flowers.
Dandelion greens next to the violas (hope I got that right) to give them a little shade.
Plant larger plants (pichuberry, tomato) in pots to give them room to grow.
Let’s take a closer look at a few of the Plants…
Spring Arizona Garden Day 1: The plants planted into the Elevated Garden, according to the Plan.
And, pausing to enjoy our Arizona sunset with the new Spring Garden. Self care!
Top 5 Basic Edible Gardening Tips from Phoenix urban farmer, Billy Anthony
As a final thought in today’s new Phoenix Backyard Gardening Blog, simple advise from Billy to me, to you…
The right soil.
The right plants at the right time.
Sunshine.
Water.
And, I’ll add, have fun!
My final reflection on Day 1 of my Spring 2019 garden.
Enjoyed the process of learning the steps and planning to plant my little garden.
Loved being outside in my backyard, with a purpose, and enjoying the self care sunset with my new garden.
Felt a sense of new accomplishment.
I’ll keep you posted as my gardening adventure evolves.
I’ll be using the #ediblegardentotable so we can easily find the edible garden progress.
If you are in the Phoenix area and would like to meet Billy Anthony, we are co-hosting a Spring Farm-to-Table Cooking Class at The Farm at South Mountain, April 7, 2019, 11am-1pm.
By Melanie Albert, Intuitive Cooking Expert, Founder & CEO Experience Nutrition, Award-Winning Cookbook Author, Speaker
Today, I’m excited to share with you the update of my website, www.ExperienceNutrition.com, With the website launch, I thought I’d take a moment to briefly share my initial motivation for healthy eating and living, along with my philosophies about plant-based eating.
The Power of Food: Mom’s Breast Cancer 23 Years Ago
23 years ago my Mom was diagnosed with breast cancer, and the conventional doctors gave her six months to live. At that point, I left my corporate marketing career in Kansas City to be with Mom and my Dad in Cocoa Beach, Florida. At night I read the few nutrition books that were available. I had already stopped eating meat and was eating organic food.
This was when I first learned that food and positive mindset were key to health.
I’m happy to say, as I write this today, that my Mom celebrated her 89th birthday this month. And, my Dad is now 92 years old. And, they are both enjoying life every day with their positivity and beautiful Cocoa Beach backyard.
Melanie Albert with Mom & Dad in Cocoa Beach, Florida
I’ll continue to share more of my journey with food and cooking in my blog posts so you can get to know me and my motivation for being here with you.
Top 6 Philosophies of Plant-Based Eating from Melanie’s cookbook, “A New View of Healthy Eating”
A new view of healthy eating begins with the food we choose to eat and extends to our shopping, cooking, and eating experiences.
The key philosophies are:
Eat real whole foods.
Shop local and in season.
Enjoy intuitive shopping.
Cook with intuition.
Eat mindfully.
Enjoy food and life.
Eat Real Whole Foods.
Eat foods that are in their natural form, as nature created them. Focus on plants and local, in-season foods. Focus on organic. When we eat real whole foods, we get more nutrition and fiber from the foods and receive the energy from the Earth. When we focus on eating organic, we eat food that is “clean,” without pesticides or herbicides, and not genetically modified (i.e., not GMO).
Real whole foods include vegetables, fruit, whole grains, legumes, nuts and seeds. It’s quite simple. The recommended foods in “A New View of Healthy Eating” are primarily in alignment with an anti-inflammatory way of eating as advocated by Andrew Weil, M.D., the Mediterranean way of eating, and the Blue Zones as researched by National Geographic, Dan Buettner, and his team. The foods and recipes are all gluten-free and dairy-free.
A New View of Healthy Eating Book, by Melanie Albert
Farm-to-Table Cooking Classes at The Farm at South Mountain in Phoenix, Arizona
Farm-to-Table Intuitive Cooking Classes at The Farm at South Mountain, Phoenix, Arizona
I’m honored to teach hands-on interactive cooking classes at the beautiful The Farm at South Mountain for the three years. Hope our local Arizona friends can join us this Fall.
Join our Plant-Based Community Come on over to our Simple Daily Plant-Based Facebook Group, where I share daily tips around shopping, cooking, and eating beautiful, delicious food. CLICK HERE TO JOIN THE GROUP
Join our e-newsletter for cooking ideas, recipes, and events. And, please let me know if you are interested in any nutrition cooking programs for your organization.
by Melanie A. Albert, intuitive cooking expert, author, speaker, retreat host, Founder & CEO Experience Nutrition Group, LLC
Summertime!!!! Peaches!!!!
I’m so happy peaches are in season in Arizona right now. Today, I bought a few perfectly ripe peaches and tomatoes from local farmers. I really didn’t have a plan to prepare them; however, right away when I got home I intuitively created, for the first time, a salad with both tomatoes and peaches. I really got excited and created sweetness with figs to balance the bitterness of the arugula. Plus, I love goji berries for their earthiness and pistachios for a little crunch.
Have fun creating your own peach salads and desserts this summer!
Beautiful Peaches at Agritopia, Gilbert, Arizona
SIMPLE INGREDIENTS
Arizona peaches, sliced (neighbor friend)
Arizona yellow tomato, sliced (Abby Lee Farms)
Arizona arugula (Blue Sky Organic Farm)
Goji berries, soaked in water for 10 minutes
Mission figs, sliced
Blood Orange Olive Oil (Queen Creek, Arizona)
Pistachios
Arizona fresh mint (Maya’s Farm)
Sea salt
SIMPLE STEPS
In a small bowl, toss arugula, blood orange olive oil, and a dash of sea salt.
Add a few peaches, goji berries, Mission figs, and mint to the arugula.
Toss all ingredients.
Beautifully plate.
Enjoy!
Making the salad…
Plating Mise en Place
Plating Video…
The Final Summer Arizona Peach Tomato Arugula Salad
Enjoy…
“A New View of Healthy Eating” by Melanie Albert is available directly from the author, and she’ll gift wrap for you.
by Melanie A. Albert, intuitive cooking expert, author, speaker, retreat host, Founder & CEO Experience Nutrition Group, LLC
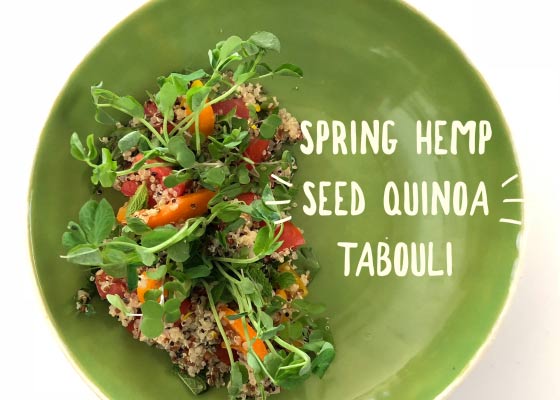
This week during our Whole Food SOUL (Seasonal Organic Unprocessed Local) cooking class at the Southwest Institute of Healing Arts, our focus was on whole grains and the students prepared Quinoa Salad and Hempseed Tabouli.
It had been awhile since I’ve used fresh mint in my dishes, and I loved both the fresh quinoa salad and hemp seed tabouli, that I very intuitively prepared a tabouli with the mint, hemp seeds, and quinoa.
I guide people to cook intuitively very often. The key is to know a few simple culinary skills, and then cook with what’s available at your farmers market or kitchen. Plus, with intuitive cooking, we listen to our body for foods we might be craving and also notice what foods we’re attracted to, with color, textures, and aromas.
Today’s tabouli was intuitive in several ways:
Listening to my body: My body was looking forward to a grounding grain and I had about a cup of the tri-color quinoa in my pantry.
Aromatherapy: The fresh aromatherapy and bright tasting mint.
Looking for a variety of color and textures:Red tomatoes, yellow pepper, green onion.
Spring garlic:Just love the cross between garlic and onion, when spring garlic is in season.
Two Simple Culinary Techniques
Cook Whole Grains: Cook quinoa with 1 cup quinoa, 2 cups previously-made veggie stock. Bring to boil on stove, cover and simmer for about 15-20 minutes. Rest the quinoa. Fluff with a fork. Use in recipe.
3-Ingredient Salad Dressing:1 part lemon, 2 parts organic extra virgin olive oil, pinch salt.
HEMP SEED QUINOA TABOULI
SIMPLE INGREDIENTS
1 cup quinoa
2 cups veggie stock
½ cup hemp seeds
Several tomatoes, rough chopped
Orange pepper, rough chopped
1 green onion, rough chopped
1 lemon, juice and zest
Organic extra virgin olive oil
Handful mint, minced
Handful parsley, minced
Pinch sea salt
Handful pea sprouts
SIMPLE STEPS
Cook quinoa with veggie stock
Rough chop all veggies
Gently toss all ingredients
Plate with sprouts
Enjoy
Hemp Seed Quinoa Tabouli: Rough Chop Veggies
Gently toss all ingredients in large bowl.Enjoy your Spring Hemp Seed Quinoa Tabouli
I have recently created the Simple Plant-Based Eating Group on Facebook, where I share daily tips around plant-based eating, and the community shares ideas. Please join us:www.facebook.com/groups/DailyPlantBasedEatingTips/
Interested in addtional simple culinary techniques and recipes with real whole foods, Melanie Albert’s book, “A New View of Healthy Eating” is available.
by Melanie A. Albert, intuitive cooking expert, author, speaker, retreat host, Founder & CEO Experience Nutrition Group, LLC
During a few of my recent cooking events, we were talking about how easy it is to prepare whole grains. I actually cook whole grains about twice a week and use them in a few meals. Two of my favorite go-to whole grains are brown rice and quinoa. I purchase whole grains in bins at one of our natural grocery stores, store them in glass jars in my panty. And, when I cook whole grains, I add a little flavor by cooking them with previously made frozen veggie stock. This week I made a batch with fresh Hawaiian turmeric root.
With the 8 simple steps in my cookbook, “A New View of Healthy Eating,” you can cook whole grains perfectly every time. Before I share the steps from the book, enjoy a few of my recent veggie dishes with whole grains.
Quick roasted farmers market veggies with the Turmeric Quinoa.
Excerpt from cookbook, “A New View of Healthy Eating”
Simple Steps to Steam Perfect Whole Grains Every Time
The steaming method is a simple way to cook whole grains. With the steaming method, we use a specific amount of grain and a specific amount of liquid. We then cook for a specific amount of time. We can steam whole grains on the stovetop, in a rice cooker, or in an oven.
For all of these steaming methods the steps are: Rinse, add liquid, cover, cook, rest, fluff, rest, and serve.
8 Steps to Steam Grains on the Stovetop
By following the specific details in this step-by-step cooking process, you will cook perfect, flavorful, tender whole grains very time.
Rinse whole grains to remove residue and extra outer starch.
Add liquid. Pour 1 cup of whole grains with 2 cups of water into a heavy pot. Use a heat diffuser under the pot to prevent the bottom layer of the grains from sticking.
Cover the pot and bring to a boil on medium-high heat.
Lower heat to lowest setting and simmer with the pot tightly covered for 15-20 minutes. Keep pot tightly covered to keep steam inside pot to cook the rice.
Rest the grains. Once cooked, remove the pot from the heat. For even cooking, uniform texture, and fluffier grains, rest the grains with the lid on the pot for 10-30 minutes.
Fluff the grains. Use a fork to lift the grains. Start at the bottom around the edge of the pot and lift the grains toward the center of the pot.
Cover and let the grains rest for another 10 minutes.
Plate and enjoy your perfect whole grains.
Steps to Steam Whole Grains in a Rice Cooker and Oven
Rice Cooker: Pour rice and liquid into a rice cooker, cover, and turn on rice cooker. Let it cook. Rest. Fluff. Rest. Serve.
Oven: After grains and liquid have come to a boil on the stove, cover and place in preheated 350-degree oven for 15-20 minutes. Cook. Rest. Fluff. Rest. Serve.
ACTION: Make a batch of whole grains this week and enjoy with a veggie dish. Share your experience with us on Facebook: www.facebook.com/NewViewHealthyEating
by Melanie A. Albert, intuitive cooking expert, author, speaker, retreat host, Founder & CEO Experience Nutrition Group, LLC
Recently, I had the great opportunity to purchase beautiful fresh organic Hawaiian turmeric root from McClendon Select at the Wednesday morning Uptown Farmers’ Market in Phoenix, Arizona. I love the fresh green taste and aroma of the turmeric, plus, its anti-inflammatory health benefits.
I had quite a bit of turmeric, so I decided to experiment with the turmeric in a raw dehydrated cracker. And, I’m so glad I did. While dehydrating, the aromatherapy of the crackers was warming and refreshing, perfect for a rainy Arizona evening. And, oh my, the crackers are so vibrant tasting, easy to prepare, and I’m excited to make raw crackers more often.
First, I’ll share the step-by-step process to dehydrate raw crackers in my book, “A New View of Healthy Eating” and then the intuitive cracker recipe I created with the fresh turmeric root.
Excerpt from “A New View of Healthy Eating”: Dehydrated Raw Flaxseed Crackers
Flax seeds, chia seeds, and buckwheat groats are perfect for a flatbread batter because they form a natural mucilaginous gel when combined with water. Once dried, it’s a great binder for crackers, flatbread, and raw tortillas or wraps.
5 Ingredients for Dehydrated Flatbread or Crackers
The basic ingredients to create the base for dehydrated flatbread or crisp crackers are very simple. Have fun using your intuition to create your own versions of crackers with this raw dehydrating process.
Soaked flax seeds, chia seeds, or buckwheat groats
Fresh vegetables (peppers, tomatoes, beets, carrots) or fruit (apples, pears)
Nuts or seeds (almonds, cashews, pecans, sunflower seeds)
Herbs and spices (basil, oregano, ginger, turmeric)
Dehydrator: to dry for 8-12 hours
Sweet Pepper Almond Flax Crisp
SIMPLE INGREDIENTS
1/2 cup golden flax seeds, ground, then soaked in 1 ½ cups water
¾ cup raw almonds, soaked in water for 2-3 hours, drained
1 ¼ cup yellow bell pepper, minced
1 shallot, minced
½ cup sun-dried tomatoes, soaked and drained
1 ½ tsp chili powder
1 ½ tsp onion granules
1 tsp sea salt
SIMPLE STEPS
1. Gather mise en place.
2. Blend ingredients.
Add soaked flax meal (ground flaxseeds and water) and almonds to food processor and blend until smooth.
Remove and place in mixing bowl.
Blend yellow pepper, shallot, and sun-dried tomatoes with a touch of water.
Add chili powder, onion granules, and sea salt to food processor with the pepper, shallot, and sun-dried tomatoes until smooth.
Add vegetable mixture to the bowl with flax meal and almonds and fold together until thoroughly combined.
3. Dehydrate.
Set dehydrator at 115 degrees F.
Spoon mixture onto dehydrator tray. Spread mixture evenly to ¼-inch thickness on non-stick dehydrator sheets with an off-set spatula.
Dehydrate 1-2 hours. Once partially dried, score batter to desired size and shape.
Dehydrate an additional 1-3 hours. Flip the crackers off the non-stick dehydrator sheets and onto the dehydrator screens so that the crackers dry properly.
Dehydrate an additional 1-2 hours or until crackers are crisp.
Dehydrating time depends on how thick the paste is to begin and how crisp you want the crackers.
4. Options.
Soft taco shells: Once flipped onto the dehydrator screen, dehydrate for 1-2 hours or until batter is not wet and is pliable.
If crisps dry too much, sprinkle water to restore pliability.
Enjoy as a cracker snack, dip in hummus, or top with a pâté.
Intuitive Raw Turmeric Crackers
SIMPLE INGREDIENTS
3/4 cup raw almonds, soaked 8-10 hours
½ cup golden and brown flaxseeds, ground
1 orange bell pepper, diced
¼ cup dehydrated tomatoes, soaked 30 minutes
2-3 tbsp soaking water from dehydrated tomatoes
1 shallot, minced
Pinch sea salt
1” fresh turmeric root, minced
SIMPLE STEPS
Soak almonds 8-10 hours in room temperature water.
Grind flaxseeds in blender.
Soak ground flaxseeds with ½ cup room temperature water for 30 minutes.
Process almonds and flaxseed mixture in food processor until combined. Pour mixture into bowl.
In food processor, process pepper, shallot, and dehydrated tomatoes, sea salt, and a few tablespoons of the tomato soaking water until smooth.
Fold in liquid mixture (pepper, shallot, dehydrated tomatoes) to the almond flaxseed mixture.
Fold in turmeric root.
Spread batter about ¼” thick with off-set spatula on dehydrator sheet.
Dehydrate at 115 degrees Fahrenheit for 1-2 hours.
Score to your desired shape.
Dehydrate another 1-2 hours. Flip crackers to mesh dehydrator sheet.
Dehydrate 2-4 additional hours to your desired crispness.
And, if you’re interested in learning additional culinary techniques as a foundation for intuitive cooking, I’m happy to mail a copy of my book, “A New View of Healthy Eating” to you.
by Melanie A. Albert, intuitive cooking expert, author, speaker, Founder & CEO Experience Nutrition Group, LLC
I’m always a little reflective during Super Bowl week, and realized it was 10 years ago that my company was first involved with the Super Bowl. That first year, we created three healthy lifestyle products with the Super Bowl XLII logo: a zen clock, soy candle collection, and matcha tea kit. For the next two Super Bowls, we catered at the Super Bowl VIP Tailgate Party with Tropical Trail Mix in Tampa, and then Hummus and Cold Soup in Miami.
Over the years, we learned about the serious health issues of the former NFL players when they retire, taught former players how to cook healthy meals, created a healthy eating program, and in 2011, my company became the Official Health & Wellness Partner of the NFL Alumni Association.
Avocado Tartare Recipe for Super Bowl
Anyway, enough reminiscing…
Today, the eve of the Super Bowl game many people were out shopping for the perfect avocados for guacamole, so I decided to create a little more fancy version of guacamole.
Avocado Tartare Mis en Place:So simple…avocado, tomatoes, lemon, and sea salt.
Avocado Tartare Plating
Enjoy your Super Bowl Day and your Avocado Guacamole and Avocado Tartare!
by Melanie A. Albert, intuitive cooking expert, author, speaker, Founder & CEO Experience Nutrition Group, LLC
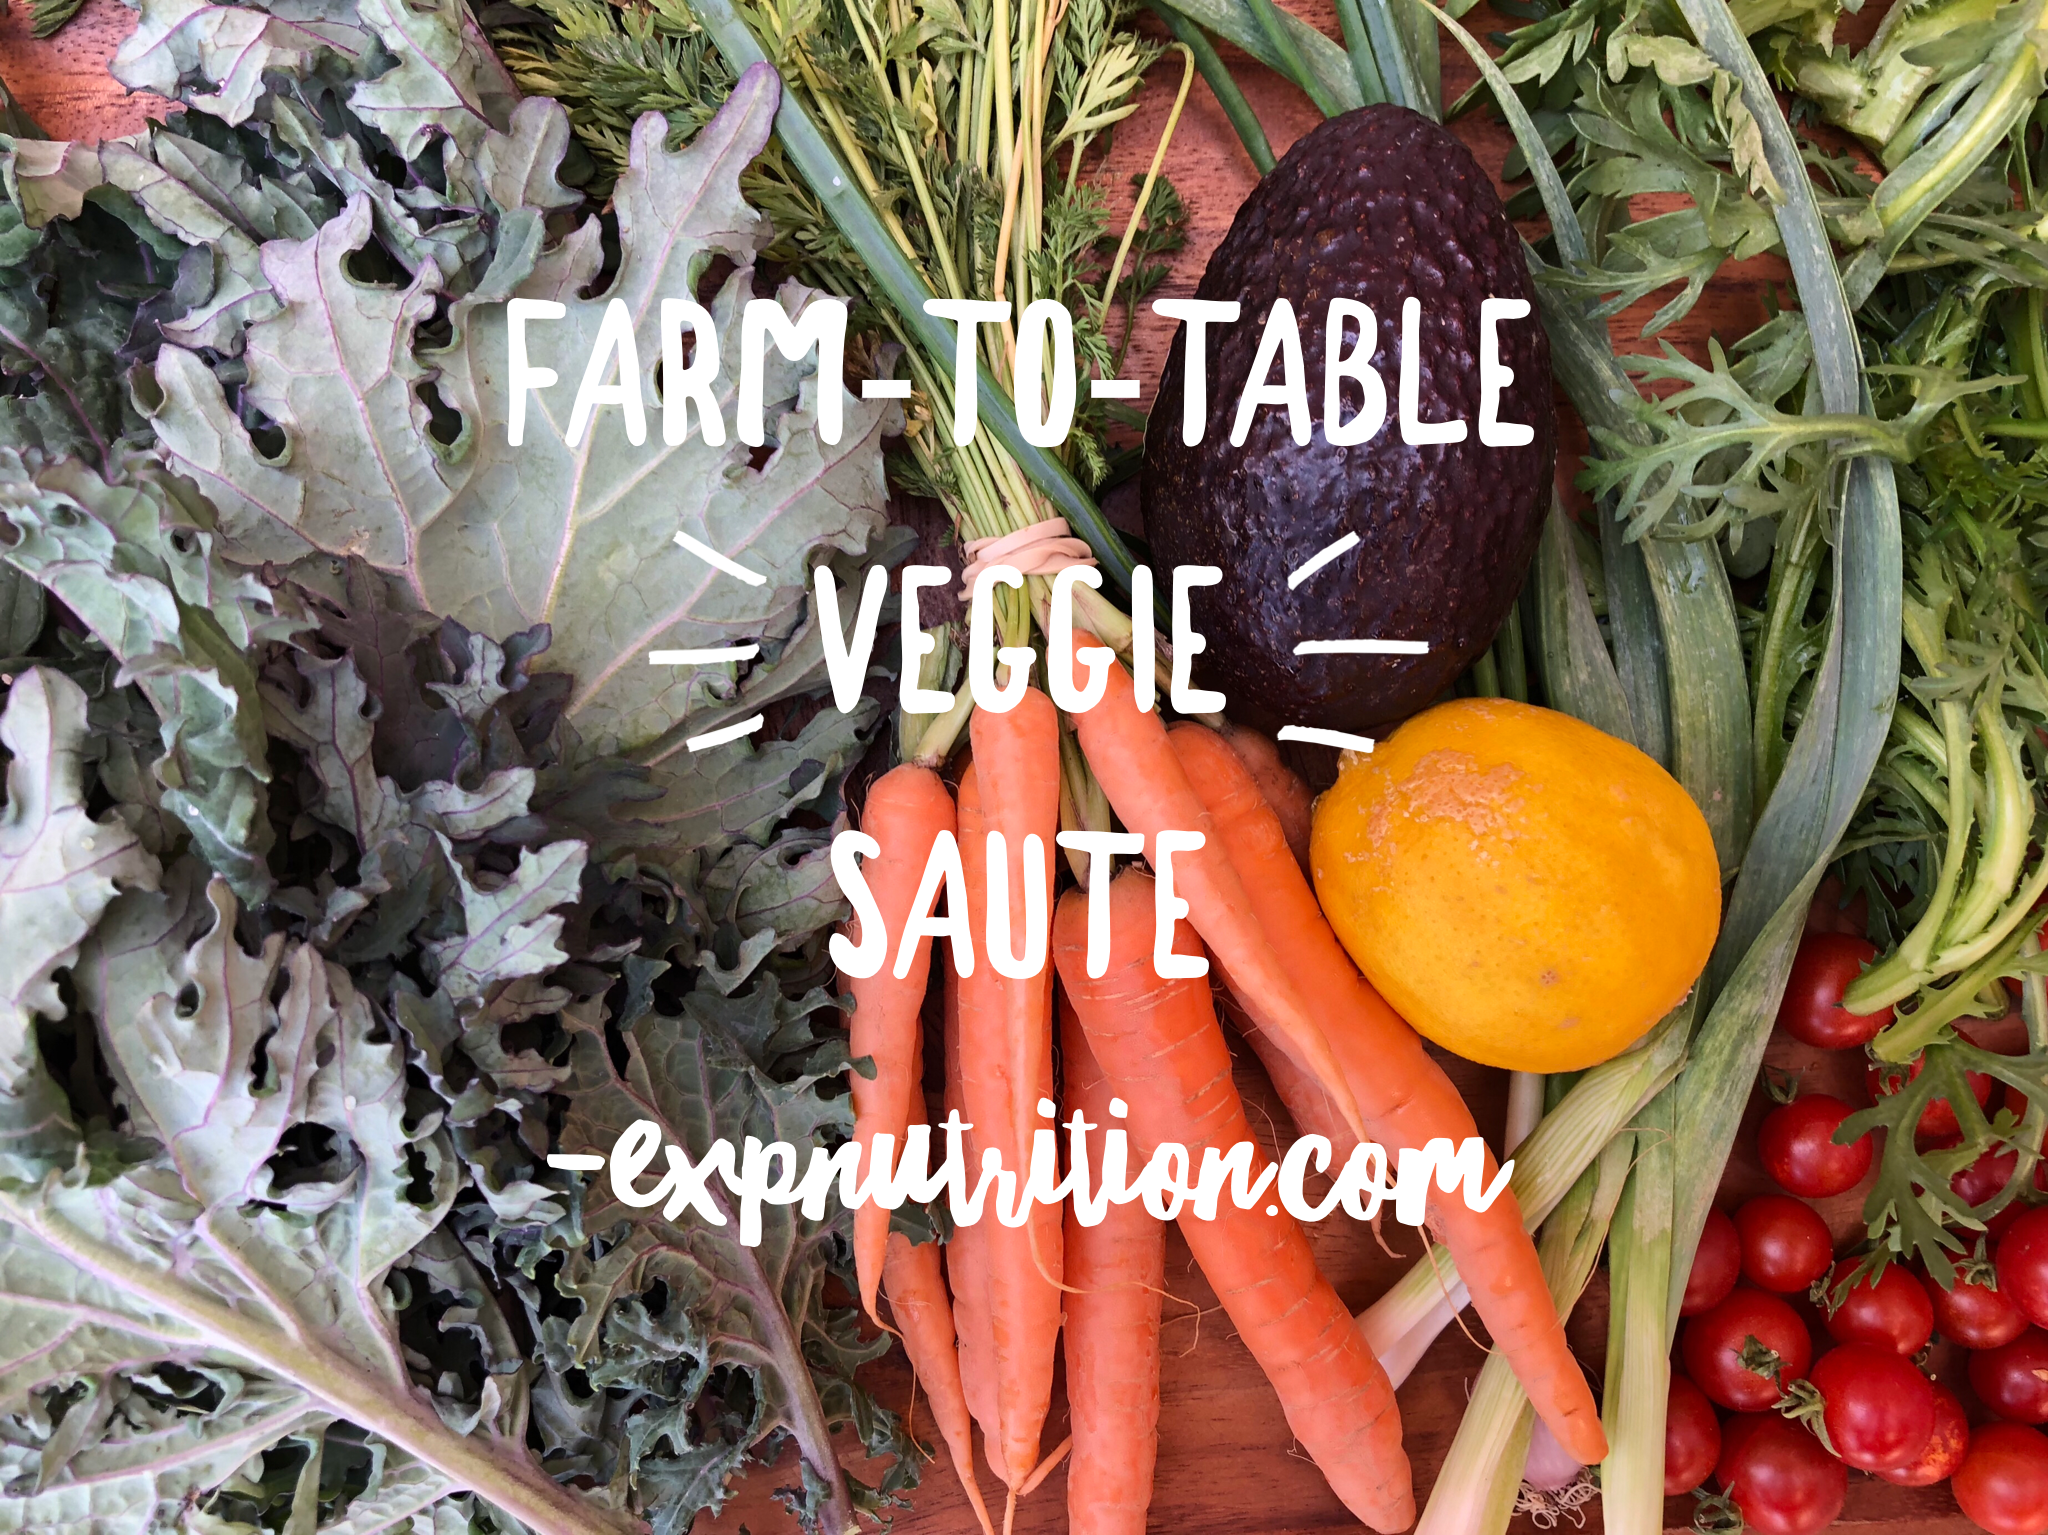
Today I very intuitively created a very simple farm-to-table veggie saute with beautiful veggies in my refrigerator from local Phoenix farmers and gardeners. When I first pulled out the veggies from my refrigerator my intention was to create a cold avocado tartar with the tomatoes and carrots. While chopping the veggies I was imagining the beautiful aromatic veggie saute from last night’s “Living an Edible Landscape Life” and decided to prepare a saute.
When cooking a quick stove-top saute, first gather your veggies. Today’s veggies are from many of our local Arizona farmers.
Green onions
Green Spring garlic, McClendon Select
Mini red tomatoes, Phoenix Community Exchange
Orange carrots, Steadfast Farms
Arizona lemon, Phoenix Community Exchange
Kale, The Farm at South Mountain, Seed & Soil Garden
Chrysanthemum greens, The Farm at South Mountain, Soil & Seed Garden
Fresh dill, Joan Baron Food in the Alley, Scottsdale
Avocado
Sea salt
Extra virgin olive oil
As always, mindfully pre-chop your veggies and get your mise en place set for cooking.
Once our mise en place is set, we mindfully cook the veggies, one-by-one. With this process, we can really taste the flavor layers. Start with a little olive oil, sweat the onions, add the garlic. Then add the veggies one-by-one. Intuitively, I usually add a little sea salt right after the tomatoes go into the pan, to bring out their sweetness. And, this time of year in Arizona, I love to squeeze in a little citrus to add a bright taste to the saute.
This slideshow requires JavaScript.
While this dish was cooking, the natural aromatherapy of the lemons and fresh dill really made the dish a more beautiful mindful experience.
Once you’ve sauteed the veggies, mindfully plate and enjoy your farm-to-table veggies. You’ll see that I added a few dehydrated tomatoes for extra beauty and flavor.
ACTION:Have fun shopping at your local farmers’ market this weekend, and please share your veggie sautes with us on Facebook: www.facebook.com/NewViewHealthyEating
For some additional veggie saute ideas, a spread from Melanie’s book, “A New View of Healthy Eating.”
If you’re in the Phoenix area, my next hands-on intuitive cooking class, Winter Farm-to-Table Harvest is at The Farm at South Mountain, Sunday, February 18, 2018, 11am-1pm. Learn more and register here.
You can order “A New View of Healthy Eating” book and I’m happy to gift wrap for you.
by Melanie A. Albert, intuitive cooking expert, author, speaker, Founder & CEO Experience Nutrition Group, LLC
This week I’ve been enjoying chrysanthemum greens, a sweet floral green, typically cooked in Asian cuisine. One of our local farms, The Farm at South Mountain, about a half mile from my home is growing chrysanthemum greens this season. We had the great opportunity to enjoy it massaged in a raw kale salad in our Team Building Cooking Challenge with Visit Phoenix. After enjoying chrysantemum greens in the salads, I decided to experiment with them in a quick saute. Check out the recipe in today’s blog. It’s incredible!
After enjoying the chrysanthemum greens so much in the kale salads, I very intuitively sauted the greens with campari tomatoes from McClendon Select and beautiful sweet carrots grown by Steadfast Farm in our area. The saute is so sweet with floral aromatic I’m loving it so much I’ve cooked it three times in the last two days.
Hope you enjoy this recipe as much as I do.
Chrysanthemum Greens Saute
Simple Ingredients
2 tbsp organic extra virgin olive oil
Handful tomatoes
Handful chrysanthemum greens
Handful mini-carrots, sliced
Avocado, sliced.
Dash sea salt
Simple Steps
Heat saute pan on medium.
Add olive oil to pan.
Once heated add tomatoes, stir, and saute for a few minutes.
Add dash of sea salt.
Add carrots, and saute until slightly soft.
Add chrysanthemum greens and saute about a minute.


 Join us on Facebook with your favorite greens creations.